Procedural Generation - binary space partitioning
Overview of the work and research done on procedural generation using binary space partitioning (BSP) during my first year of bachelor’s degree
Introduction
“Intelligent” monsters! Randomly generated maps! Repeatability!
Those are the key goals we must reach in order to make a game that will feel more or less as a “new experience” every time it is played.
Context
Currently at the SAE-Institute-Geneva. I am studying Game Programming in order to obtain a Bachelor of Science. During one of our modules, we were introduced to multiple examples of procedural generation and AI theories.
One of the obligatory parts of this “exam” is to write a blogpost on a technical subject. So here I am writing about a subject that is very interesting but that I only discovered a year ago and really started to learn during my courses: “Procedural Generation”.
Intention
Since I am not an expert on that subject, this technical blogpost is intended to share what I have learned and maybe interest people who already heard about the subject but have never really done a “deep dive” into it.
Announce of content
For this blogpost, I will go through the game I made and explain what were my choices in order to realise it. This blogpost will be composed in the following way:
The basic knowledge
The type of generation I chose
The tools I used
Deep dive in the code
The result
The basic knowledge
In order to understand what PCG (procedural generation) is, there is a minimum knowledge to have before starting. Since this is a blogpost and not a scientific review, I will try to keep it simple and will not cover every mentioned subject in detail.
Graph Theory
First of all, before even starting with PCG, we need to understand what a Graph is. Basically, a graph is a structure of objects called “Nodes” where some of them are paired to others. The pairing of two objects will create a “Link”.
There are different types of graphs: non-directed graphs, directed graphs, weighted graphs. All of them are used in different ways for different purposes.
When a graph has only nodes with one connection it is called a Tree. In that tree there is generally a “Root” node, the starting point, normal nodes that follow and at the end of each branch a “Leaf”, a node with no child under it.
Graph Theory - search algorithms (BFS & DFS)
In order to use these graphs, we need to be able to search through them. To do so we have two main ways of doing it. One of them is the BFS (Breadth First Search).
The BFS algorithm is a way of searching through the graph where each child next to the currently processed node is checked before moving further on. In order to do so we have to use a data structure called “Queue”. That queue is a list of objects where the order in which we process them is known as “FIFO” (First In First Out), that means that the first object to go in will also be the first to be processed. At first sight this might not be essential, but it does affect the way of searching through the graph.
Basically, this is the output of a BFS on a tree:
The other way of searching through the graph is the DFS (Deapth First Search).
The DFS is going to search through the first child found until there aren’t any children left. To do that we use a data structure called “Stack”. That stack is a list of objects where the order of process is known as “LIFO” (Last In First Out), that means that the last object to go in will be the first to be processed. The output of a DFS search will look like this:
Neighbours
To describe neighbours there are two different ways. The first is given by John Von Neumann. Long story short, the “Von Neumann Neighbours” are the neighbours directly next to the cell. If the processed cell has a coordinate of [0,0] the direct neighbours will be : [0,1],[1,0],[0,-1],[-1,0].
The second way of describing neighbours is given by Edward Forrest Moore. The neighbours in this case are those directly next to the processed cell and the ones in diagonal. for the same given example [0,0] the Moore’s Neighbours are the following : [0,1],[1,1],[1,0],[1,-1],[0,-1],[-1,-1],[-1,0],[-1,1]
Note that all these neighbours are described in a clockwise order on a two dimensional grid. It is not necessary to respect that order according to what we want to do with these neighbours and there are also three dimensional grids but for the purpose of this blogpost I will intentionally not talk about that.
Some algorithms
Now that we have the basic knowledge to go further, I wanted to do an overview of the different algorithms I could have used and was introduced to during this module before going further in the one(s) I used.
-Cellular automaton:
A cellular automaton is a space (grid) filled with cells, these cells have a defined number of states ( such as “ON” or “OFF”, alive or dead). According to the rules given to each cell, the automaton will react and adapt until it reaches a stable state.
-Flood fill:
The flood fill is a way to create an open area generated procedurally by a cellular automaton or noise by going through all the cells and deleting cells that are not respecting the desired conditions.
-Drunkard’s Walk :
Drunkard’s Walk is a type of generation where you define a number of iterations (steps) and let randomness decide where these steps will be made by going through neighbours.
-Binary Space Partitioning (BSP):
The BSP is an algorithm of division. Basically, with a given area, we divide it into two “sub-areas” according to the wanted parameters and start over again with the two sub-areas as we did with the first main area until we reach the conditions we want to meet (minimum area, size, width, height, aso…).
There are other types of generation, but this blogpost is not intended to go through all of them. These are only some examples explained in a very simple and amateur way.
The types of PCG I chose
In order to apply procedural generation to a game, I decided to use one of the games I made with Unity during a previous exam that was concentrated on game design. The name of that game is “BillyTheZombie”, a twin stick shooter where you have to survive multiple waves of zombies. Since the game basis was already well established it was just a matter of applying what I was taught to the game.
Since the game’s map was basically intended to be cut into areas with different levels of difficulty for each of these areas, my choice was quite easy and the best fit for it was definitely the BSP.
The tools I used
Unity is delivered with a lot of tools to help developers create games fast. Thanks to the tools built in unity I was able to rapidly see what my code was doing before cleaning it up and using it on the real game. One of these tools is a function called “OnGizmoDraw”, it gives the ability to draw simple shapes and actually see what is happening with the code.
Another set of tools I used was the Unity 2D Package, it was essential to my game since it was made in 2D, with it came the TileMap and RuleTile who were very useful tools to simplify my coding journey and not have to “hardcode” every tile placement rule.
Basically thanks to these tools, I just needed to create areas and rooms, and paint tiles on different layers in order to accomplish my maps without having to worry about what goes where.
Deep dive in the code
The Boundary
Now that we have a general understanding and the tools I used. I am going to go through the different methods and scripts I used in order to accomplish my procedural generation.
First of all I had to define the area in which the generation had to be done. For that reason I used a “BoundsInt” , basically an area created in unity and rounded to Ints. Then I applied that area’s size to the different tilemaps
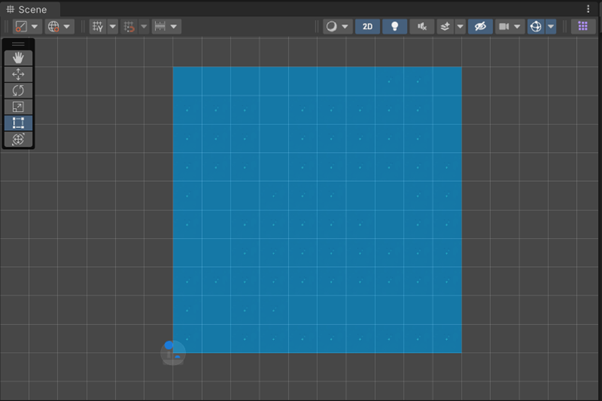
After that I had to create the background for my game. Since the game takes place in an earth-like world, I generated a map filled with water. That was the easiest part of the job. I just had to take the position of all of the tiles in the “WaterTileMap” (WaterLayer) and paint them with water tiles. To do so, I went through all the positions of the area on the X and Y axis and added them to a HashSet (List that only includes one unique example of an object).
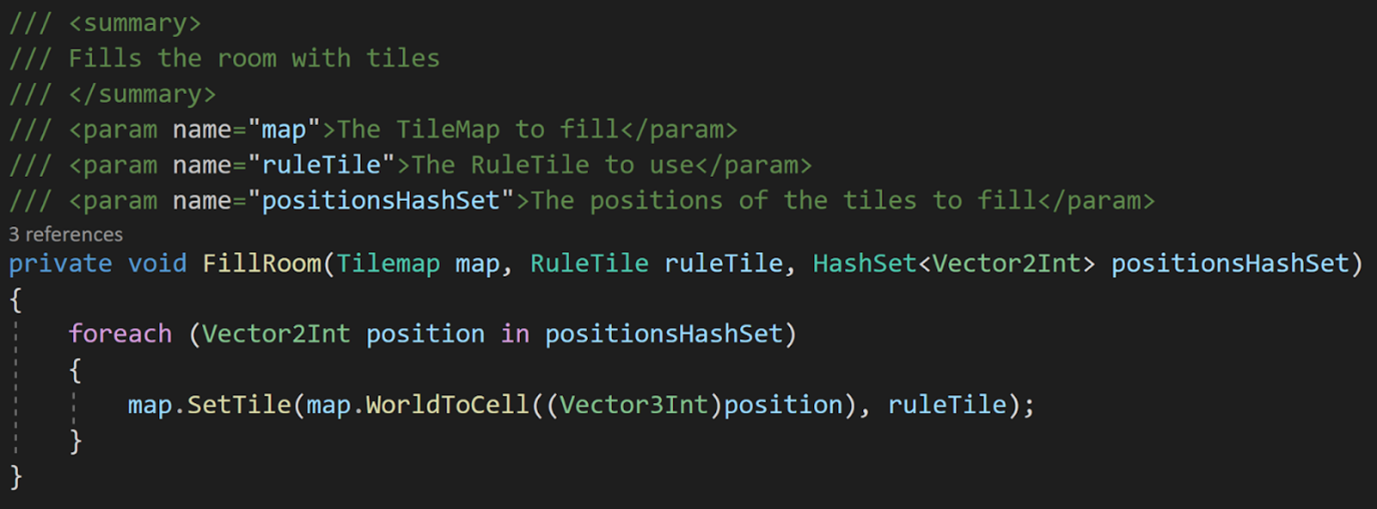
Once that was done I created a method to paint on a tilemap, at every position in a given position HashSet, a desired tile.
The result was the following:
That was the easy part. Once the water was created I had to get on creating rooms.
The rooms
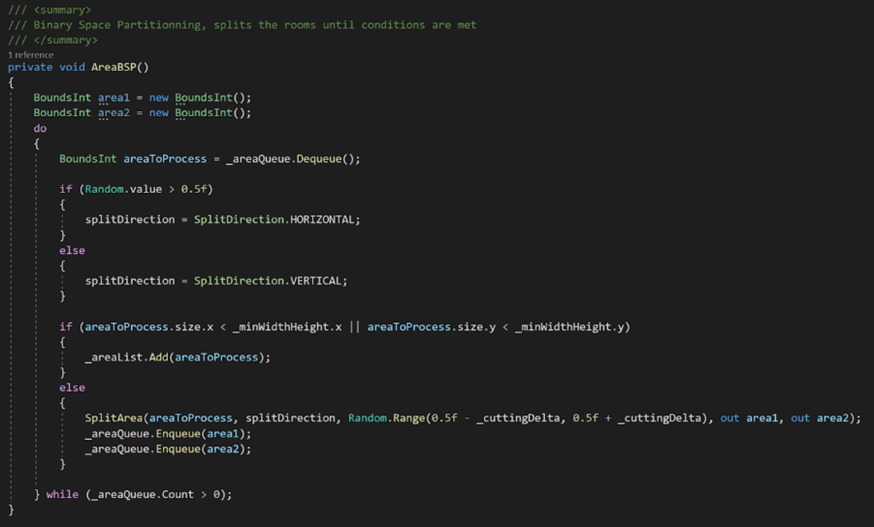
That is where the BSP comes in. As explained higher up it is used to split areas, the code I made for this is the following:
Here the “area1” and “area2” are temporary variables (BoundsInt) created in order to store the data of the two areas resulting from the split of the first one.
In this method, a random value is emitted and serves the method to decide in which direction we want to split it.
If the areaToProcess meets the minimal size conditions, it is added to the list of areas. If not, it will be split and the result of each split will be enqueued in the “AreaQueue”. The method will keep on going until there are no more areas in the AreaQueue. Since we are using a Queue, the tree search type is the BFS.
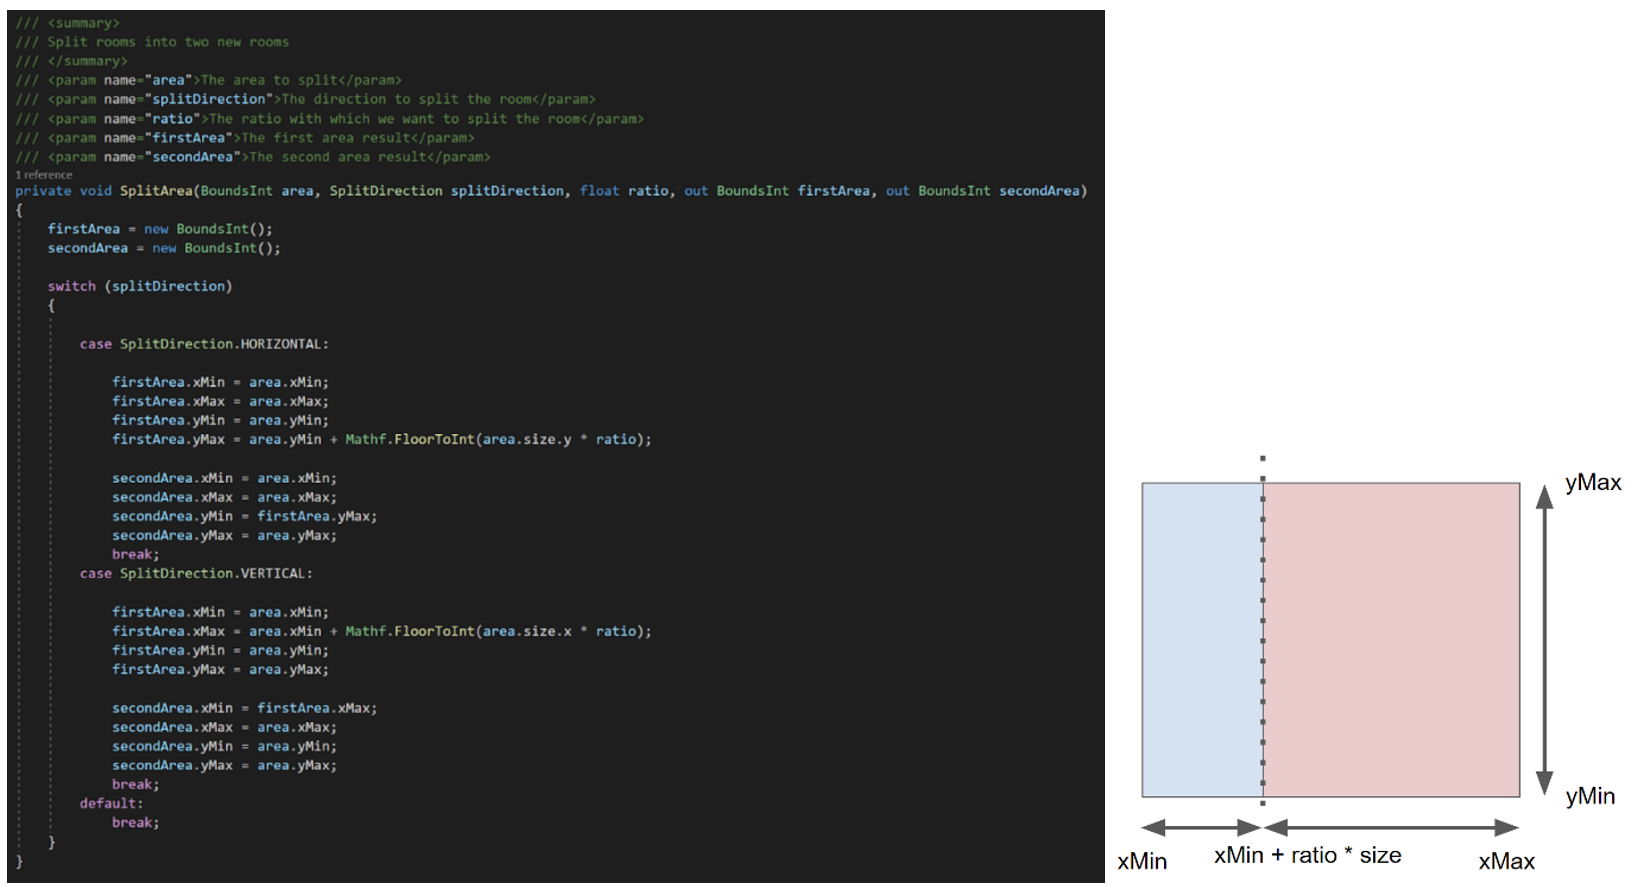
To split the areas, I created a method called “SplitArea”, which takes as arguments a BoundsInt (the area to process), an Enum (splitDirection, either HORIZONTAL(0) or VERTICAL(1)), a float (ratio for the split) and two outputs of type BoundsInt (area1 and area2). The method looks like this :
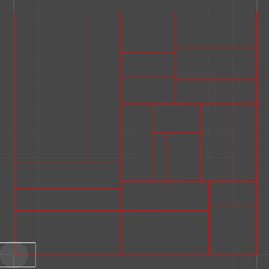
And the result was the following:
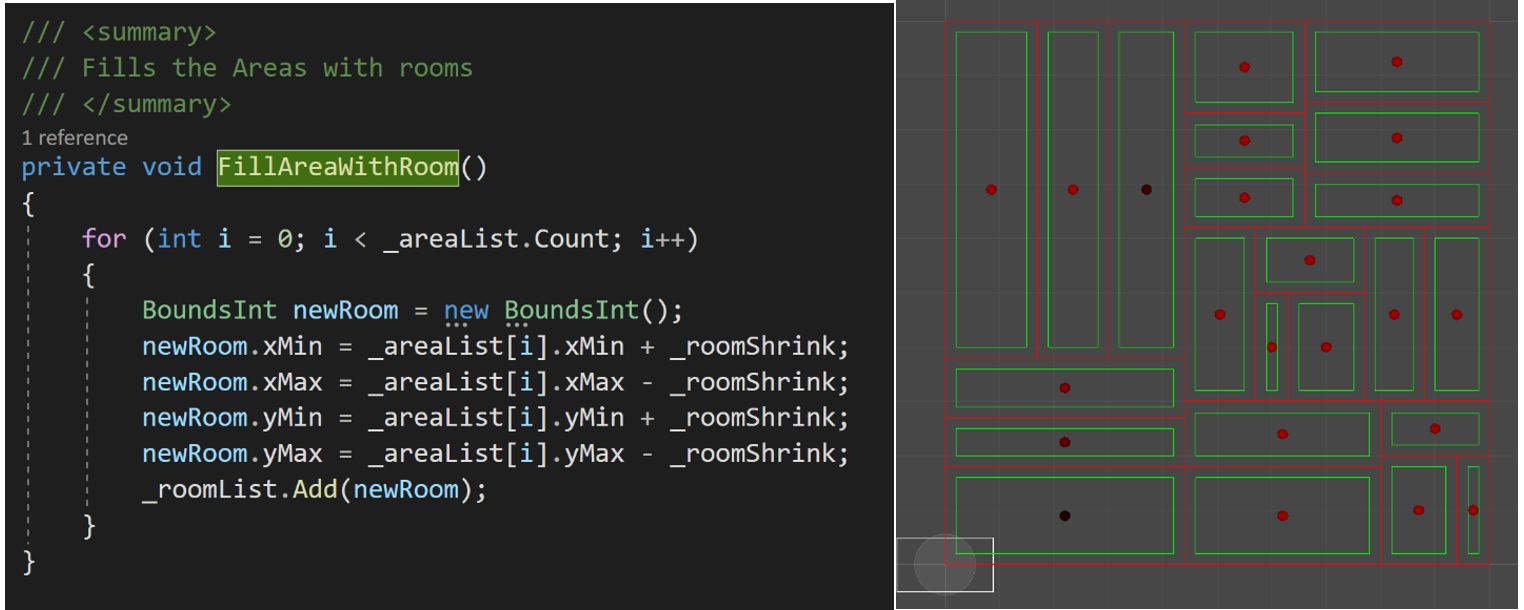
Once the Areas were split, I wanted to fill them with rooms separated from each other, otherwise the BSP would have had no sense. In order to do so, I took all the areas from the “AreaList” and shrunk them by the desired amount (Int “roomShrink”) and added them to a RoomList.
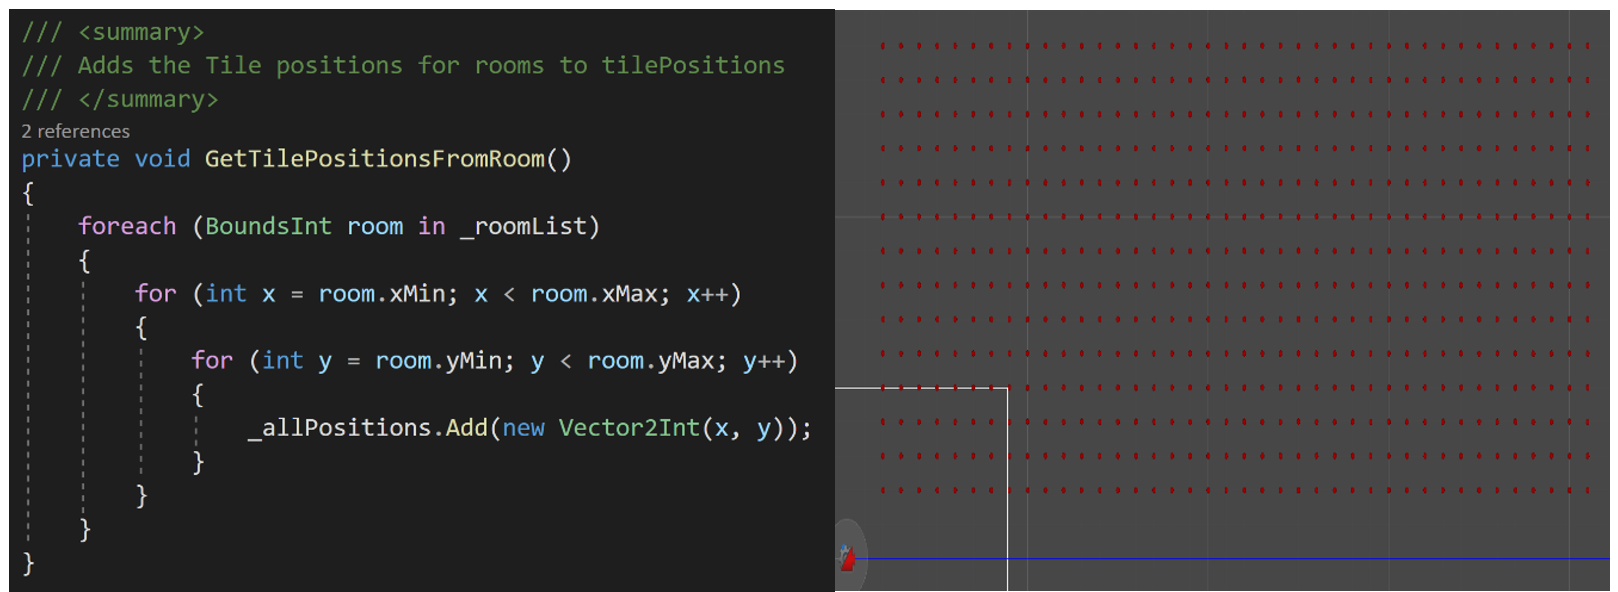
After I managed to create my shrinked rooms I just had to get all the positions with the previous “GetTileFromPosition” method and add them to a list of positions.
I finally had my rooms, created with a binary space partitioning algorithm.
That was already a nice part of the job done, but obviously without any connections to the neighbouring rooms the player would not have been able to go from one room to the other (no, Billy can not swim…sorry).
So, I had to create links between rooms, ideally I wanted to keep only one link per room and after that I had to create a path from one room to the other and paint it. That is when it became really hard.
The connections
After multiple tries without success I finally found two methods to do it (special thanks to my teacher who probably saved one or two hairs from falling off of my head). One special part used for these methods is the “Linq” library. Very useful, I only wish I had known about it earlier.
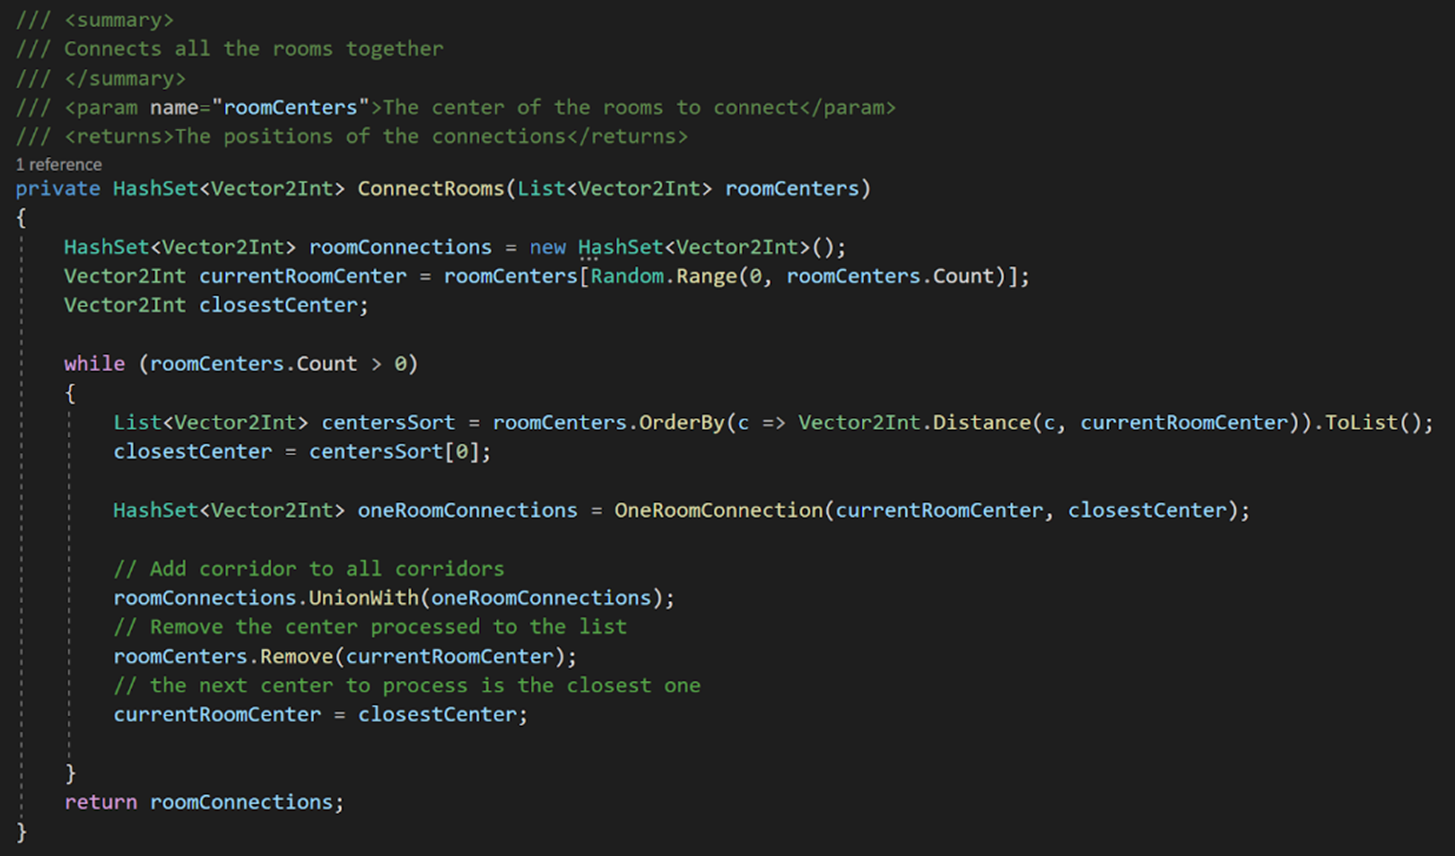
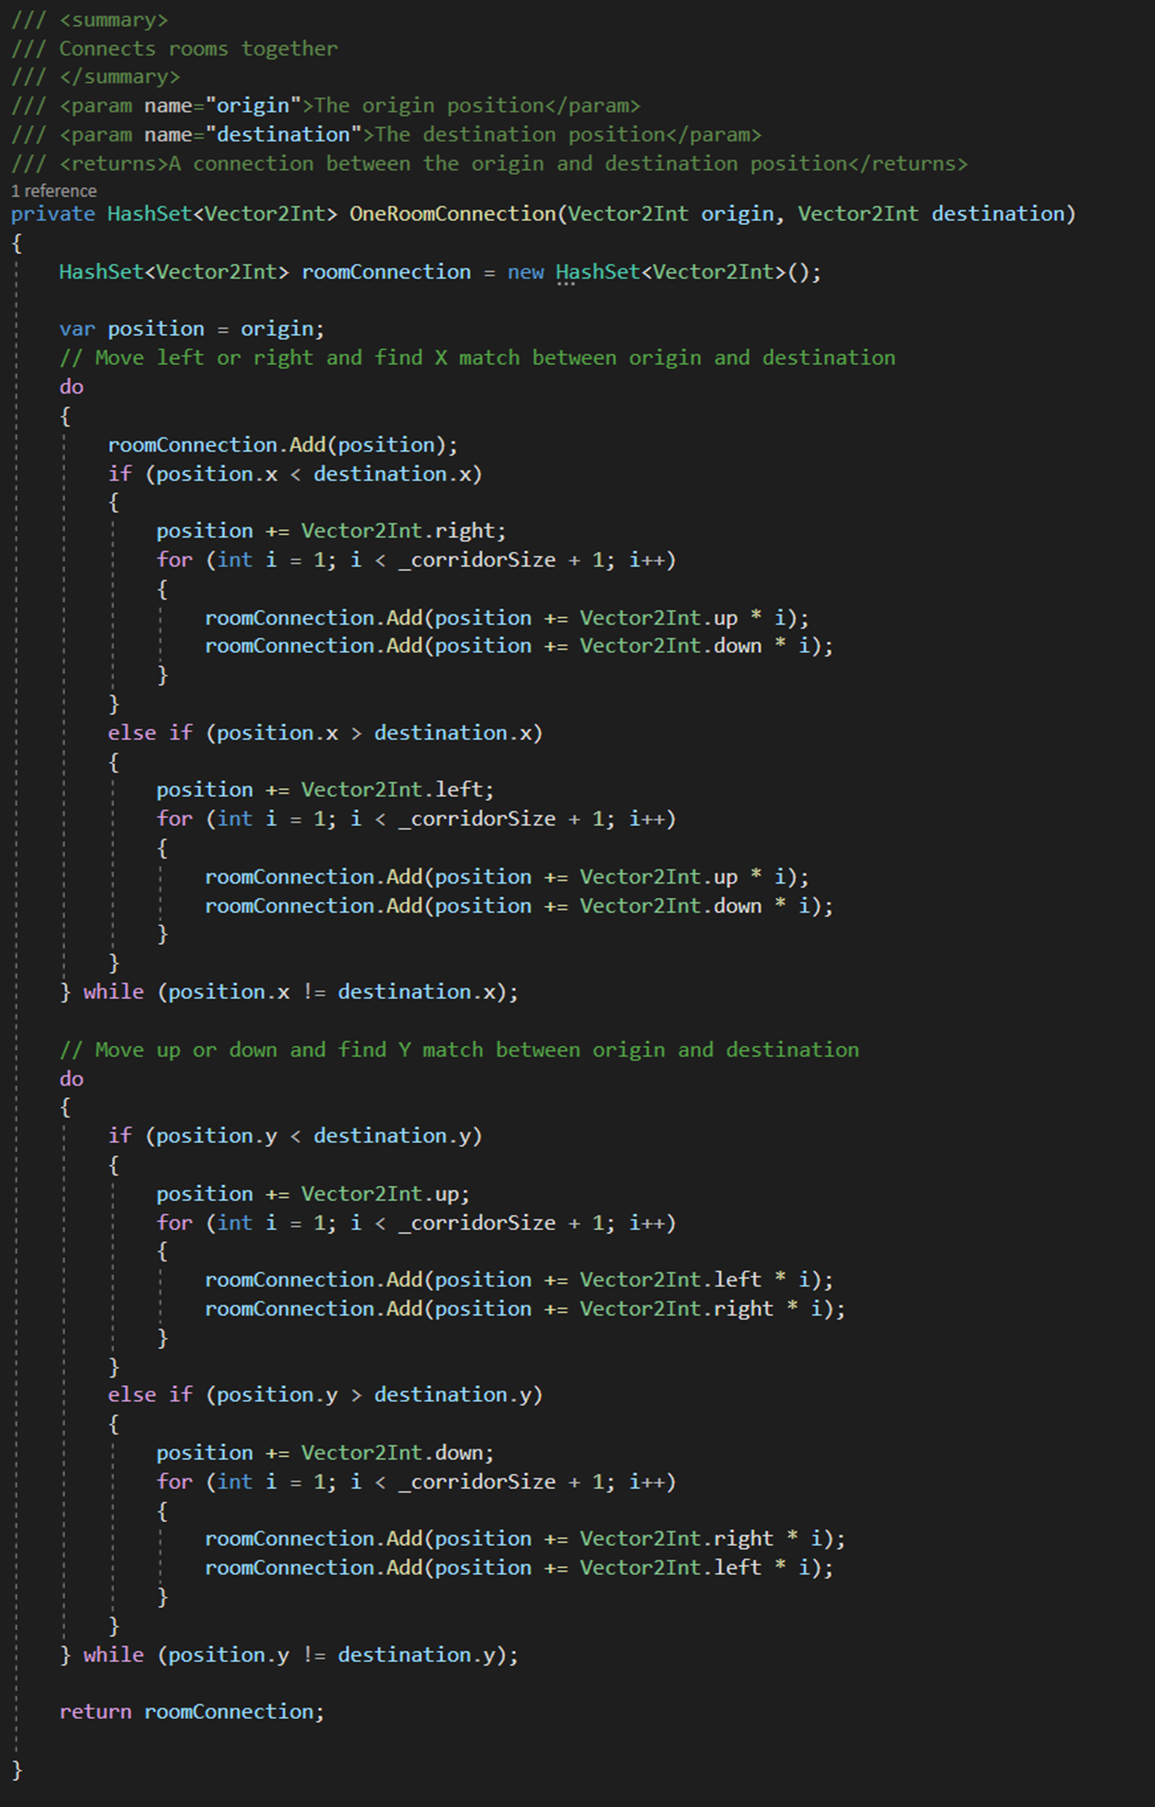
The methods were the following:
This method takes as parameters a list of Vector2Ints (roomCenters), choses randomly one of them and gets the closest center from that room to the other ones.
At the end it will add the room connection to the room connections HashSet and remove it from the room centers list.
The “OneRoomConnection” is a method made to create the path between two rooms. It adds positions to the room until the destination is met. Finally it returns the room connection.
The result
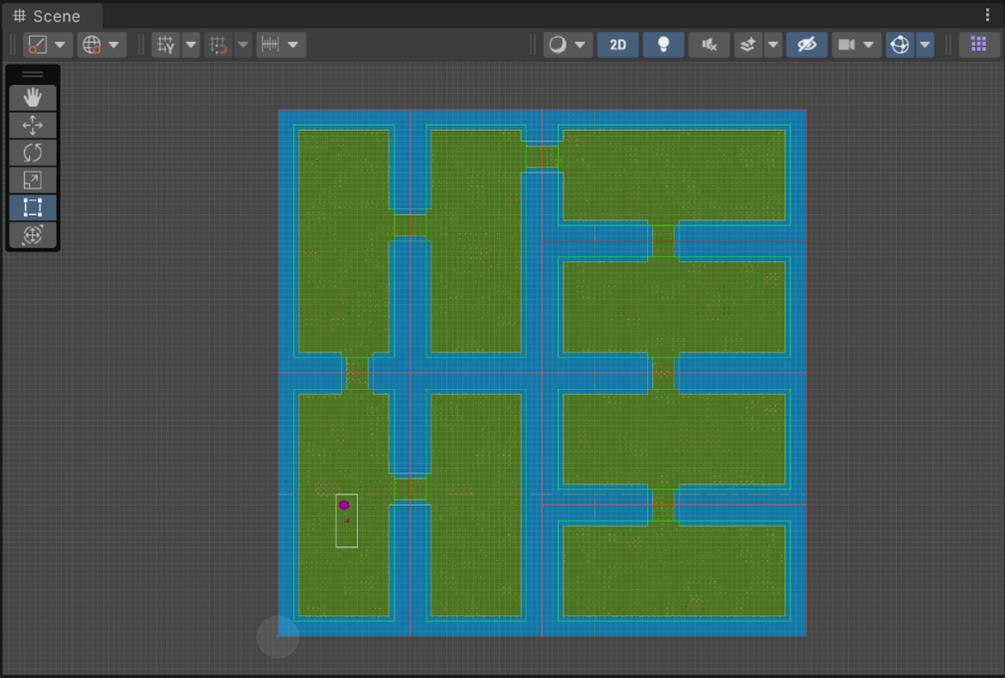
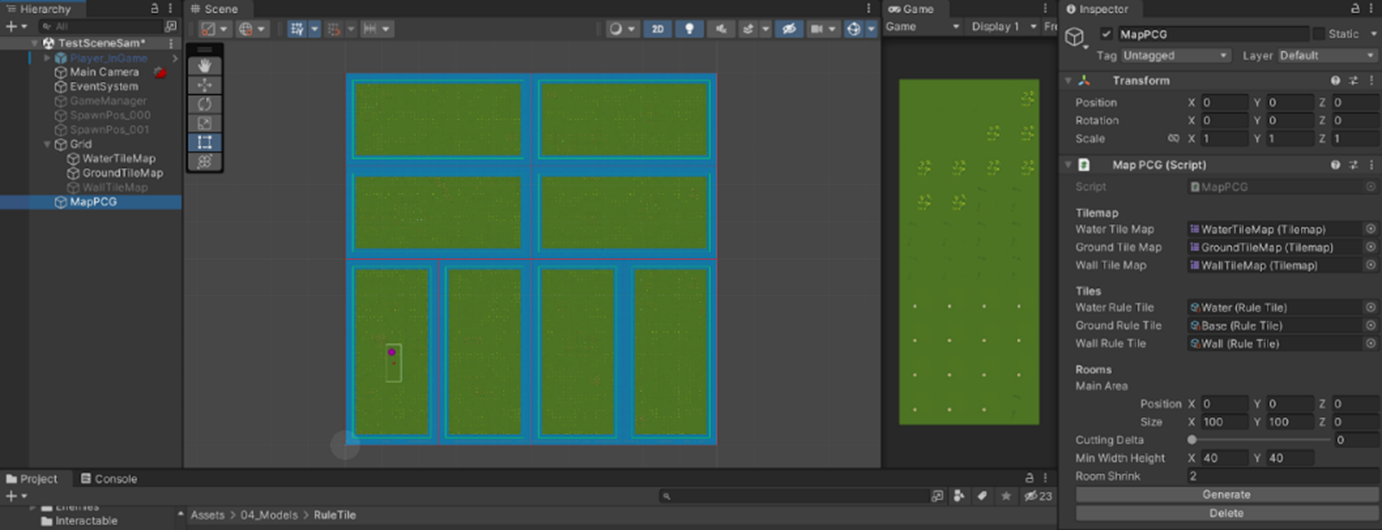
At the end of all that process, I just reuse the FillRoom() method to fill the rooms and corridors with tiles.
The final result looks like this:
Summary
If you have reached this point, I would first of all like to thank you for reading. My goal was to explain without too many details what procedural generation and binary space partitioning is and how I used it for my game.
In the end, the BSP was very interesting to learn and try. Of course, using the BSP is useful if you want to create defined maps but can’t help for the generation of open maps, caves or mazes like a Drunkard’s Walk or a Cellular automaton would.
Personally, even though I was helped a lot and already knew a bit about PCG, I found it really hard to create a system that worked. The theory is quite simple to understand, applying it is much harder.
I would like to give a special thanks to my teacher, Mr.Albert who took a lot of time to explain and cover the subject to be sure that everything was well understood. He also helped a lot when it came to transferring knowledge to working code. I would also like to thank my colleague Yassine Benseghir who reviewed my blogpost and brought some ideas on how to improve it.
For those who are interested in giving it a try, my only piece of advice would be to go slowly and get help if you are stuck. Along my journey I often got mad at myself for going too quickly and ending up being stuck because of a method I thought was working but was actually not.
