
MarbleMaze: Deep Dive — Pluggable Tutorial Condition System
Tutorials are the most fragile part of a mobile game. Write them with hardcoded input checks and you get a mess that breaks every time the UI shifts. Wire them to specific GameObjects and scene changes become a refactor. This post covers the system I built to make every tutorial step data-driven, input-agnostic, and fully configurable in the Unity inspector — without a single special-case in the core tutorial runner.
Architecture Overview
The system has four distinct layers that compose independently:
Condition Layer
  ITutorialCondition            — single-method interface: IsSatisfied()
  IContextBoundCondition        — extends with BindContext() for UI-aware conditions
  ITargetedTutorialCondition    — extends with AnchorId for inspector wiring
  10+ concrete implementations  — tap, swipe, drag, gamepad, area, ordered …

Tutorial Data Layer
  TutorialStep                  — conditions + mask + animations + input gate + events
  Tutorial                      — named sequence of steps
  TutorialManager               — coroutine runner; resolves conditions each frame

Scene Integration Layer
  TutorialContext               — registers UI anchor RectTransforms by string ID
  TutorialTrigger               — 3D physics trigger → fires manager callback
  TutorialSignalEmitter / Bus   — decoupled scene-to-manager signal channel

Input Control Layer
  InputGate / MovementGate      — flags enums; player code checks before acting
  TutorialOverlayMask           — four-panel scrim with a live spotlight cutout
The Condition Interface Hierarchy
The entire system rests on one method:
// ITutorialCondition.cs
public interface ITutorialCondition
{
    bool IsSatisfied();
}
TutorialManager polls this every frame in a WaitUntil — it doesn’t know or care what
kind of input the condition listens to. Everything else is an implementation detail.
Two extension interfaces handle conditions that need to know where on screen they apply.
Instead of injecting a RectTransform into the constructor (which would break Unity’s
serialization), binding happens through an explicit BindContext call at step start:
public interface IContextBoundCondition
{
    void BindContext(TutorialContext context, string anchorId, Canvas canvas);
}

public interface ITargetedTutorialCondition : IContextBoundCondition
{
    string AnchorId { get; } // exposes the anchor ID so the manager can call BindContext
}
TutorialManager checks for both interfaces and binds them automatically — no
scene-side wiring needed:
// TutorialManager.cs — RunTutorial()
foreach (var condition in step.completionConditions)
{
    if (condition is IContextBoundCondition bound &&
        condition is ITargetedTutorialCondition targeted &&
        currentContext != null)
    {
        bound.BindContext(currentContext, targeted.AnchorId, tutorialCanvas);
    }
}
The Condition Implementations
Simple Conditions — No Context Needed
TapAnywhereCondition — the simplest possible condition. Any press anywhere on screen:
public class TapAnywhereCondition : ITutorialCondition
{
    public bool IsSatisfied()
        => Pointer.current != null && Pointer.current.press.wasPressedThisFrame;
}
PressInputActionCondition — binds to any InputAction asset, so any button in
any Unity Input System action map can act as a tutorial gate:
public class PressInputActionCondition : ITutorialCondition
{
    [SerializeField] private InputActionReference action;

    public bool IsSatisfied()
        => action?.action?.WasPressedThisFrame() ?? false;
}
TapGamepadButtonCondition — enumerates every standard gamepad button. One
switch on a strongly typed enum, no magic strings:
public class TapGamepadButtonCondition : ITutorialCondition
{
    public enum GamepadButton { South, North, East, West,
        LeftShoulder, RightShoulder, LeftTrigger, RightTrigger, Start, Select }

    public GamepadButton button;

    public bool IsSatisfied()
    {
        var gamepad = Gamepad.current;
        if (gamepad == null) return false;
        return button switch
        {
            GamepadButton.South => gamepad.buttonSouth.wasPressedThisFrame,
            GamepadButton.Start => gamepad.startButton.wasPressedThisFrame,
            // …
        };
    }
}
Area Conditions — Context-Bound
TapInAreaCondition — resolves the target UI element’s world corners to screen
coordinates at bind time, then checks every press against that rect:
public class TapInAreaCondition : ITutorialCondition,
    IContextBoundCondition, ITargetedTutorialCondition
{
    [SerializeField] private string anchorId;
    public string AnchorId => anchorId;
    public float padding = 0f;

    private Rect screenRect;

    public void BindContext(TutorialContext context, string anchorId, Canvas canvas)
    {
        var rect = context?.Get(anchorId);
        if (rect == null) return;

        Vector3[] corners = new Vector3[4];
        rect.GetWorldCorners(corners);

        Vector2 min = RectTransformUtility.WorldToScreenPoint(null, corners[0]);
        Vector2 max = RectTransformUtility.WorldToScreenPoint(null, corners[2]);

        screenRect = Rect.MinMaxRect(
            min.x - padding, min.y - padding,
            max.x + padding, max.y + padding);
    }

    public bool IsSatisfied()
    {
        var pointer = Pointer.current;
        if (pointer == null || !pointer.press.wasPressedThisFrame) return false;
        return screenRect.Contains(pointer.position.ReadValue());
    }
}
Binding at step start rather than every frame means the world-to-screen conversion runs once per step, not once per frame — important when Unity’s layout system might otherwise recalculate corners on every dirty.
TapAndReleaseInAreaCondition adds a tap quality gate: tracks press position and
time, then validates on release that the pointer didn’t move too far and the press didn’t
last too long. This filters out accidental swipes that started inside the target rect:
public bool IsSatisfied()
{
    var pointer = Pointer.current;
    if (pointer == null) return false;

    if (pointer.press.wasPressedThisFrame)
    {
        pressPosition = pointer.position.ReadValue();
        pressTime     = Time.time;
        pressedInside = screenRect.Contains(pressPosition);
        return false;
    }

    if (pressedInside && pointer.press.wasReleasedThisFrame)
    {
        float duration = Time.time - pressTime;
        float distance = Vector2.Distance(pressPosition, pointer.position.ReadValue());

        return screenRect.Contains(pointer.position.ReadValue())
               && duration <= maxDuration       // < 0.3s
               && distance <= maxMoveDistance;  // < 40px
    }

    return false;
}
Swipe Conditions
SwipeCondition validates direction using a dot product threshold — the swipe vector
must point within ~37° of the required direction (dot > 0.8) to count:
public class SwipeCondition : ITutorialCondition
{
    public Vector2 direction;
    public float minDistance = 100f;

    private Vector2 start;
    private bool isSwiping = false;

    public bool IsSatisfied()
    {
        var pointer = Pointer.current;
        if (pointer == null) return false;

        if (pointer.press.wasPressedThisFrame) { start = pointer.position.ReadValue(); isSwiping = true; }

        if (isSwiping && pointer.press.isPressed)
        {
            Vector2 delta = pointer.position.ReadValue() - start;
            if (delta.magnitude >= minDistance &&
                Vector2.Dot(delta.normalized, direction.normalized) > 0.8f)
            {
                isSwiping = false;
                return true;
            }
        }

        if (pointer.press.wasReleasedThisFrame) isSwiping = false;
        return false;
    }
}
SwipeAndReleaseCondition is a tighter variant that only resolves on finger lift,
preventing mid-swipe detection for drag-style interactions.
Drag Conditions
DragFromToCondition and DragFromReleaseAtCondition teach drag gestures by
validating that the touch originated within a start radius, traveled a minimum
distance, and arrived within an end radius. Both radii and positions are resolved
from a TutorialContext anchor at bind time:
public void BindContext(TutorialContext context, string anchorId, Canvas canvas)
{
    var uiAnchor = context.anchors.FirstOrDefault(a => a.id == anchorId);
    if (uiAnchor.rect == null) return;

    // start/end are local positions on the anchor RectTransform
    startScreen = RectTransformUtility.WorldToScreenPoint(null,
        uiAnchor.rect.TransformPoint(uiAnchor.startPosition));
    endScreen   = RectTransformUtility.WorldToScreenPoint(null,
        uiAnchor.rect.TransformPoint(uiAnchor.endPosition));
}
The difference between the two: DragFromToCondition resolves while the pointer is
still held (teaching joystick-style drags), while DragFromReleaseAtCondition resolves
on release (teaching flick or swipe-to-confirm gestures).
OrderedCondition — Composite Sequencing
OrderedCondition wraps a list of other conditions and advances through them in order.
Only when the last one is satisfied does it return true:
public class OrderedCondition : ITutorialCondition
{
    private int currentIndex = 0;
    public List<ITutorialCondition> conditions;

    public bool IsSatisfied()
    {
        if (currentIndex >= conditions.Count) return true;
        if (conditions[currentIndex].IsSatisfied()) currentIndex++;
        return currentIndex >= conditions.Count;
    }
}
This makes it possible to build a multi-gesture tutorial step — “tap here, then swipe
left” — as a single condition entry in a step, without needing extra steps in the
Tutorial data structure.
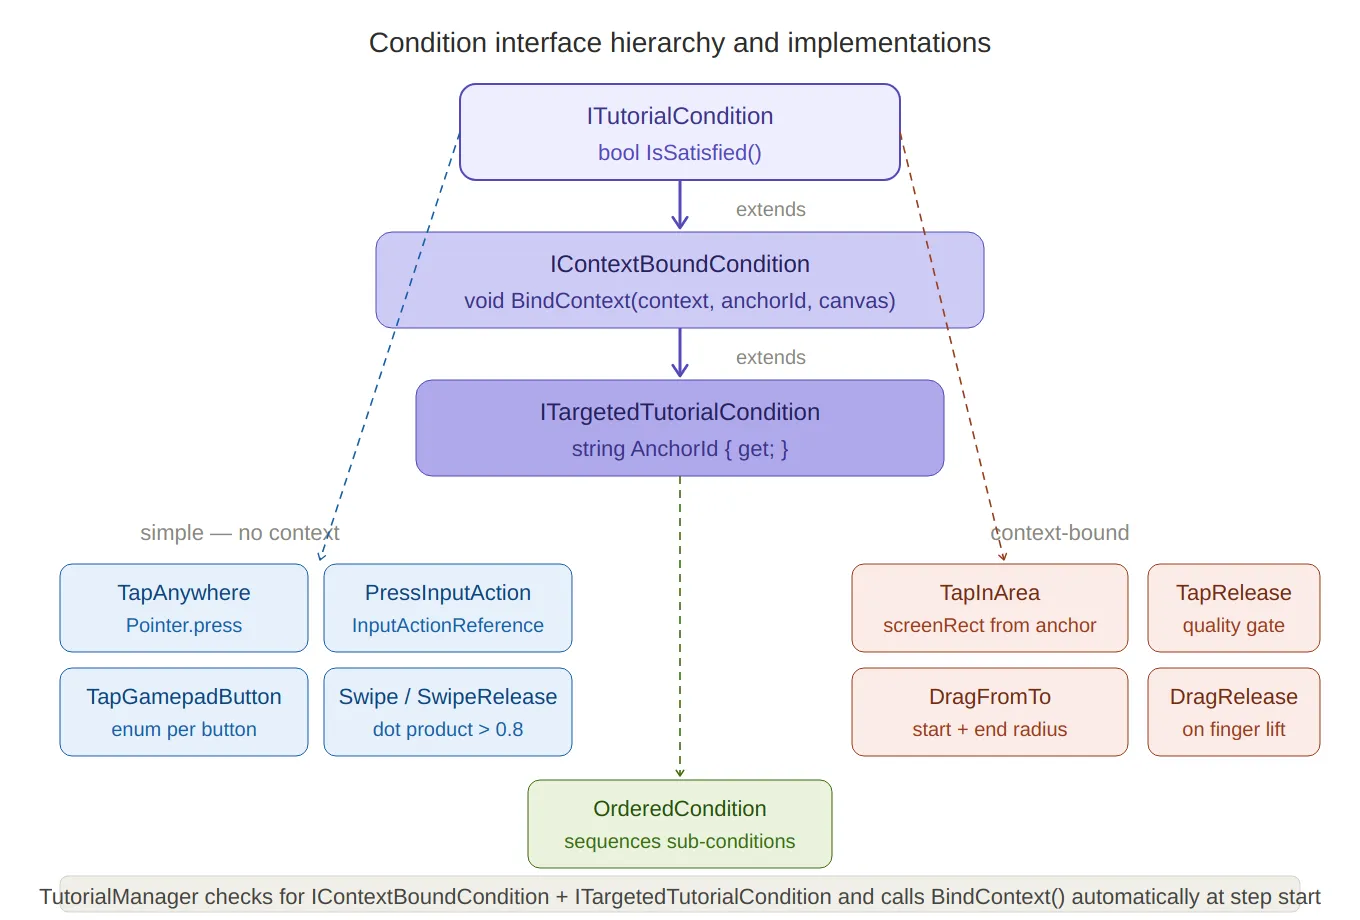
Condition interface hierarchy — the three-level inheritance chain
(ITutorialCondition → IContextBoundCondition → ITargetedTutorialCondition) at the top, with the 10+
implementations branching below: blue boxes for simple conditions (no context needed: tap anywhere,
gamepad buttons, swipe) and coral boxes for context-bound ones (area tap, drag from/to).
OrderedCondition sits below as the composite. The footer note explains the automatic BindContext call.
SerializeReference — Polymorphism in the Inspector
Conditions are stored in TutorialStep using [SerializeReference]:
// TutorialManager.cs — TutorialStep
[SerializeReference]
public List<ITutorialCondition> completionConditions = new List<ITutorialCondition>();
[SerializeReference] is Unity’s mechanism for serializing interface and abstract class
references by managed type — unlike [SerializeField], which only works with concrete
types Unity knows the size of at compile time. Each list entry stores the full concrete
type name alongside its fields, so adding a new condition class requires no changes to
TutorialStep or TutorialManager.
The Custom Property Drawer
Serializing polymorphic types solves the data problem; the UX problem is that the default
inspector shows a raw managedReferenceValue field with no way to pick a type. The custom
drawer solves this with reflection-based type discovery:
// TutorialConditionDrawer.cs
static TutorialConditionDrawer()
{
    conditionTypes = AppDomain.CurrentDomain.GetAssemblies()
        .SelectMany(a => { try { return a.GetTypes(); } catch { return Array.Empty<Type>(); } })
        .Where(t =>
            typeof(ITutorialCondition).IsAssignableFrom(t) &&
            !t.IsInterface &&
            !t.IsAbstract)
        .ToList();
}
This runs once at editor load. Every class that implements ITutorialCondition is
automatically discovered and added to a dropdown — including any new condition type
added in the future. No registration step, no attribute required:
int newIndex = EditorGUI.Popup(dropdownRect, label, currentIndex,
    displayNames.Select(n => new GUIContent(n)).ToArray());

if (newIndex != currentIndex)
{
    property.managedReferenceValue = newIndex == 0
        ? null
        : Activator.CreateInstance(conditionTypes[newIndex - 1]);
}
Selecting a type from the dropdown instantiates it via Activator.CreateInstance and
assigns it to the managedReferenceValue. The drawer then draws each child field of the
concrete type using SerializedProperty iteration — so TapInAreaCondition.anchorId and
SwipeCondition.minDistance both appear automatically in the inspector with their correct
types and labels.
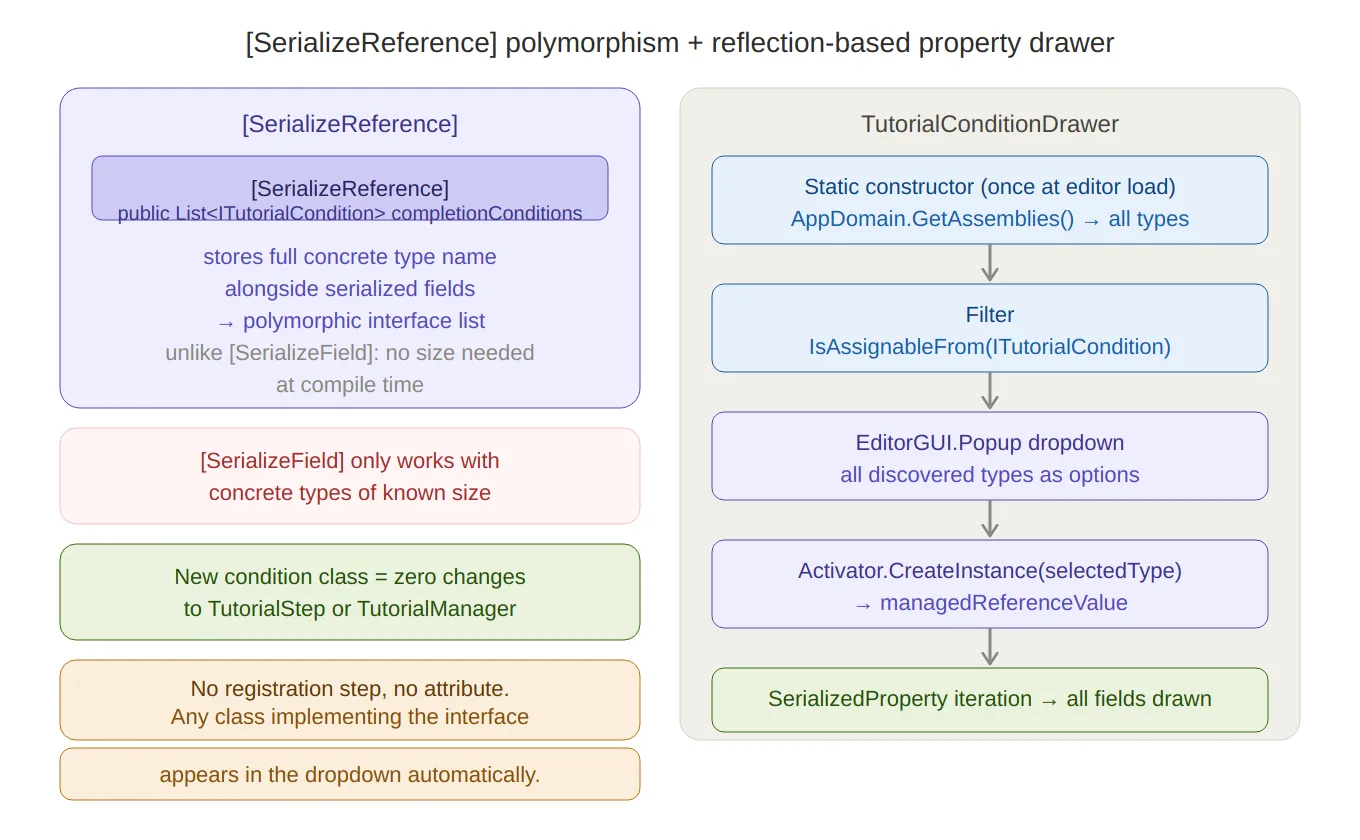
SerializeReference + property drawer — left side explains why [SerializeReference] enables polymorphic
interface lists where [SerializeField] can’t, plus the “zero changes to existing code” benefit. Right side
traces the five-step drawer pipeline: static reflection scan → filter by interface → dropdown →
Activator.CreateInstance → child field iteration.
Tutorial Data Structures
A Tutorial is a named sequence of TutorialStep objects:
public class Tutorial
{
    public string tutorialName;
    public int    levelNumber;
    public string tutorialType;
    public List<TutorialStep> steps = new List<TutorialStep>();
}
Each TutorialStep carries everything the runner needs for that beat:
public class TutorialStep
{
    public TutorialUIElement[]  tutorialUIElements;  // hand-prompt animations
    public TutorialMaskData     maskData;            // overlay focus target
    public bool                 autoComplete;        // time-based vs condition-based
    public float                waitTime;
    public ConditionLogic       conditionLogic;      // Any or All
    [SerializeReference]
    public List<ITutorialCondition> completionConditions;
    public AllowedInput         allowedInput;        // what inputs are gated
    public AllowedMovement      allowedMovement;
    public UnityEvent           onStepStart;
    public UnityEvent           onStepComplete;
}
ConditionLogic.Any means the step completes when at least one condition is satisfied —
useful for steps that can be completed by either a tap or a button press.
ConditionLogic.All requires every condition — useful for ordered or simultaneous
multi-input steps.
The Tutorial Runner Coroutine
TutorialManager.RunTutorial is a single coroutine that loops through steps. Each iteration:
- Applies the overlay mask — focuses the four-panel scrim around the step’s target UI element
- Starts UI animations — plays the hand-prompt or arrow sequences defined per step
- Sets the input gate — restricts player input to what the step allows
- Fires
onStepStart— any designer-wired UnityEvent - Waits for completion — either a timer or a
WaitUntilpolling conditions - Cleans up — resets gates, stops animations, fires
onStepComplete, advances index
// TutorialManager.cs
private IEnumerator RunTutorial(Tutorial tutorial)
{
    yield return FadeTo(tutorialCanvasGroup, 1f, bgFadeInOutTime);

    while (currentStepIndex < tutorial.steps.Count)
    {
        var step = tutorial.steps[currentStepIndex];

        // 1. Mask
        if (step.maskData?.enableMask == true && currentContext != null)
        {
            RectTransform target = currentContext.Get(step.maskData.focusTargetId);
            overlayMask.FocusOnTarget(tutorialCanvas, step.maskData.padding, target);
            overlayMask.gameObject.SetActive(target != null);
        }

        // 2. Animations
        foreach (var ui in step.tutorialUIElements)
            ui.elementAnimation.PlaySequence(ui.animationSequence, ui.loop);

        // 3. Input gate
        InputGate.Allowed    = step.allowedInput;
        MovementGate.Allowed = step.allowedMovement;

        // 4. Step start event
        step.onStepStart?.Invoke();

        // 5. Wait
        if (step.autoComplete)
            yield return new WaitForSeconds(step.waitTime);
        else
        {
            foreach (var c in step.completionConditions)   // bind context-aware conditions
                if (c is IContextBoundCondition b && c is ITargetedTutorialCondition t)
                    b.BindContext(currentContext, t.AnchorId, tutorialCanvas);

            yield return new WaitUntil(() => forceStepComplete || AreConditionsSatisfied(step));
        }

        // 6. Cleanup
        InputGate.Allowed    = AllowedInput.All;
        MovementGate.Allowed = AllowedMovement.All;
        foreach (var ui in step.tutorialUIElements)
            ui.elementAnimation.gameObject.SetActive(false);
        step.onStepComplete?.Invoke();
        currentStepIndex++;
    }

    overlayMask.gameObject.SetActive(false);
    yield return FadeTo(tutorialCanvasGroup, 0f, bgFadeInOutTime);
}
forceStepComplete is a flag that TutorialTrigger can set externally to advance the step
regardless of conditions — useful for physics-gated steps where the player’s marble entering
a volume is the completion event.
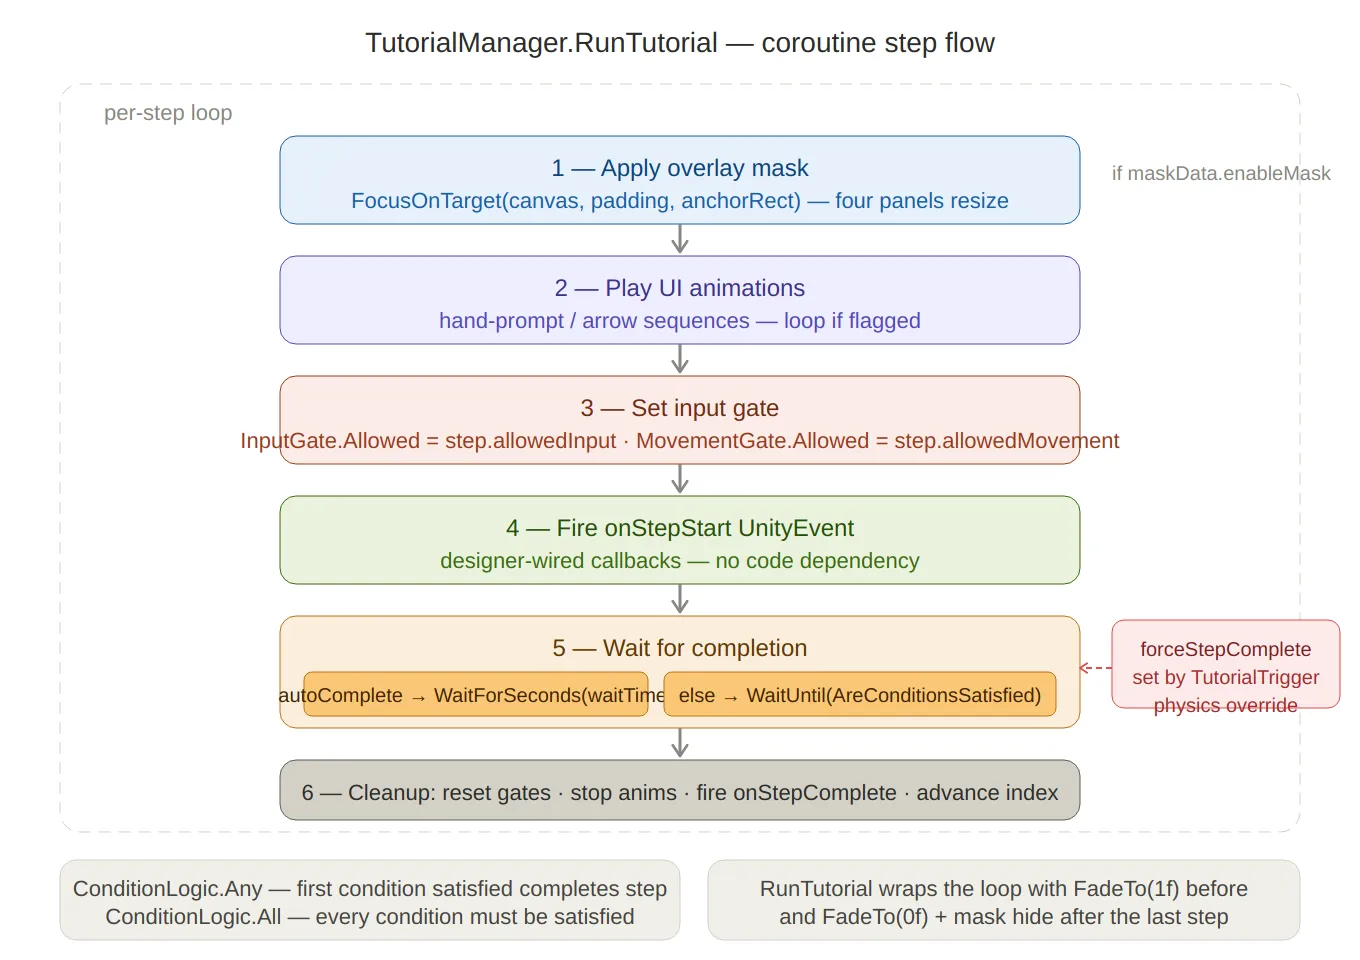
Runner coroutine flow — the six sequential steps inside the per-step loop
(mask → animate → input gate → onStepStart → wait → cleanup), with the autoComplete
branch clearly split, and the forceStepComplete physics override shown as a side input
into the wait step. ConditionLogic.Any vs .All noted at the bottom.
InputGate and MovementGate
The gate system uses C#‘s [Flags] enum so individual inputs can be combined bitwise:
[Flags]
public enum AllowedInput
{
    None     = 0,
    Move     = 1 << 0,
    Jump     = 1 << 1,
    Touch    = 1 << 2,
    Swipe    = 1 << 3,
    Tap      = 1 << 4,
    All      = ~0      // all bits set
}

public static class InputGate
{
    public static AllowedInput Allowed = AllowedInput.All;
}
Player input code checks the gate before acting:
// PlayerController.cs (example check)
if (!InputGate.Allowed.HasFlag(AllowedInput.Move)) return;
Setting AllowedInput.None locks all input; AllowedInput.Move | AllowedInput.Jump
lets the player move and jump but disables touch/swipe — useful for a step that says
“use the joystick to move here” without the player being able to tap-skip the instruction.
MovementGate applies the same pattern at the physics level, restricting directional
movement independently of the input layer.
TutorialOverlayMask — Four-Panel Scrim
The overlay consists of four semi-transparent panels (Top, Bottom, Left, Right) that together cover everything on screen except the target element. Instead of moving the panels — which would require recalculating anchors — only their sizes change:
// TutorialOverlayMask.cs
public void FocusOnTarget(Canvas canvas, float padding, RectTransform target)
{
    RectTransform canvasRect = canvas.transform as RectTransform;

    Vector3[] canvasCorners = new Vector3[4];
    canvasRect.GetWorldCorners(canvasCorners);

    Vector3[] t = new Vector3[4];
    target.GetWorldCorners(t);

    // Apply padding to target corners
    Vector3 targetBL = t[0] - new Vector3(padding, padding, 0);
    Vector3 targetTR = t[2] + new Vector3(padding, padding, 0);

    ScaleTopBottom(Top,    canvasCorners[1].y, t[1].y); // canvas top  → target top
    ScaleTopBottom(Bottom, t[0].y, canvasCorners[0].y); // target bot  → canvas bot
    ScaleLeftRight(Left,   canvasCorners[0].x, t[0].x); // canvas left → target left
    ScaleLeftRight(Right,  t[2].x, canvasCorners[2].x); // target right → canvas right
}

private void ScaleTopBottom(RectTransform rect, float canvasEdgeY, float targetEdgeY)
{
    Vector2 size = rect.sizeDelta;
    size.y = Mathf.Abs(canvasEdgeY - targetEdgeY);
    rect.sizeDelta = size;
}
Each panel is anchored to its respective canvas edge and only resizes along one axis.
The result is a pixel-precise rectangular spotlight that appears instantly without any
animation overhead — the resize is a single sizeDelta assignment.
Scene Integration
TutorialContext — UI Anchor Registry
TutorialContext is a MonoBehaviour placed in every scene that has tutorials.
It registers itself with TutorialManager on Awake and exposes a named array of
UIAnchor structs:
public class TutorialContext : MonoBehaviour
{
    [Serializable]
    public struct UIAnchor
    {
        public string id;
        public RectTransform rect;
        public Vector2 startPosition; // local position on rect (for drag conditions)
        public Vector2 endPosition;
        public bool gizmos;
    }

    public UIAnchor[] anchors;

    private void Awake() => TutorialManager.Instance.RegisterContext(this);

    public RectTransform Get(string id)
    {
        foreach (var a in anchors)
            if (a.id == id) return a.rect;
        return null;
    }
}
The gizmos flag toggles a Scene View visualisation drawn with Handles — green lines
connect startPosition to endPosition on each anchor, making drag gesture targets
visible during authoring without entering play mode.
TutorialBus — Decoupled Scene Signals
Any scene element can emit a named signal without a direct reference to TutorialManager:
public static class TutorialBus
{
    public static event Action<TutorialSignal> OnSignal;

    public static void Raise(string id, object payload = null)
        => OnSignal?.Invoke(new TutorialSignal(id, payload));
}

public class TutorialSignalEmitter : MonoBehaviour
{
    public void Emit(string signalId) => TutorialBus.Raise(signalId);
}
TutorialReceiver — a base MonoBehaviour — subscribes to TutorialBus.OnSignal and
filters by a designer-configured list of signal IDs:
public abstract class TutorialReceiver : MonoBehaviour, ITutorialReceiver
{
    [SerializeField] protected List<string> listenToSignalIds;

    protected virtual void OnEnable()  => TutorialBus.OnSignal += HandleSignal;
    protected virtual void OnDisable() => TutorialBus.OnSignal -= HandleSignal;

    private void HandleSignal(TutorialSignal signal)
    {
        foreach (string id in listenToSignalIds)
            if (signal.id == id) OnTutorialSignal(signal);
    }

    public abstract void OnTutorialSignal(TutorialSignal signal);
}
TutorialTrigger — Physics-Driven Tutorial Activation
A TutorialTrigger is a 3D collider placed in the game world. When the player’s
marble (or a power-up) enters it, it fires a callback registered with GameTutorialManager:
public class TutorialTrigger : MonoBehaviour
{
    public int triggerIndex;
    public bool skipStep;
    public string tutorialId;
    public GameTutorialManager manager;

    private void Start()
    {
        if (skipStep)
            manager.RegisterTrigger(triggerIndex,
                () => TutorialManager.Instance.CompleteCurrentStep());
        else
            manager.RegisterTrigger(triggerIndex,
                () => TutorialManager.Instance.StartTutorial(tutorialId));
    }

    private void OnTriggerEnter(Collider other)
    {
        if (other.CompareTag("Player") || other.CompareTag("Ufo") || other.CompareTag("Rocket"))
            manager.TriggerActivated(triggerIndex);
    }
}
GameTutorialManager stores callbacks in a Dictionary<int, Action> and removes them
after firing — so each trigger activates at most once, even if the marble passes through
the collider again.

Scene integration — the four components arranged around TutorialManager at the centre:
TutorialContext (UI anchor registry with gizmo preview) top-left, TutorialBus (static decoupled signal channel)
top-right, TutorialTrigger (3D physics → single-fire callback) bottom-left, and TutorialOverlayMask bottom-right
rendered as an actual four-panel diagram with the spotlight cutout visible. The [Flags] InputGate note sits between
the manager and the mask.
Summary
| Component | Role |
|---|---|
ITutorialCondition | Single-method interface; polled every frame by the runner |
IContextBoundCondition | Opt-in binding for conditions that need UI element positions |
ITargetedTutorialCondition | Exposes AnchorId so the manager can call BindContext automatically |
OrderedCondition | Composite: sequences sub-conditions; multi-gesture steps without extra steps |
[SerializeReference] | Polymorphic list serialization; no concrete type needed at the step level |
TutorialConditionDrawer | Reflection discovers all implementations; dropdown + field expansion |
TutorialStep | Per-step data: conditions, mask, animations, gates, UnityEvents |
TutorialManager.RunTutorial | Coroutine runner: mask → animate → gate → wait → cleanup |
InputGate / MovementGate | [Flags] enums; per-bit input restriction checked by player code |
TutorialOverlayMask | Four-panel scrim; only sizeDelta changes — no repositioning |
TutorialContext | Per-scene UI anchor registry; gizmo visualisation of drag paths |
TutorialBus | Static event bus; signals without direct references |
TutorialTrigger | 3D physics → callback; single-fire via Dictionary<int, Action> |
The key property of this architecture is that adding a new kind of tutorial step requires
only a new ITutorialCondition class. The drawer discovers it automatically, the runner
polls it through the interface, and the context binding happens without any new code in
TutorialManager. A drag condition, a timer condition, a network-event condition — all
follow the same path from inspector to runtime.