-
MarbleMaze: Deep Dive — GC-Friendly Grid Data Structure
The procedural generator at the heart of MarbleMaze runs every time a new level starts. On mobile, that means it needs to produce a complete maze — including hazard decoration and star placement — without triggering the garbage collector. This post is about the data structure that makes that possible.
The Problem with a Naive Approach
The obvious first instinct for a grid of cells is a 2D array of objects:
// What you might reach for first
Cell[,] grid = new Cell[width, height];
If
Cellis a class, every element is a heap-allocated object with a GC header and a pointer stored in the array. Accessing a cell involves two indirections: the array lookup gives you a reference, and the reference points to the object somewhere on the heap. On a 15×30 grid that is 450 separate heap allocations, each a potential GC target.More importantly, modifying a cell means reading the reference, following the pointer, and mutating the object in place. Since the pipeline modifies every carved cell multiple times across three decoration passes, this creates significant pointer-chasing pressure — bad for CPU cache locality, and even worse on a mobile CPU with a small L1 cache.
The solution is to make the cell a value type.
CellData — A Struct That Carries the Full Cell State
Every cell in the maze is represented by a single
CellDatastruct:// CoreData.cs [System.Serializable] public struct CellData { public bool isEmpty; // true = wall, false = walkable public GroundType ground; // Floor, Ice, Piques, MovingPlatform … public OverlayType overlay; // None, Start, End, Star public bool isEnd; public bool isHorizontal; // orientation for line-of-three hazards public bool requiresTwoSolidNeighbours; // placement constraint flag }Being a
structmeans:- There is no GC header — structs aren’t tracked by the garbage collector
- There is no heap allocation per cell — the data lives directly inside the containing array
- The entire grid is a single contiguous block of memory — CPU prefetching works efficiently when iterating row by row
- Passing a
CellDatato a method returns a copy — no accidental shared-state mutations
The
[System.Serializable]attribute is not cosmetic — it is what allows Unity to includeCellDatavalues inside aScriptableObjectarray for pre-authored level storage (covered later in the serialization section).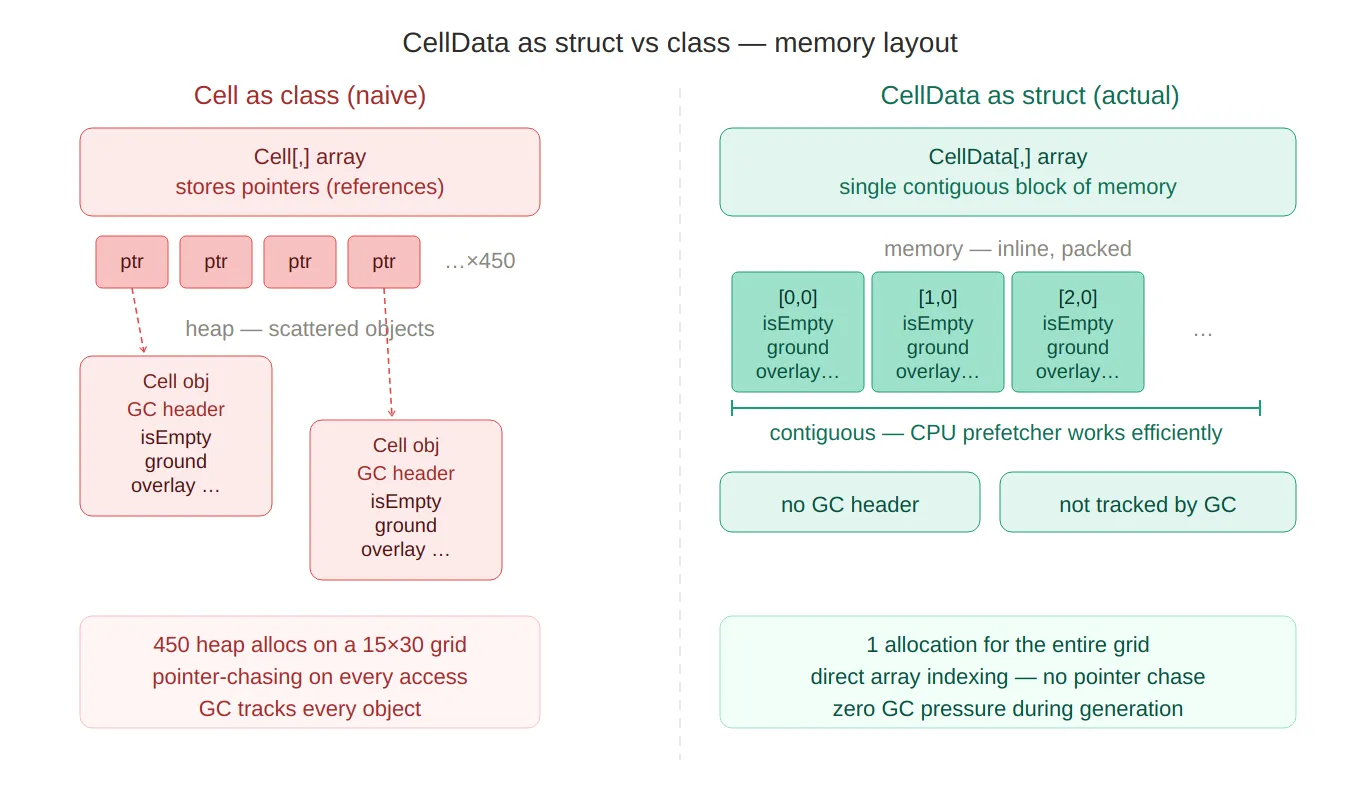
Struct vs class memory — side-by-side comparison of
Cellas a class (450 scattered heap objects, pointer chasing, GC headers) versusCellDataas a struct (one contiguous block, direct array indexing, zero GC tracking). The red vs green colour coding makes the performance story immediately legible.
Grid — The Wrapper That Provides the Interface
CellDatais a primitive. Navigating a flat 2D array by raw index everywhere would make the codebase brittle. TheGridclass wraps the 2D array and provides a clean API:// CoreData.cs public class Grid { private CellData[,] cells; public int Width => cells.GetLength(0); public int Height => cells.GetLength(1); public Grid(int width, int height) { cells = new CellData[width, height]; } public bool IsInside(int x, int y) => x >= 0 && y >= 0 && x < Width && y < Height; public bool IsInside(Vector2Int position) => IsInside(position.x, position.y); }Griditself is a class — deliberately so. The generation pipeline passes the same grid through six separate stages. IfGridwere a struct, every method call would copy the entire 2D array. As a class, it passes by reference with no copying overhead.This is the classic C# trade-off: cells are value types (cheap to store, safe to read), the container is a reference type (cheap to pass, shared ownership).
Two Accessor Patterns
The most important design decision in the
GridAPI is exposing two distinct ways to access a cell, each with a different intent.GetCell — Safe Copy for Reading
public CellData GetCell(int x, int y) => cells[x, y]; public CellData GetCell(Vector2Int pos) => cells[pos.x, pos.y];GetCellreturns a value copy of the struct. This is the right choice for read-only use: you get a snapshot of the cell’s current state that cannot accidentally modify the underlying array, and the caller can store it in a local variable without concern.// PhysicalMazeGenerator.cs — reads a copy to decide what to spawn CellData cell = grid.GetCell(x, y); if (cell.isEmpty) return; SpawnGround(cell, basePosition, x, y);GetCellRef — Direct Reference for Writing
public ref CellData GetCellRef(int x, int y) => ref cells[x, y]; public ref CellData GetCellRef(Vector2Int pos) => ref cells[pos.x, pos.y];GetCellRefreturns aref— a managed reference to the struct that lives inside the array. Mutating the returned ref modifies the array element directly, with no intermediate copy:// MazeGenerator.cs — writes directly into the array via ref ref var cell = ref grid.GetCellRef(pos); cell.isEmpty = false; cell.ground = chosen.groundType;Without
ref, the equivalent would require a copy-modify-assign round trip:// What it would look like without ref — one extra copy per write CellData cell = grid.GetCell(pos); cell.isEmpty = false; cell.ground = chosen.groundType; grid.SetCell(pos.x, pos.y, cell); // write backAcross thousands of cells and three decoration passes, eliminating that copy-assign is meaningful. More importantly, the
refpattern makes the intent explicit — the caller signals at the call site that it is about to mutate the cell, not just inspect it.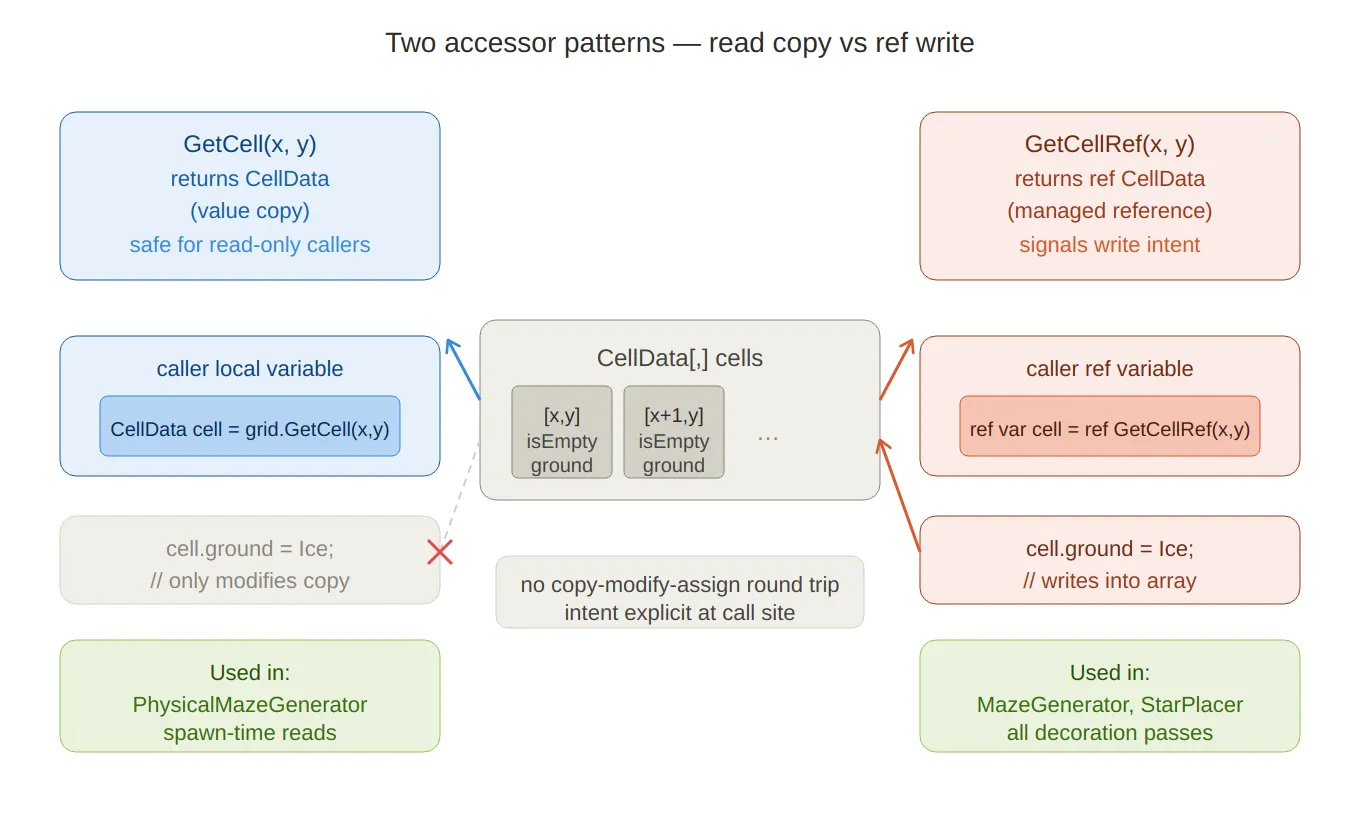
Two accessor patterns — shows
GetCellreturning a value copy to the left (safe for reads, mutations don’t reach the array) andGetCellRefreturning a managedrefto the right (writes go directly into the array, no round-trip). The crossed arrow on the left makes it clear that mutating a copy has no effect on the underlying data.
The ref Pattern in Practice
Once you see it in one place, you’ll notice it everywhere in the generator:
// GridUtils.cs — forces a floor tile at the start position
ref var cell = ref grid.GetCellRef(start.x, start.y);
cell.isEmpty = false;
cell.ground  = GroundType.Floor;
// MazeGenerator.cs — ApplyTwoSolidTiles pass ref var cell = ref grid.GetCellRef(pos); cell.ground = hazard.groundType; cell.isEmpty = false; cell.requiresTwoSolidNeighbours = true;// StarPlacer.cs — marks a cell as a star overlay grid.GetCellRef(pos.x, pos.y).overlay = OverlayType.Star;// LevelData_SO.cs — populates a new Grid from serialized data ref var cell = ref grid.GetCellRef(x, y); cell = gridData[y * gridWidth + x]; // struct assignment — full copy in one lineThe last example is worth noting: assigning one struct to another in C# copies all fields in a single instruction. There is no custom copy constructor, no hidden allocation — it is just a memory copy of the struct’s size.
Query API
Beyond the two core accessors,
Gridexposes a set of query methods for the rest of the codebase to use without knowing about the internal array layout:// 4-directional neighbours as copies — safe for constraint checks public List<CellData> GetNeighbours4(int x, int y) { … } // Filtered queries using predicates — used by archetype tools and debug windows public List<CellData> GetCellsWhere(Func<CellData, bool> predicate) { … } public List<CellData> GetCellsWithGround(GroundType groundType) { … } public List<CellData> GetCellsWithOverlay(OverlayType overlayType) { … } public List<CellData> GetNonEmptyCells() { … } public List<CellData> GetEmptyCells() { … }These return
List<CellData>— copied values, not references. They are designed for querying, not mutation. Any code that needs to modify cells uses a separate loop withGetCellRefrather than mutating out of a query result.Two methods address the specific spatial problem of finding valid positions near the level’s exit tile — used by the player-spawn system after generation:
// 8-directional neighbours of the End cell, with walkability filtering
public bool TryGetWalkableEndNeighbours(out List<Vector2Int> positions) { … }
public bool TryGetEndNeighbours(out List<(Vector2Int pos, CellData cell)> neighbours) { … }
The 8-way version exists because the exit can be placed at the edge of the maze, where strictly 4-directional adjacency might return zero walkable neighbours.
GridFactory — Initialization Convention
Before any generation runs, the grid needs a defined starting state.
GridFactory.CreateWallGridinitialises every cell as a wall (isEmpty = true) with a default floor ground type:// GridFactory.cs public static Grid CreateWallGrid(int width, int height) { Grid grid = new Grid(width, height); for (int x = 0; x < width; x++) for (int y = 0; y < height; y++) grid.SetCell(x, y, new CellData { isEmpty = true, ground = GroundType.Floor, overlay = OverlayType.None, isEnd = false }); return grid; }Starting as all-walls means the generator only ever carves open cells — it never needs to re-close one. This simplifies every downstream pass: a cell with
isEmpty == trueis unconditionally a wall, regardless of any other field values.
Serialization — Flattening to a 1D Array
Unity cannot serialize a 2D array (
CellData[,]) in aScriptableObjectdirectly. Pre-authored levels — hand-crafted layouts stored in the project — need to survive asset serialization and be reconstructable at runtime.LevelData_SOsolves this by flattening the 2D grid into a 1DCellData[]using the standard row-major index formulaindex = y * width + x:// LevelData_SO.cs [Tooltip("Flattened grid: index = y * width + x")] public CellData[] gridData;Two conversion methods handle the round-trip:
// Grid → flat array (for saving / exporting)
public void FromGrid(Grid grid)
{
    gridWidth  = grid.Width;
    gridHeight = grid.Height;
    gridData   = new CellData[gridWidth * gridHeight];

    for (int y = 0; y < gridHeight; y++)
        for (int x = 0; x < gridWidth; x++)
            gridData[y * gridWidth + x] = grid.GetCell(x, y);
}

// Flat array → Grid (for loading at runtime)
public Grid ToGrid()
{
    Grid grid = new Grid(gridWidth, gridHeight);

    for (int y = 0; y < gridHeight; y++)
        for (int x = 0; x < gridWidth; x++)
        {
            ref var cell = ref grid.GetCellRef(x, y);
            cell = gridData[y * gridWidth + x]; // struct copy — all fields at once
        }

    return grid;
}
Because
CellDatais a struct marked[Serializable], Unity’s serializer knows exactly how to write and read each field. There is no custom serializer, no JSON intermediate — just direct binary serialization of value types.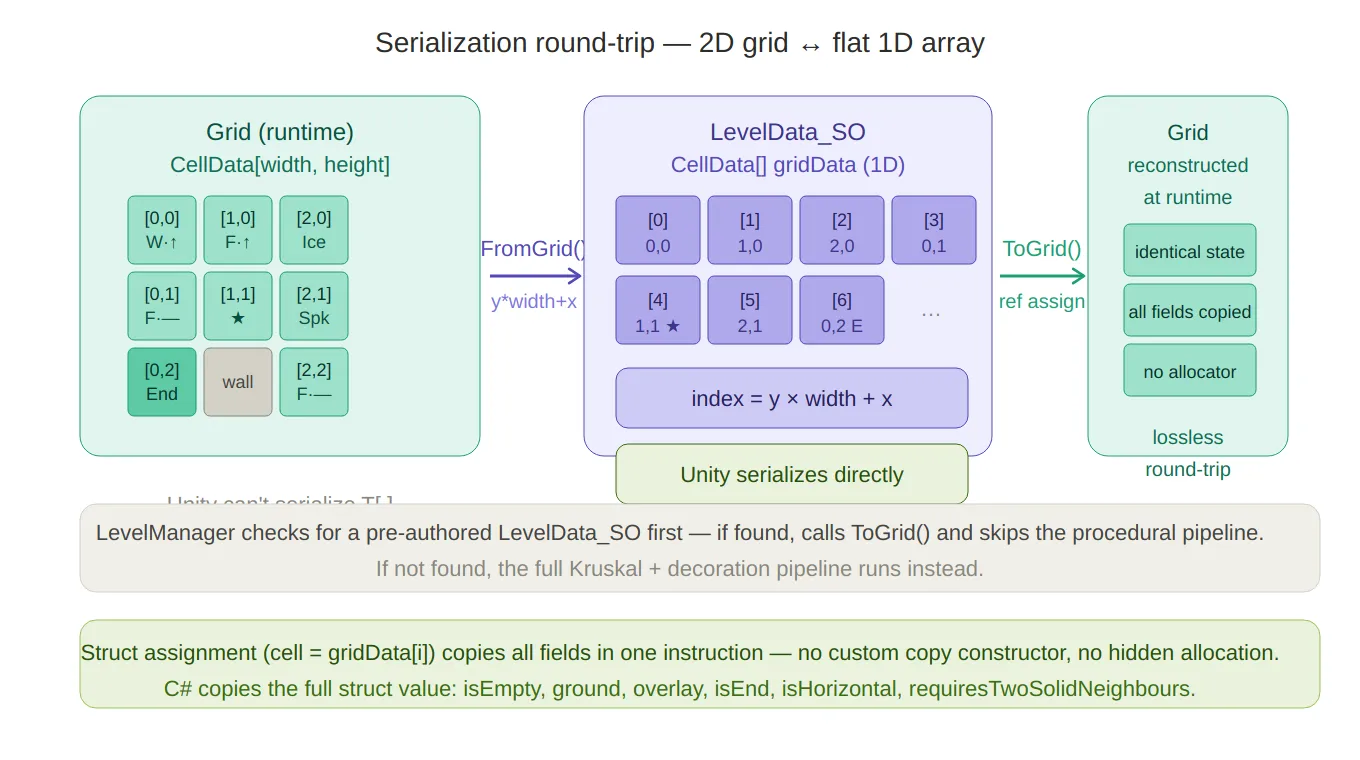
Serialization round-trip — traces the
FromGrid()path (2D → 1D withy*width+x) and theToGrid()path back, with the actual cell slots rendered so you can see which index maps to which coordinate. The bottom notes cover the struct-assignment single-instruction copy and the LevelManager fallback logic.LevelManagerchecks for a pre-authored level first; if none exists, it falls through to the procedural generator:// LevelManager.cs — GenerateRuntimeLevel() LevelData_SO existing = database.GetLevelDataAtIndex(levelIndex); if (existing != null) { usedSeed = existing.usedSeed; return existing.ToGrid(); // deserialize from flat array } // … otherwise run the procedural pipeline
Downstream Consumption — PhysicalMazeGenerator
Once the
Gridis fully populated,PhysicalMazeGeneratoriterates it to spawn Unity GameObjects. At this stage, only read copies are needed — the generation phase is over, soGetCell(notGetCellRef) is used throughout:// PhysicalMazeGenerator.cs for (int y = 0; y < height; y++) { for (int x = 0; x < width; x++) { CellData cell = grid.GetCell(x, y); // read copy — no mutation Vector3 basePosition = GridToWorld(new Vector2Int(x, y)); SpawnCell(cell, basePosition, x, y); } }One detail worth highlighting in the spawner: timed hazards (doors, platforms) need to start in alternating states so they don’t all open and close in sync. The spawner derives this from the cell’s grid position using a bitwise checkerboard pattern:
// PhysicalMazeGenerator.cs — SpawnGround()
if (ground.TryGetComponent<ITimedHazard>(out var hazard))
{
    bool isInverted = ((x + y) & 1) == 1; // true for odd-sum cells
    hazard.SetState(isInverted);
}
(x + y) & 1is a fast parity check — equivalent to(x + y) % 2 == 1but without the division. Adjacent cells always have different parities, so neighbouring hazards always start in opposite phases.
Full Lifecycle of a Grid
GridFactory.CreateWallGrid(w, h)
        │
        ▼
MazeGenerator.GenerateKruskalMaze  →  carved HashSet<Vector2Int>
        │
        ▼
GridUtils.MarkStartAndEnd          →  ref writes for Start/End overlay
        │
        ▼
MazeGenerator.ApplyMaze            →  ref writes across 3 decoration passes
        │
        ▼
StarPlacer.PlaceStars              →  ref writes for Star overlays
        │
        ▼
LevelManager.CurrentGrid           →  Grid held in memory for scene lifetime
        │
        ├── PhysicalMazeGenerator  →  GetCell reads → Instantiate GameObjects
        └── LevelData_SO.FromGrid  →  flatten to CellData[] for asset serialization
Every stage from creation to consumption uses the same
Gridinstance — passed by reference, mutated in place during generation, then read-only during consumption. No copies of the grid itself are made at any point in the pipeline.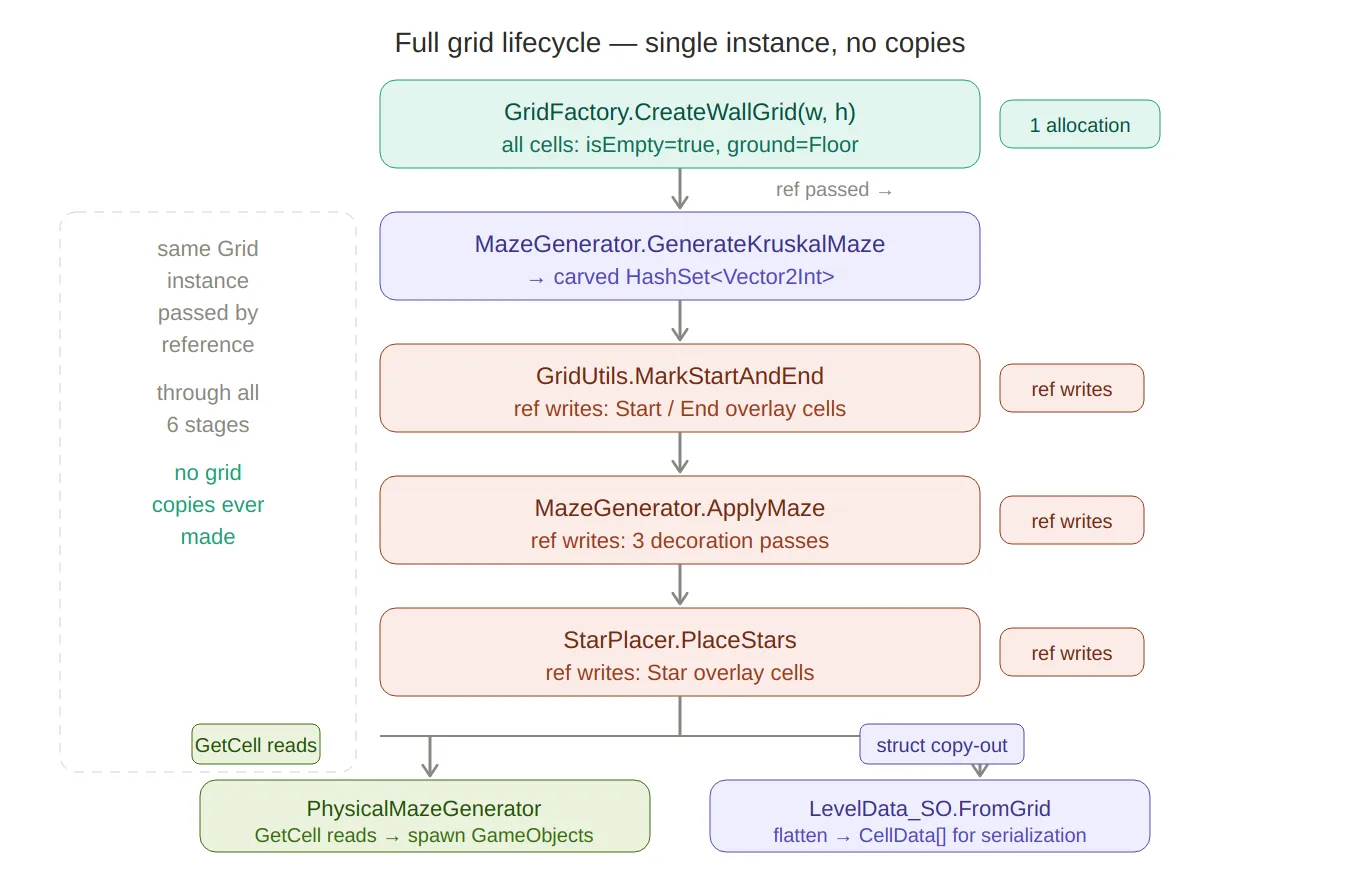
Grid lifecycle pipeline — the full six-stage flow from
CreateWallGridto the two downstream consumers (PhysicalMazeGeneratorfor read-only spawning,LevelData_SOfor serialization). The dashed bracket on the left calls out that the sameGridinstance passes through all stages — no copies of the grid itself are ever made.
Summary
Design choice Reason CellDatais astructNo per-cell heap allocation; contiguous memory; no GC pressure Gridis aclassReference semantics — same instance passes through all pipeline stages GetCellreturns a copySafe default for read-only callers; prevents accidental mutation GetCellRefreturnsrefZero-overhead in-place mutation; signals write intent at the call site [Serializable]onCellDataEnables direct Unity serialization into LevelData_SOassetFlat 1D serialization Unity can’t serialize T[,];y * width + xis the lossless round-tripAll-wall initialization Single direction of change (carve open); no need to re-wall The grid design has no moving parts — no pooling, no custom allocators, no unsafe code. The performance benefit comes purely from choosing the right built-in language feature (
struct,ref return) and using it consistently throughout the pipeline.Created on February 2026 -
MarbleMaze: Deep Dive — Adaptive Difficulty Engine
Generating infinite levels is only half the problem. The other half is making sure those levels feel appropriately hard — not so easy the player disengages, not so punishing they quit. This deep dive covers how I built an adaptive difficulty system that scales across three independent axes and responds to player performance in real time.
The Problem
A fixed difficulty curve works fine for a small set of hand-crafted levels. For a procedural game with no upper bound on level count, it falls apart. Players start the same place but their skill trajectories diverge quickly — one player breezes through the first 50 levels, another struggles at level 10. A single curve can’t serve both.
The system I built scales along three independent axes:
Axis What scales Controlled by Grid size Level dimensions (maze complexity) Level index Hazard composition Which tile types appear and how densely Cycle archetype + multiplier Difficulty multiplier How aggressively hazards are applied Player performance All three are computed in a single call at the start of each level:
// LevelManager.cs — GenerateRuntimeLevel()
RuntimeLevelParameters runtimeParams =
    RuntimeLevelProgression.GetParametersForLevel(
        levelIndex,
        tileDatabase_SO,
        levelCycleProgression_SO,
        levelsPerCycle,
        previousLivesLostToThisLevel,   // local performance
        failedTimes,                     // failure count
        globalDifficultyModifier.difficultyDebt  // cross-session debt
    );
The result is a
RuntimeLevelParametersstruct that overwrites the baseGeneratorParameters_SObefore the maze generator runs.
Axis 1 — Grid Size Progression
The most visible form of difficulty scaling is the physical size of the maze. A 5×10 grid is a short, narrow corridor. A 15×30 grid is a sprawling multi-path maze.
Size grows across five discrete phases, each lerped smoothly within its range:
// RuntimeLevelParameters.cs
int lvl = levelIndex + 1;

void LerpSize(int startLevel, int endLevel,
              int startW, int endW,
              int startH, int endH)
{
    float t = Mathf.InverseLerp(startLevel, endLevel, lvl);
    width  = Mathf.RoundToInt(Mathf.Lerp(startW, endW, t));
    height = Mathf.RoundToInt(Mathf.Lerp(startH, endH, t));
}

if      (lvl <= 10) LerpSize(1,  10,  5,  5,  10, 10);  // fixed intro size
else if (lvl <= 20) LerpSize(11, 20,  5,  7,  10, 15);  // width begins
else if (lvl <= 35) LerpSize(21, 35,  7,  10, 15, 20);  // height grows fast
else if (lvl <= 50) LerpSize(36, 50,  10, 15, 20, 25);  // both expand
else if (lvl <= 70) LerpSize(51, 70,  10, 15, 25, 30);  // height pushes further
else
{
    // Endgame: caps out around level 100
    float t = Mathf.Clamp01((lvl - 70) / 30f);
    width  = Mathf.RoundToInt(Mathf.Lerp(10, 15, t));
    height = Mathf.RoundToInt(Mathf.Lerp(25, 30, t));
}
Phase boundaries were chosen to front-load the feeling of growth — the player experiences the most dramatic change between levels 10 and 35, when height more than doubles. After level 70 the grid caps, and difficulty comes purely from hazard composition.
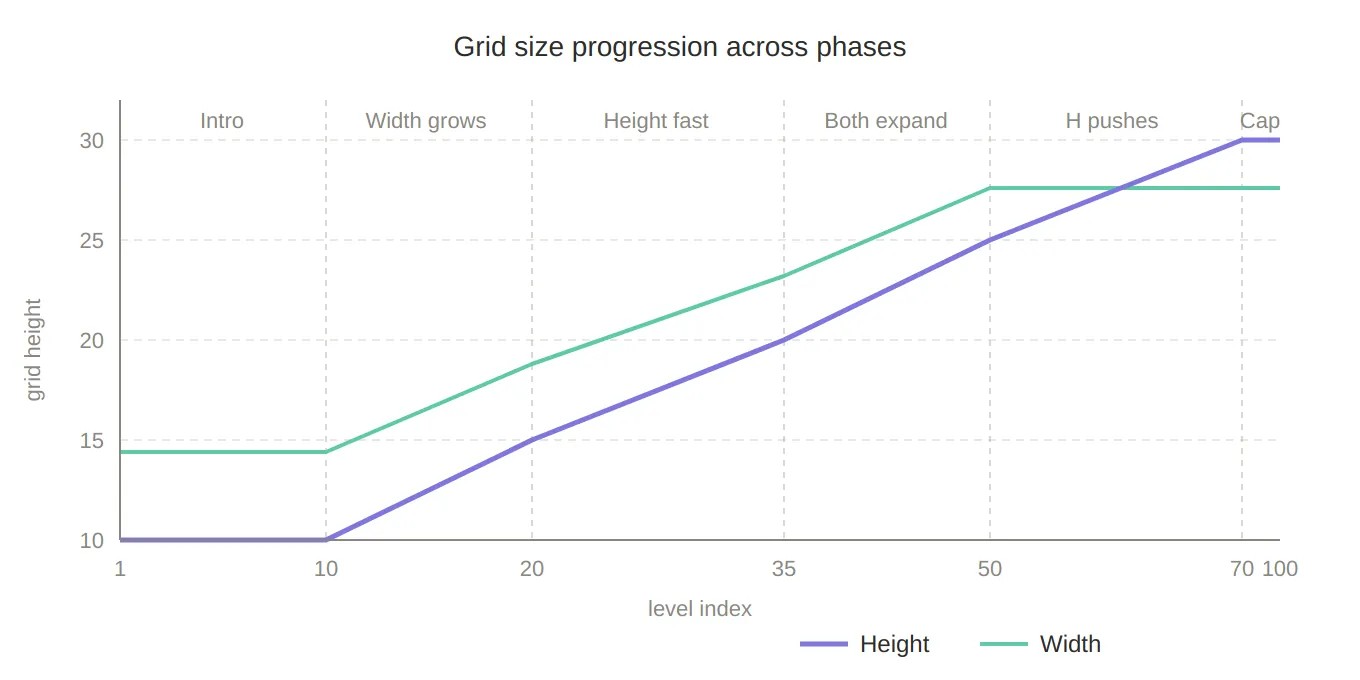
Grid size progression — a line chart showing how width and height grow across the five phases (levels 1–100), making the front-loaded height explosion between levels 10–35 visually obvious, and the cap after level 70 clear.
Star spacing also derives from height so that stars never feel trivially close on large mazes:
int minStarDistance = Mathf.Max(1, height / 3);
Axis 2 — Cycle-Based Archetype Selection
Grid size controls how much space the player navigates; archetypes control what that space is filled with. An archetype is a
ScriptableObjectthat declares which hazard types should appear in a level and at what base weight:// LevelArchetypeData_SO.cs public class LevelArchetypeData_SO : ScriptableObject { public string archetypeName; [Serializable] public struct ModifierWeight { public GroundType groundType; // Ice, Piques, MovingPlatform … [Range(0f, 1f)] public float weight; // 0 = inactive, 1 = dominant } public ModifierWeight[] modifiers; public int maxActiveModifiers = 2; }Archetypes are organised into cycles — groups of
levelsPerCyclelevels that share the same set of allowed archetypes. ALevelCycleProgression_SOholds the ordered list of cycles that the designer composes in the Unity inspector:// LevelCycleProgression_SO.cs public class LevelCycleProgression_SO : ScriptableObject { public LevelArchetypeData_SO recoveryArchetype; public List<LevelCycleDefinition> cycles; } // LevelCycleDefinition.cs public class LevelCycleDefinition { public string cycleName; // e.g. "Precision Intro" public List<LevelArchetypeData_SO> allowedArchetypes; }The archetype for any level is selected deterministically from the cycle’s allowed list — no randomness here, because the designer needs to reason about what the player will encounter at each position within a cycle:
static LevelArchetypeData_SO SelectArchetype(
    LevelCycleProgression_SO progression,
    int cycleIndex, int cycleLevel, bool isRecovery)
{
    if (isRecovery) return progression.recoveryArchetype;

    int safeCycleIndex = Mathf.Clamp(cycleIndex, 0, progression.cycles.Count - 1);
    var cycle = progression.cycles[safeCycleIndex];

    // Rotate through the allowed archetypes by position within the cycle
    int archetypeIndex = cycleLevel % cycle.allowedArchetypes.Count;
    return cycle.allowedArchetypes[archetypeIndex];
}
cycleIndex = levelIndex / levelsPerCycle— the current cycle block.
cycleLevel = levelIndex % levelsPerCycle— the position within that block.Once the last defined cycle is reached,
safeCycleIndexclamps to it, so late-game levels keep drawing from the final cycle’s archetypes indefinitely.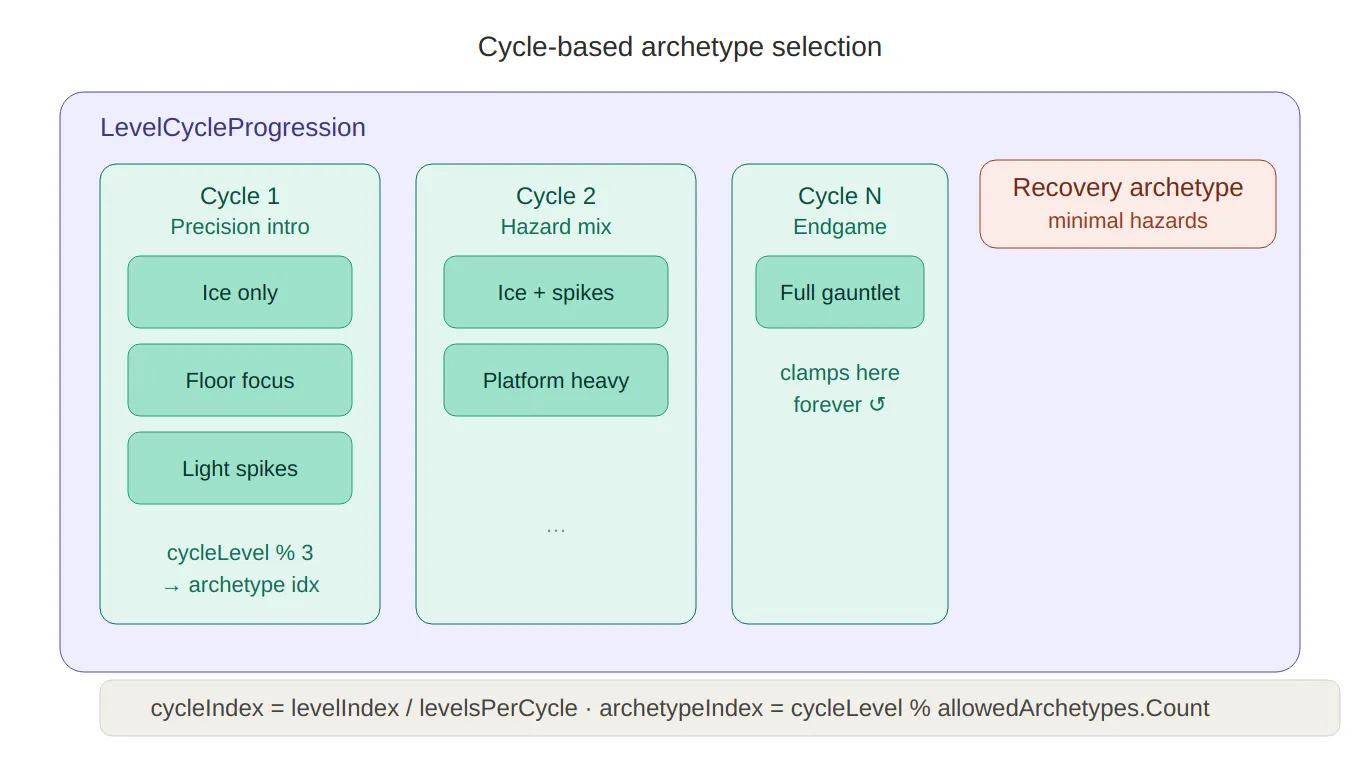
Cycle/archetype structure — a containment diagram showing LevelCycleProgression holding multiple cycles, each with its allowed archetypes, plus the recovery archetype sitting separately. The cycleLevel % count rotation logic is shown at the bottom.
Axis 3 — The Adaptive Difficulty Multiplier
The multiplier is what makes the system responsive. It is computed fresh every level from two independent signals: local stress (what happened this specific level) and global debt (accumulated pressure across the session).
Local Multiplier — Per-Level Stress
The local multiplier is derived from how many lives the player lost on the previous attempt and how many times they have failed the same level outright:
// RuntimeLevelParameters.cs
static float GetDifficultyMultiplier(int livesLost, int failedTimes)
{
    float multiplier = 1f;

    if      (livesLost >= 3) multiplier = 0.5f;   // game over → big relief
    else if (livesLost == 2) multiplier = 0.7f;   // moderate relief
    else if (livesLost == 1) multiplier = 0.85f;  // small nudge

    // Each failure shaves 5%, capped at 3 failures (−15%)
    int cappedFailures = Mathf.Min(failedTimes, 3);
    multiplier *= 1f - (0.05f * cappedFailures);

    return Mathf.Clamp(multiplier, 0.5f, 1f);
}
The failure penalty uses diminishing returns — the third failure has the same impact as the first, but you can never accumulate more than −15% from failures alone. This prevents the game from becoming trivially easy on a level the player keeps quitting immediately.
Global Debt — Cross-Session Pressure
The local multiplier resets every level. The global multiplier persists across multiple levels, carrying forward a difficulty debt that accumulates whenever the player loses lives:
// LevelManager.cs
void UpdateGlobalDifficulty(int livesLost)
{
    if (livesLost <= 0) return;

    float addedDebt = livesLost * 0.1f;  // 1 life = +0.1, 3 lives = +0.3

    globalDifficultyModifier.difficultyDebt =
        Mathf.Clamp01(globalDifficultyModifier.difficultyDebt + addedDebt);

    globalDifficultyModifier.remainingLevels = 4; // effect lasts 4 levels
}

void ConsumeGlobalDifficulty()
{
    if (globalDifficultyModifier.remainingLevels <= 0)
    {
        globalDifficultyModifier.difficultyDebt = 0f; // debt expires
        return;
    }
    globalDifficultyModifier.remainingLevels--;
}
The debt is then converted to a multiplier via a simple
Lerp:static float GetGlobalDifficultyMultiplier(float difficultyDebt) { float maxRelief = 0.8f; // global can reduce difficulty by at most 20% return Mathf.Lerp(1f, maxRelief, difficultyDebt); }A
difficultyDebtof0→ multiplier1.0(no effect).
AdifficultyDebtof1→ multiplier0.8(maximum 20% relief).The debt state is stored in a
GlobalDifficultyState_SOScriptableObject — a simple two-field container that lives in the project and survives scene loads:// GlobalDifficultyState_SO.cs public class GlobalDifficultyState_SO : ScriptableObject { public float difficultyDebt; // 0 → no easing, 1 → max easing public int remainingLevels; // how many more levels the debt persists }Combining Both Signals
The two multipliers multiply together to produce the final value passed into archetype application:
float localDifficultyModifier  = GetDifficultyMultiplier(livesLostThisLevel, failedTimes);
float globalDifficultyModifier = GetGlobalDifficultyMultiplier(globalDifficultyDebt);
float finalMultiplier          = localDifficultyModifier * globalDifficultyModifier;
At their minimum:
0.5 (local) × 0.8 (global) = 0.4— hazard weights reduced to 40% of their designed value.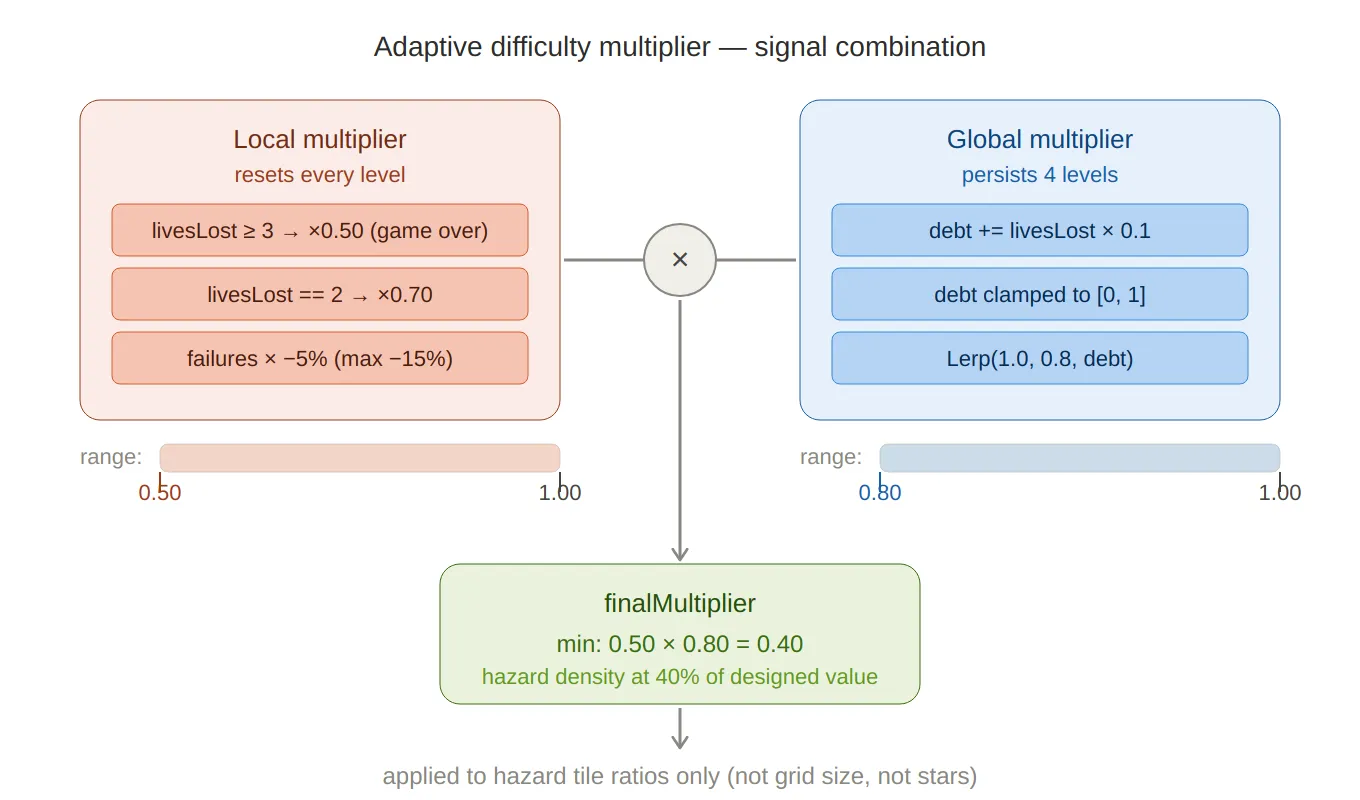
Multiplier combination — shows the two independent signals (local stress from lives lost, global debt accumulated over sessions), how they each produce a sub-multiplier in their own range, and how they multiply together to produce the final hazard density factor (minimum 0.40).
Applying the Multiplier — Archetype to Tile Ratios
The
finalMultiplieris not applied to the level size or star count — it only affects hazard tile ratios inside the activeTileDatabase_SO.ApplyArchetypeDatafirst zeros every hazard’s ratio, then re-weights only the ones listed in the archetype:static void ApplyArchetypeData( LevelArchetypeData_SO data, TileDatabase_SO tileDatabase, float cycleT, float difficultyModifier) { // Clear all ratios first foreach (var hazardTile in tileDatabase.HazardTiles) hazardTile.ratio = 0; if (data == null || data.modifiers == null) return; foreach (var modifier in data.modifiers) { // Scale: archetype weight × position within cycle × difficulty multiplier float scaled = Mathf.Clamp01(modifier.weight * cycleT * difficultyModifier); HazardTileDefinition_SO hazardTile = tileDatabase.GetHazardByGroundType(modifier.groundType); // Never exceed the tile's designer-set maximum ratio hazardTile.ratio = Mathf.Min(hazardTile.maxRatio, scaled * hazardTile.maxRatio); } }cycleTiscycleLevel / (levelsPerCycle - 1)— the normalised position within the current cycle (0 at the cycle’s first level, 1 at the last). This means hazards ramp up smoothly across each cycle and reset to zero at the start of the next, giving the player a sense of escalation and then relief.The
maxRatiocap on eachHazardTileDefinition_SOis the designer’s safety valve — no matter how the runtime modifies weights, a tile can never exceed the density that was playtested as acceptable.
Hazard Variety Unlocking
Beyond density, the number of distinct hazard types active at once also scales with level.
ApplyHazardVariationruns after archetype application and trims the active hazard set down to a target count, randomly disabling whichever ones are over the cap:static void ApplyHazardVariation(int levelIndex, TileDatabase_SO tileDatabase) { int lvl = levelIndex + 1; int targetActive; if (lvl < 40) targetActive = 1; else if (lvl < 70) targetActive = UnityEngine.Random.Range(1, 3); // 1–2 else if (lvl < 100) targetActive = UnityEngine.Random.Range(2, 4); // 2–3 else { float r = UnityEngine.Random.value; if (r < 0.6f) targetActive = 3; else if (r < 0.9f) targetActive = 2; else targetActive = 4; } var active = tileDatabase.HazardTiles .Where(h => h.ratio > 0).ToList(); int toDisable = active.Count - targetActive; for (int i = 0; i < toDisable; i++) { int idx = UnityEngine.Random.Range(0, active.Count); active[idx].ratio = 0; active.RemoveAt(idx); } }Early levels introduce hazards one at a time — the player learns each type in isolation before combinations appear. The endgame weighted distribution (
60% / 30% / 10%) keeps three hazard types as the norm while leaving room for the occasional four-hazard surprise.
Recovery Levels
When a player is under maximum stress — both local and global debt at their ceiling — the system can inject a recovery level: a deliberately gentle maze generated from a dedicated archetype with minimal or no hazards.
Recovery is gated behind two conditions being true simultaneously:
static bool HasMaxDifficultyRelief(int livesLost, int failedTimes, float globalDifficultyDebt)
{
    bool maxLocalRelief  = livesLost >= 3;       // game-over territory
    bool maxGlobalRelief = globalDifficultyDebt >= 1f; // debt is maxed out
    return maxLocalRelief && maxGlobalRelief;
}
Requiring both prevents a single bad level from immediately triggering recovery — the player has to be consistently struggling. When the condition holds, recovery levels appear at a frequency that itself decreases as cycles progress:
static bool IsRecoveryLevel(int cycleIndex, int cycleLevel, bool hasMaxRelief)
{
    if (!hasMaxRelief) return false;

    // Frequency shrinks as the player advances: 6 → 5 → 4 → 3 (minimum)
    int recoveryFrequency = Mathf.Clamp(6 - cycleIndex, 3, 6);
    return (cycleLevel % recoveryFrequency) == recoveryFrequency - 1;
}
In early cycles a recovery level can appear every 6 levels; by cycle 3+ the minimum is every 3 levels. This ensures a struggling late-game player gets more frequent relief than a struggling early-game one — because late-game levels are objectively harder.
How It All Connects
Every piece feeds into
LevelManager.GenerateRuntimeLevel:// LevelManager.cs private Grid GenerateRuntimeLevel(int levelIndex, LevelDatabase_SO database, GeneratorParameters_SO baseParameters, out int usedSeed) { // Pre-authored levels take priority LevelData_SO existing = database.GetLevelDataAtIndex(levelIndex); if (existing != null) { usedSeed = existing.usedSeed; return existing.ToGrid(); } // Compute all runtime parameters RuntimeLevelParameters runtimeParams = RuntimeLevelProgression.GetParametersForLevel( levelIndex, tileDatabase_SO, levelCycleProgression_SO, levelsPerCycle, previousLivesLostToThisLevel, // from previous attempt failedTimes, // total failures on this level globalDifficultyModifier.difficultyDebt // cross-session debt ); // Patch the base ScriptableObject with runtime values baseParameters.gridWidth = runtimeParams.width; baseParameters.gridHeight = runtimeParams.height; baseParameters.tileDatabase_SO = runtimeParams.tileDatabase_SO; baseParameters.minStarDistance = runtimeParams.minStarDistance; baseParameters.inputSeed = -1; // force random seed return PxP.PCG.Generator.GenerateMaze(levelIndex, baseParameters, out usedSeed); }After a level ends,
ProcessLevelDataandMarkLevelAsFailedupdate the debt for the next call:// On level complete: ConsumeGlobalDifficulty(); // decrement remaining debt levels UpdateGlobalDifficulty(livesLostThisLevel); // add new debt if lives were lost // On level failed: UpdateGlobalDifficulty(currentLivesLostToThisLevel); currentLevelData.failedTimes++;The debt is stored in a
ScriptableObject, so it persists across scene loads without needing any explicit serialisation on level transition.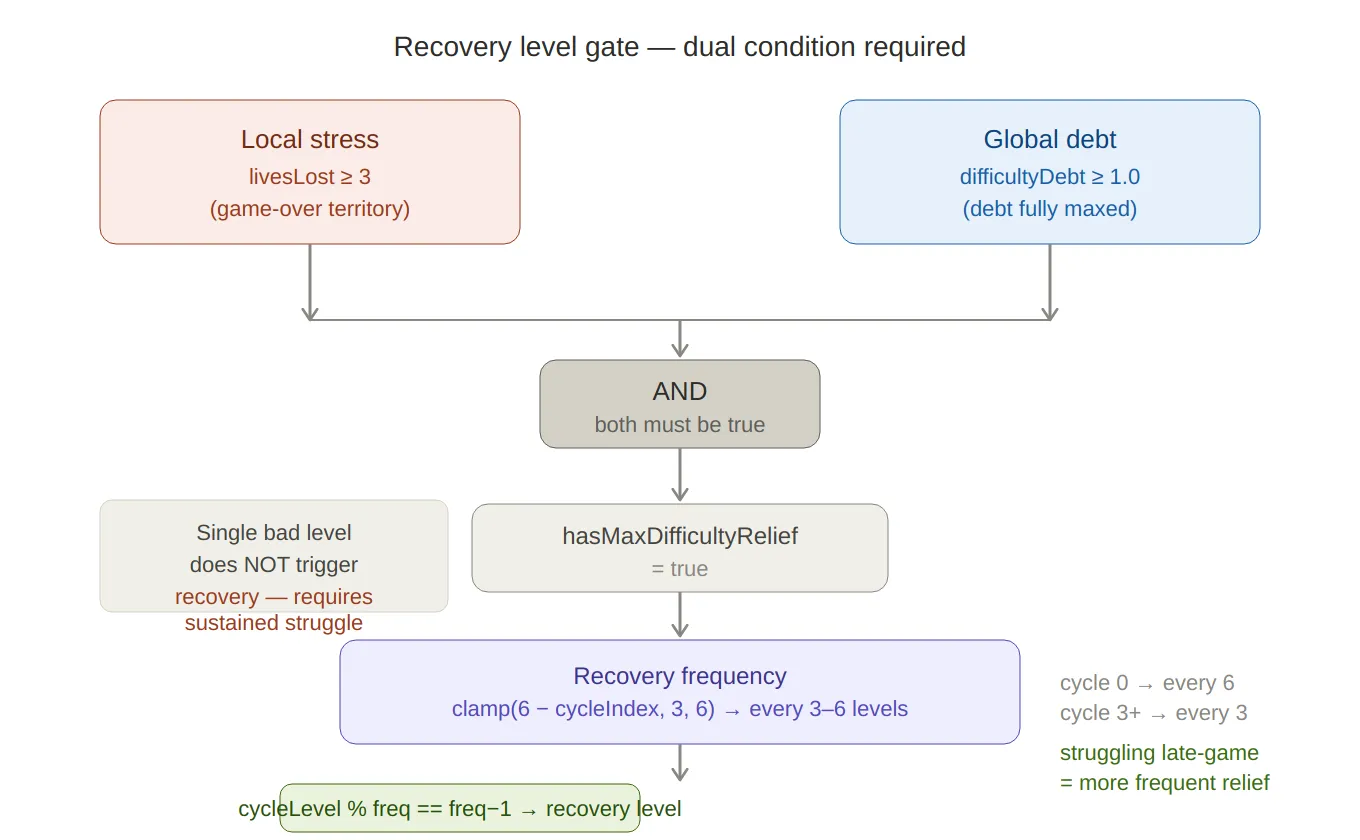
Recovery level gate — a flowchart showing the AND condition (both local stress AND global debt must be maxed), the frequency formula clamp(6 − cycleIndex, 3, 6), and the note that later cycles trigger recovery more often — because later levels are objectively harder.
Telemetry
Every level generates a
LevelTelemetryEventthat logs the archetype, dominant modifier, outcome, and duration to Firebase. This data was essential for validating the difficulty curve during playtesting — particularly for confirming that recovery levels were triggering at the right frequency and that debt was decaying at a reasonable pace.// LevelTelemetryEvent.cs public struct LevelTelemetryEvent { public int levelIndex; public int cycleIndex; public string archetypeName; public string dominantModifier; // which GroundType dominated this level public string result; // "success" / "fail" / "quit" public int attemptNumber; public float duration; }
Summary
Component Role RuntimeLevelProgressionStateless calculator — takes performance data, returns parameters GlobalDifficultyState_SOPersistent debt store (ScriptableObject, survives scene loads) LevelArchetypeData_SODesigner-authored hazard composition per archetype LevelCycleProgression_SOOrdered sequence of cycles with their allowed archetypes LevelManagerOwns player performance state, accumulates debt, drives generation HazardTileDefinition_SO.maxRatioPer-tile safety cap — playtested ceiling the runtime never exceeds Key design decisions:
RuntimeLevelProgressionis a static, stateless class. It receives all the inputs it needs and returns a struct. No singleton, no side effects — easy to unit test, easy to call from an editor window.- Debt lives in a ScriptableObject. This sidesteps serialisation ceremony on scene transition and makes it inspectable in the editor during playtesting.
- Local and global signals multiply, not add. Additive relief could stack into a combined value below the intended floor; multiplication keeps both signals proportional and the output bounded without extra clamping logic.
- Recovery requires both signals at maximum. A single bad level doesn’t trigger a recovery; the player has to be genuinely struggling across multiple levels before the system steps in.
Created on February 2026 -
MarbleMaze: Deep Dive — Procedural Maze Generation with Kruskal's Algorithm
This is a deep dive into the procedural level generator behind MarbleMaze: Galactic Stars. Every level the player encounters is generated at runtime — no hand-crafted layouts, no level files. Each one is unique, yet fully reproducible from a single integer seed.
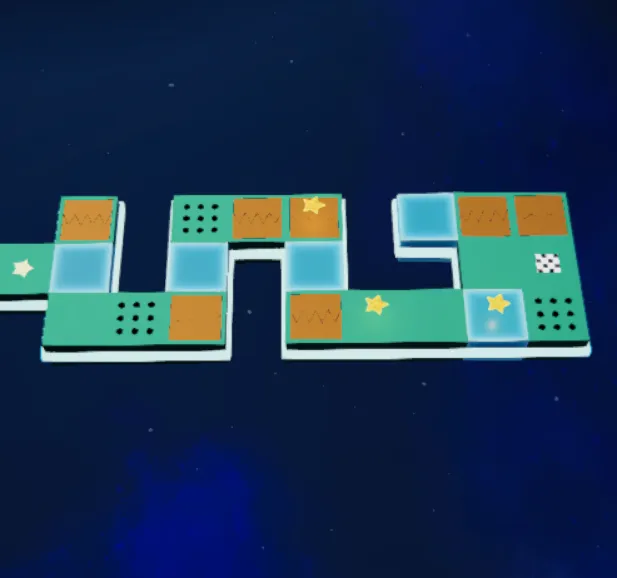 The four steps established for this generation are all described in this post.Read the full process below…
The Goal
The generator needs to produce a perfect maze — a grid of cells connected by passages where every cell is reachable and there are no loops. On top of that, it needs to:
- Place hazard tiles (ice, spikes, doors, moving platforms) in a way that feels hand-crafted
- Guarantee start and end positions
- Scatter collectible stars at meaningful distances from each other
- Do all of this deterministically from a single seed (the level index), so the same level always looks the same
The whole pipeline runs in four sequential steps, orchestrated by a single static entry point:
// Generator.cs
public static Grid GenerateMaze(int levelIndex, GeneratorParameters_SO p, out int usedSeed)
{
    usedSeed = levelIndex == -1
        ? (p.inputSeed == -1 ? Random.Range(int.MinValue, int.MaxValue) : p.inputSeed)
        : levelIndex;

    var rng = new System.Random(usedSeed);

    Grid grid = GridFactory.CreateWallGrid(p.gridWidth, p.gridHeight);

    // 1. Perfect maze
    var carved = MazeGenerator.GenerateKruskalMaze(p.gridWidth, p.gridHeight, rng);

    // 2. Start / End
    var start = GridUtils.GetStartPosition(grid, p);
    var end   = GridUtils.ResolveEndPosition(grid, p, rng);
    GridUtils.MarkStartAndEnd(grid, start, end);

    // 3. Tile rules
    MazeGenerator.ApplyMaze(grid, carved, p, rng);

    // 4. Stars
    StarPlacer.PlaceStars(grid, p, carved, start, end, rng);

    return grid;
}
Passing
levelIndexdirectly as the seed is the simplest possible reproducibility guarantee — regenerating level 42 will always produce the same maze.
Step 0 — The Grid & CellData
Before anything is generated,
GridFactory.CreateWallGridinitialises the grid with every cell marked as empty (a wall). Generation then works by carving passages through it.// GridFactory.cs public static Grid CreateWallGrid(int width, int height) { Grid grid = new Grid(width, height); for (int x = 0; x < width; x++) for (int y = 0; y < height; y++) grid.SetCell(x, y, new CellData { isEmpty = true, ground = GroundType.Floor }); return grid; }Each cell in the grid is a
CellDatastruct — a value type stored directly in a 2D array. No heap allocations during traversal, no GC pressure on mobile:// CoreData.cs [System.Serializable] public struct CellData { public bool isEmpty; // true = wall, false = walkable public GroundType ground; // Floor, Ice, Piques, MovingPlatform … public OverlayType overlay; // None, Start, End, Star public bool isEnd; public bool isHorizontal; // orientation flag for line hazards public bool requiresTwoSolidNeighbours; }The
Gridclass wrapsCellData[,]and exposes two accessor styles.GetCellreturns a copy (safe for reading), whileGetCellRefreturns arefto the struct for in-place mutation without boxing or a round-trip copy:public ref CellData GetCellRef(int x, int y) => ref cells[x, y];This pattern appears everywhere in the generator — every tile rule modifies cells through
refaccessors to keep the pipeline allocation-free.
Step 1 — Kruskal’s Algorithm for Perfect Mazes
Kruskal’s algorithm builds a minimum spanning tree of a graph. Applied to a grid, it builds a spanning tree of all cells — which is exactly what a perfect maze is: every cell connected, no loops, exactly one path between any two points.
The Even-Cell Trick
A key implementation detail: cells only live at even coordinates. A 10×10 grid has cells at
(0,0),(0,2),(2,0),(2,2)… and so on. The odd coordinates are the walls between cells.When two cells are connected by removing the wall between them, three positions become walkable:
- cell A (even, even)
- cell B (even, even)
- the wall between them — the midpoint
(A + B) / 2
This is the standard “cell + passage” encoding for grid mazes.
// MazeGenerator.cs public static HashSet<Vector2Int> GenerateKruskalMaze(int width, int height, System.Random rng) { // 1. Collect cells at even coordinates only var cells = new List<Vector2Int>(); for (int x = 0; x < width; x += 2) for (int y = 0; y < height; y += 2) cells.Add(new Vector2Int(x, y)); // 2. Build the edge list (connections between adjacent cells, 2 apart) var edges = new List<Edge>(); foreach (var c in cells) { TryAddEdge(c, Vector2Int.right * 2); TryAddEdge(c, Vector2Int.up * 2); } // 3. Shuffle edges for randomness GridUtils.Shuffle(edges, rng); // 4. Kruskal: union cells, carve passages for accepted edges var uf = new UnionFind<Vector2Int>(cells); var carved = new HashSet<Vector2Int>(); foreach (var e in edges) { if (!uf.Union(e.a, e.b)) continue; // already connected — skip carved.Add(e.a); // cell A carved.Add(e.b); // cell B carved.Add((e.a + e.b) / 2); // wall between them } return carved; }Unionreturnsfalsewhen the two cells already share a root — meaning connecting them would create a loop. By skipping those edges, Kruskal’s guarantees the result is loop-free.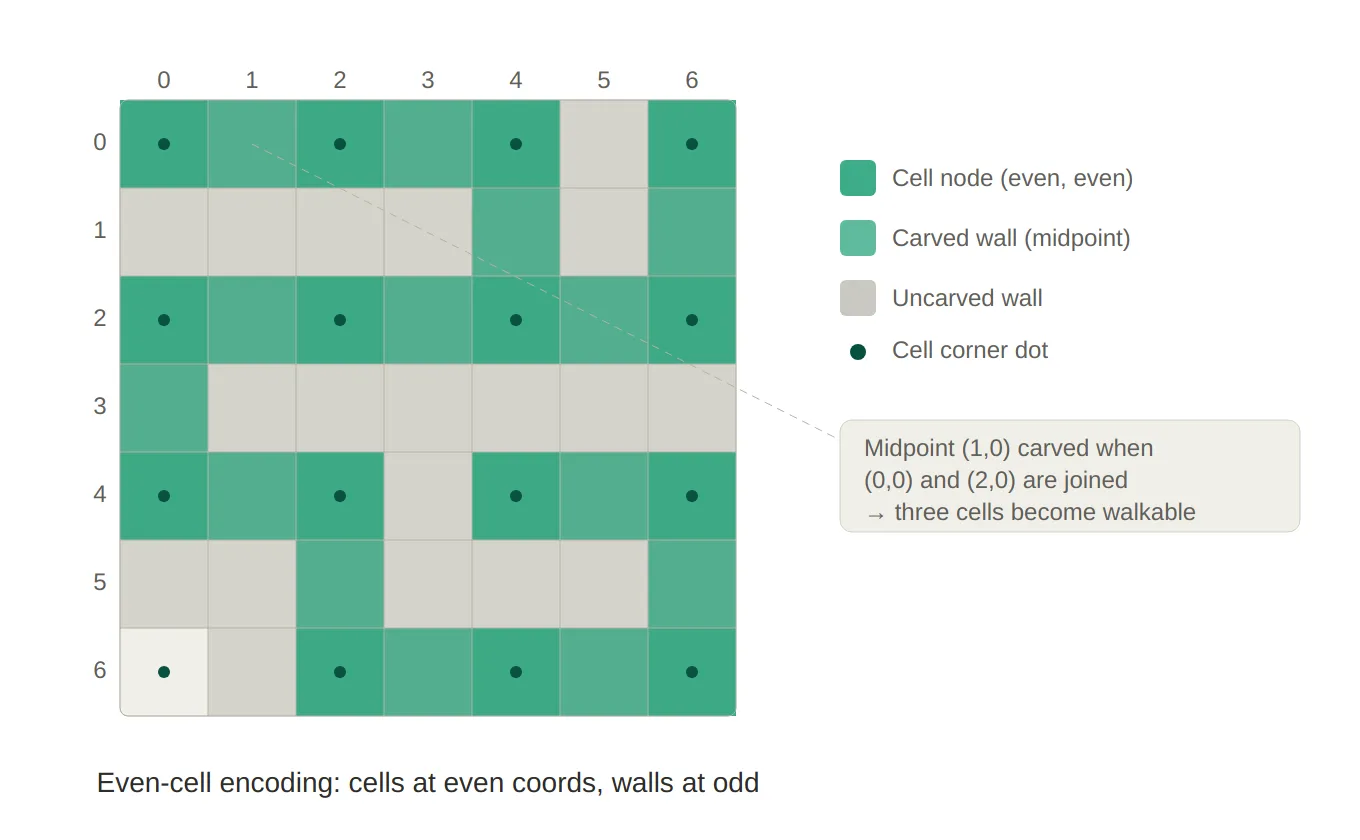
Grid & Kruskal’s — The even-cell encoding is shown as a 7×7 coordinate grid. Cell nodes sit at even coordinates (marked with dots), walls at odd ones. The teal path traces a sample spanning tree carved by the algorithm — notice how every connected passage lights up three tiles: cell A, cell B, and the midpoint wall between them.
Step 2 — Union-Find Data Structure
The correctness of Kruskal’s depends entirely on efficiently answering one question: “Are these two cells already connected?”
This is exactly the Union-Find (or Disjoint Set Union) data structure. I implemented it as a generic class so it can work with any comparable type —
Vector2Intin this case:// UnionFind.cs public class UnionFind<T> { private readonly Dictionary<T, T> parent; private readonly Dictionary<T, int> rank; public UnionFind(IEnumerable<T> nodes) { parent = new Dictionary<T, T>(); rank = new Dictionary<T, int>(); foreach (var n in nodes) { parent[n] = n; // each node is its own root initially rank[n] = 0; } } public T Find(T x) { if (!parent[x].Equals(x)) parent[x] = Find(parent[x]); // path compression return parent[x]; } public bool Union(T a, T b) { T rootA = Find(a); T rootB = Find(b); if (rootA.Equals(rootB)) return false; // same tree — would create a cycle // Union by rank: attach the shorter tree under the taller one if (rank[rootA] < rank[rootB]) parent[rootA] = rootB; else if (rank[rootA] > rank[rootB]) parent[rootB] = rootA; else { parent[rootB] = rootA; rank[rootA]++; } return true; } }Two classical optimisations are in play:
Path compression (in
Find): after traversing up to the root, every node along the path is re-pointed directly at the root. Future lookups on the same node take O(1).Union by rank (in
Union): the tree with the smaller depth is attached under the taller one, keeping trees balanced and preventing worst-case O(n) chains.Together these give O(α(n)) amortised per operation, where α is the inverse Ackermann function — effectively constant for any input size you’d encounter in practice.
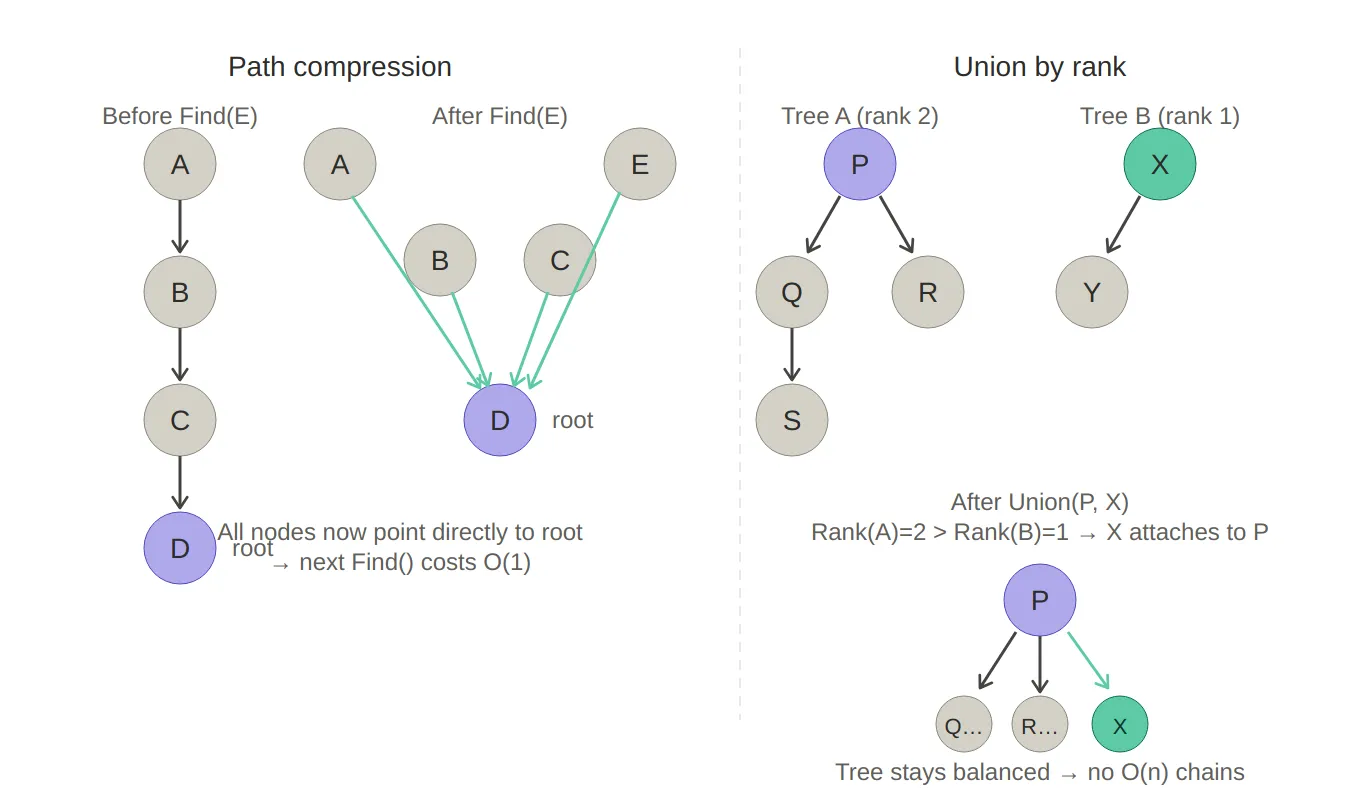
Union-Find — The left side shows path compression in action: a 4-deep chain (A→B→C→D) collapses to a flat star shape after a single Find(E), so every subsequent lookup is O(1). The right side shows union by rank: Tree B (rank 1) is attached under Tree A (rank 2) rather than the other way around, keeping the merged tree balanced.
Step 3 — Tile Decoration (3-Pass System)
The carved
HashSet<Vector2Int>from Kruskal’s only tells us which cells are walkable — it says nothing about what kind of floor tile each cell should be.MazeGenerator.ApplyMazeruns three passes in sequence, each adding a layer of tile variety with progressively stricter context requirements.Pass 1 — Base Tiles
Every carved cell gets a ground type via weighted random selection from the active hazard list. The weights are normalised at runtime so the ratios sum to at most 1.0 — any remainder becomes plain
Floor:private static void ApplyBaseTiles(Grid grid, HashSet<Vector2Int> carved, TileDatabase_SO db, System.Random rng) { var hazards = db.SimpleHazards.ToList(); foreach (var pos in carved) { ref var cell = ref grid.GetCellRef(pos); if (cell.overlay != OverlayType.None) continue; // don't overwrite Start/End cell.isEmpty = false; float total = hazards.Sum(h => h.ratio); float scale = Mathf.Min(1f, total) / total; // normalise to ≤ 1.0 double roll = rng.NextDouble(); float cumulative = 0f; foreach (var h in hazards) { cumulative += h.ratio * scale; if (roll < cumulative) { cell.ground = h.groundType; break; } } } }Pass 2 — Two-Solid-Neighbour Tiles
Some hazards (e.g. wall spikes) only make sense when the cell has at least two solid (non-empty) neighbours — otherwise they’d appear floating in mid-air. This pass collects all eligible candidates, shuffles them, then fills up to a ratio target:
private static bool IsValidTwoSolidPlacement(Grid grid, Vector2Int pos)
{
    int solidNeighbours = 0;
    foreach (var d in Directions4)
    {
        var n = pos + d;
        if (!grid.IsInside(n)) continue;
        var neighbor = grid.GetCell(n.x, n.y);

        // Reject if a neighbour is already a two-solid tile — prevents clustering
        if (neighbor.requiresTwoSolidNeighbours) return false;

        if (!neighbor.isEmpty) solidNeighbours++;
    }
    return solidNeighbours >= 2;
}
The anti-clustering check (
requiresTwoSolidNeighbours) prevents two of these tiles from sitting next to each other, which would look and play poorly.Pass 3 — Line Tiles (3-cell Hazards)
The last pass places 3-cell hazards (e.g. a moving platform with two edge pieces). These require three consecutive walkable cells in a row or column:
// Collect valid center positions for horizontal and vertical lines
if (x-1 >= 0 && x+1 < grid.Width &&
    IsWalkable(grid, x-1, y) && IsWalkable(grid, x, y) && IsWalkable(grid, x+1, y))
    candidates.Add((new Vector2Int(x, y), horizontal: true));
After placement, all three cells are recorded in a
bool[,] reservedarray to prevent overlapping lines from the same or subsequent passes:private static void ApplyLine(Grid grid, bool[,] reserved, (Vector2Int center, bool horizontal) c, HazardTileDefinition_SO hazard) { // Center cell gets the primary ground type ref var centerCell = ref grid.GetCellRef(c.center); centerCell.ground = hazard.groundType; centerCell.isHorizontal = c.horizontal; // Side cells get a different "edge" type (e.g. platform endcap) if (c.horizontal) { SetSide(grid, c.center.x - 1, c.center.y, hazard); SetSide(grid, c.center.x + 1, c.center.y, hazard); Reserve(reserved, c.center.x - 1, c.center.y, c.center.x, c.center.y, c.center.x + 1, c.center.y); } // ... vertical case mirrors this }This three-pass design — base → context-aware → structural — mirrors how a level designer would layer detail: first paint the floor, then add wall-hugging elements, then place the large set-pieces.
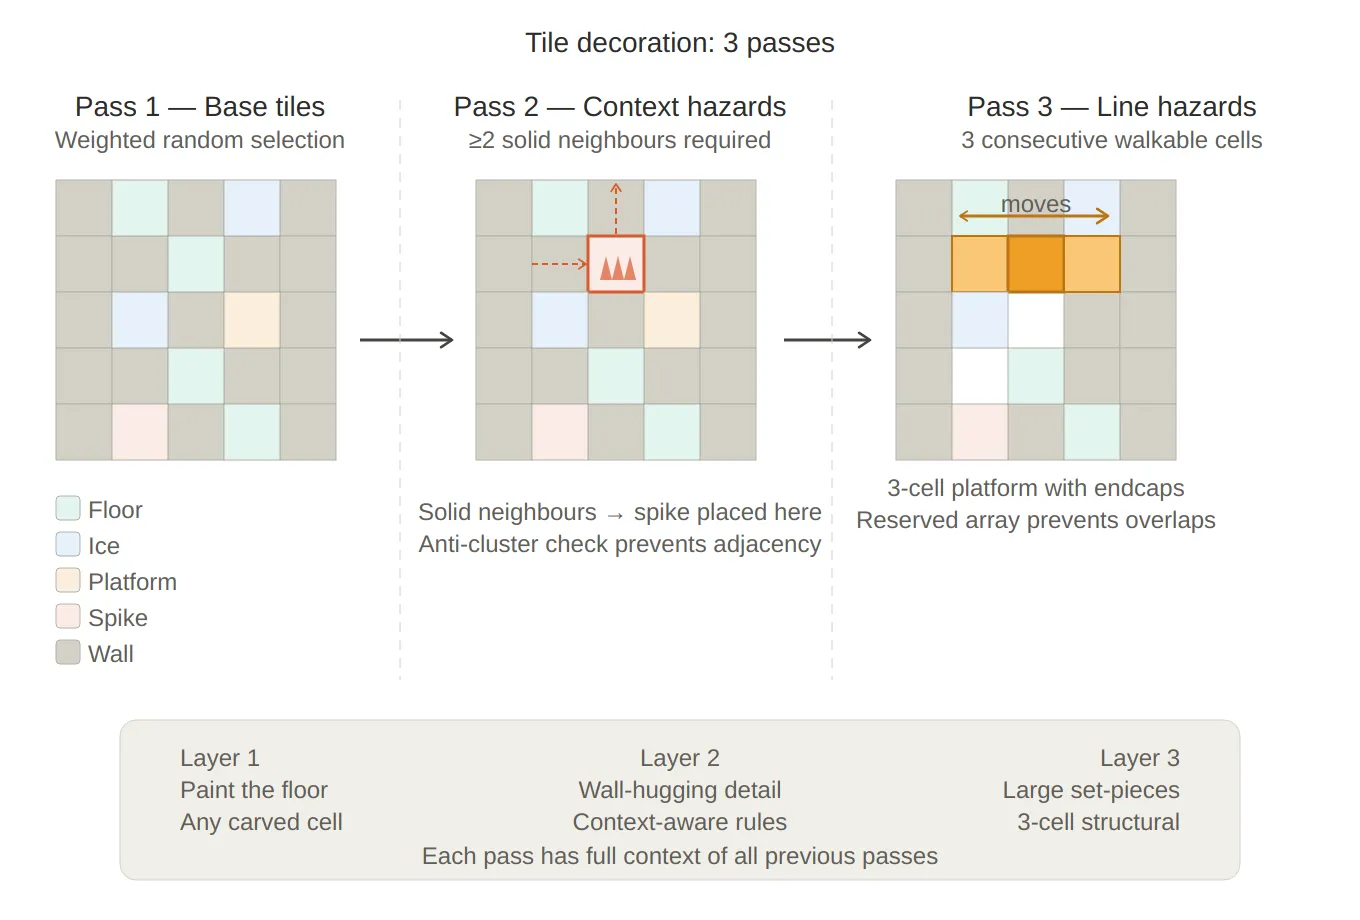
3-pass decoration — Each panel shows the same maze at a different stage. Pass 1 lays down random floor types. Pass 2 uses the neighbour context (the red arrows) to place a spike tile that has ≥2 solid neighbours. Pass 3 places a 3-cell moving platform across three consecutive walkable cells, with a reserved array preventing overlaps.
Step 4 — Star Placement
Stars use a two-pass placement strategy to balance the ideal spacing constraint against the reality that small or heavily decorated mazes might not have enough spread-out candidates.
public static void PlaceStars(Grid grid, GeneratorParameters_SO p,
    HashSet<Vector2Int> walkable, Vector2Int start, Vector2Int end, System.Random rng)
{
    var placed     = new List<Vector2Int>();
    var candidates = walkable.Where(c => c != start && c != end).ToList();
    GridUtils.Shuffle(candidates, rng);

    // Pass 1: strict — enforce minStarDistance between all placed stars
    foreach (var pos in candidates)
    {
        if (placed.Count >= p.starCount) break;
        if (grid.GetCell(pos.x, pos.y).overlay != OverlayType.None) continue;
        if (grid.GetCell(pos.x, pos.y).isEmpty) continue;
        if (grid.GetCell(pos.x, pos.y).requiresTwoSolidNeighbours) continue;
        if (placed.Any(s => Vector2Int.Distance(s, pos) < p.minStarDistance)) continue;

        grid.GetCellRef(pos.x, pos.y).overlay = OverlayType.Star;
        placed.Add(pos);
    }

    // Pass 2: relaxed — drop the distance constraint to fill the quota
    if (placed.Count < p.starCount)
    {
        foreach (var pos in candidates)
        {
            if (placed.Count >= p.starCount) break;
            if (grid.GetCellRef(pos.x, pos.y).overlay != OverlayType.None) continue;
            if (grid.GetCell(pos.x, pos.y).isEmpty) continue;
            if (grid.GetCell(pos.x, pos.y).requiresTwoSolidNeighbours) continue;
            if (placed.Contains(pos)) continue;

            grid.GetCellRef(pos.x, pos.y).overlay = OverlayType.Star;
            placed.Add(pos);
        }
    }
}
Stars also refuse to land on two-solid-neighbour tiles — those are already decorated with context-dependent hazards and would be confusing to navigate.
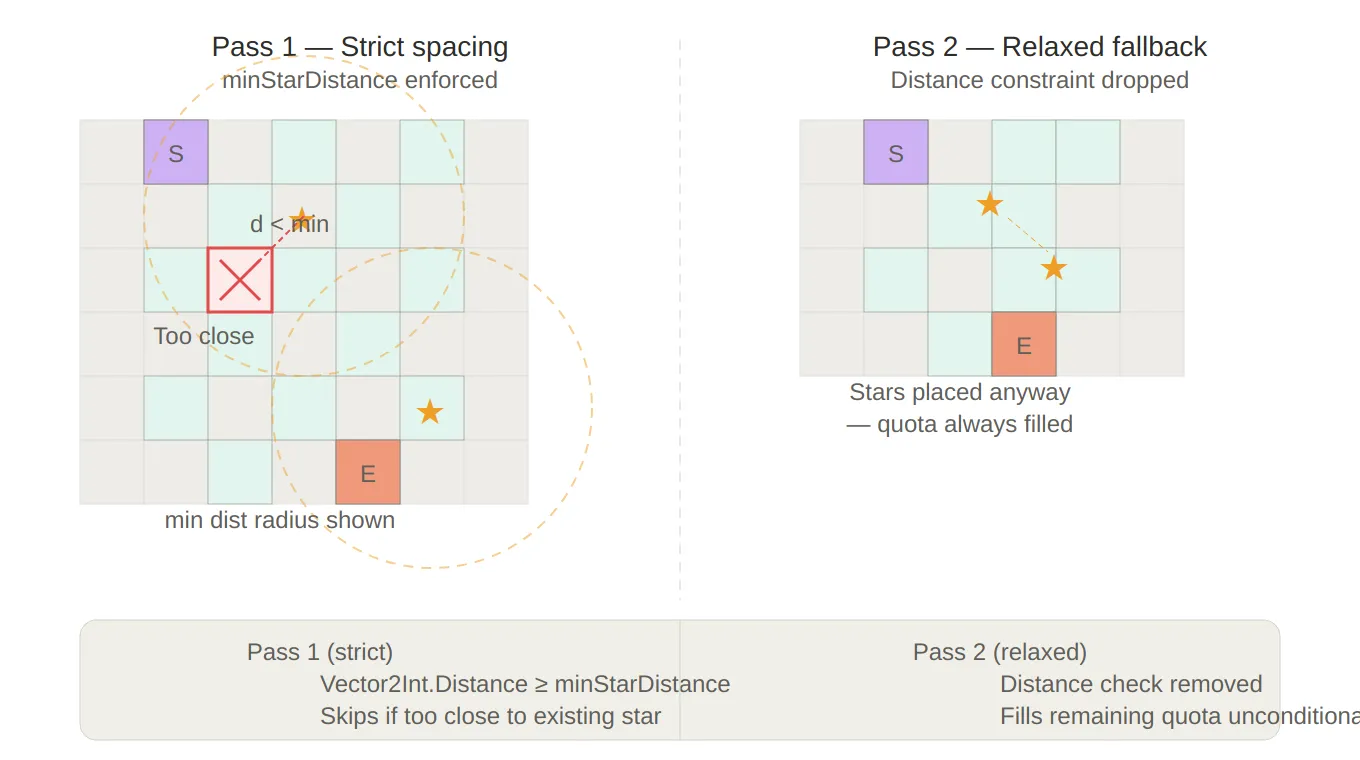
Star placement — Pass 1 shows the minimum-distance exclusion circles around each placed star, with a rejected candidate (red ✕) that falls inside one. Pass 2 shows a small maze where no spread-out candidates remain, so the quota is filled anyway by placing stars close together — guaranteeing the level never breaks.
Configuration: The GeneratorParameters_SO
All generation parameters live in a
ScriptableObject, making them adjustable in the Unity inspector without touching code:public class GeneratorParameters_SO : ScriptableObject { public int gridWidth = 10; public int gridHeight = 10; public bool randomEnd = true; public int endMaxHeightPercent = 20; // end stays in the bottom 20% of the grid public int inputSeed = -1; // -1 = random; set for fixed test levels public TileDatabase_SO tileDatabase_SO; [Range(0, 20)] public int starCount = 3; [Range(1, 10)] public int minStarDistance = 2; }The
RuntimeLevelProgressionsystem modifies these parameters before each level — growing the grid size, adjusting hazard ratios, and changing star count as the player advances. That system is covered in its own deep-dive.
Summary
The summary of the system is the following:
Component Role GridFactoryInitialises an all-wall grid UnionFind<T>Cycle detection for Kruskal’s; path compression + union by rank MazeGenerator.GenerateKruskalMazeBuilds the carved passage set MazeGenerator.ApplyMaze3-pass tile decoration GridUtilsStart/end placement, shuffle, safety queries StarPlacer2-pass star placement with distance fallback GeneratorPipeline entry point, seed management GeneratorParameters_SODesigner-configurable generation settings The key design choices that hold everything together:
- Seeded
System.Randomrather thanUnityEngine.Random— deterministic, no global state - Struct-based
CellDatain a 2D array — allocation-free pipeline, no GC spikes on mobile refaccessors — in-place mutation without boxing- 3-pass decoration — each pass has access to the output of the previous, enabling context-aware rules
- 2-pass star placement — strict constraint with a guaranteed fallback prevents levels from breaking on small grids
Created on February 2026 -
Occlusion Cutout Effect - AlchemisTeddy 🧪🐻
After experimenting with a stencil-based see-through effect Unity Tips – Creating a Stencil See-Through Effect in Unity 6, I quickly noticed limitations. In scenarios such as tight tunnels or parallel wall intersections, the stencil solution introduced artifacts and did not feel robust.
For a second attempt, I drew inspiration from Baldur’s Gate III’s beautiful occlusion cutout system.
Luckily, Mojang’s Senior Technical Artist Brendan “Sully” Sullivan had already broken down the technique in Unreal Engine 80.lv article, which served as a strong reference.
The challenge was now clear: How do we reproduce this effect inside Unity?
The full process is described below…Created on September 2025 -
Unity Tips - Creating native DLLs in C++
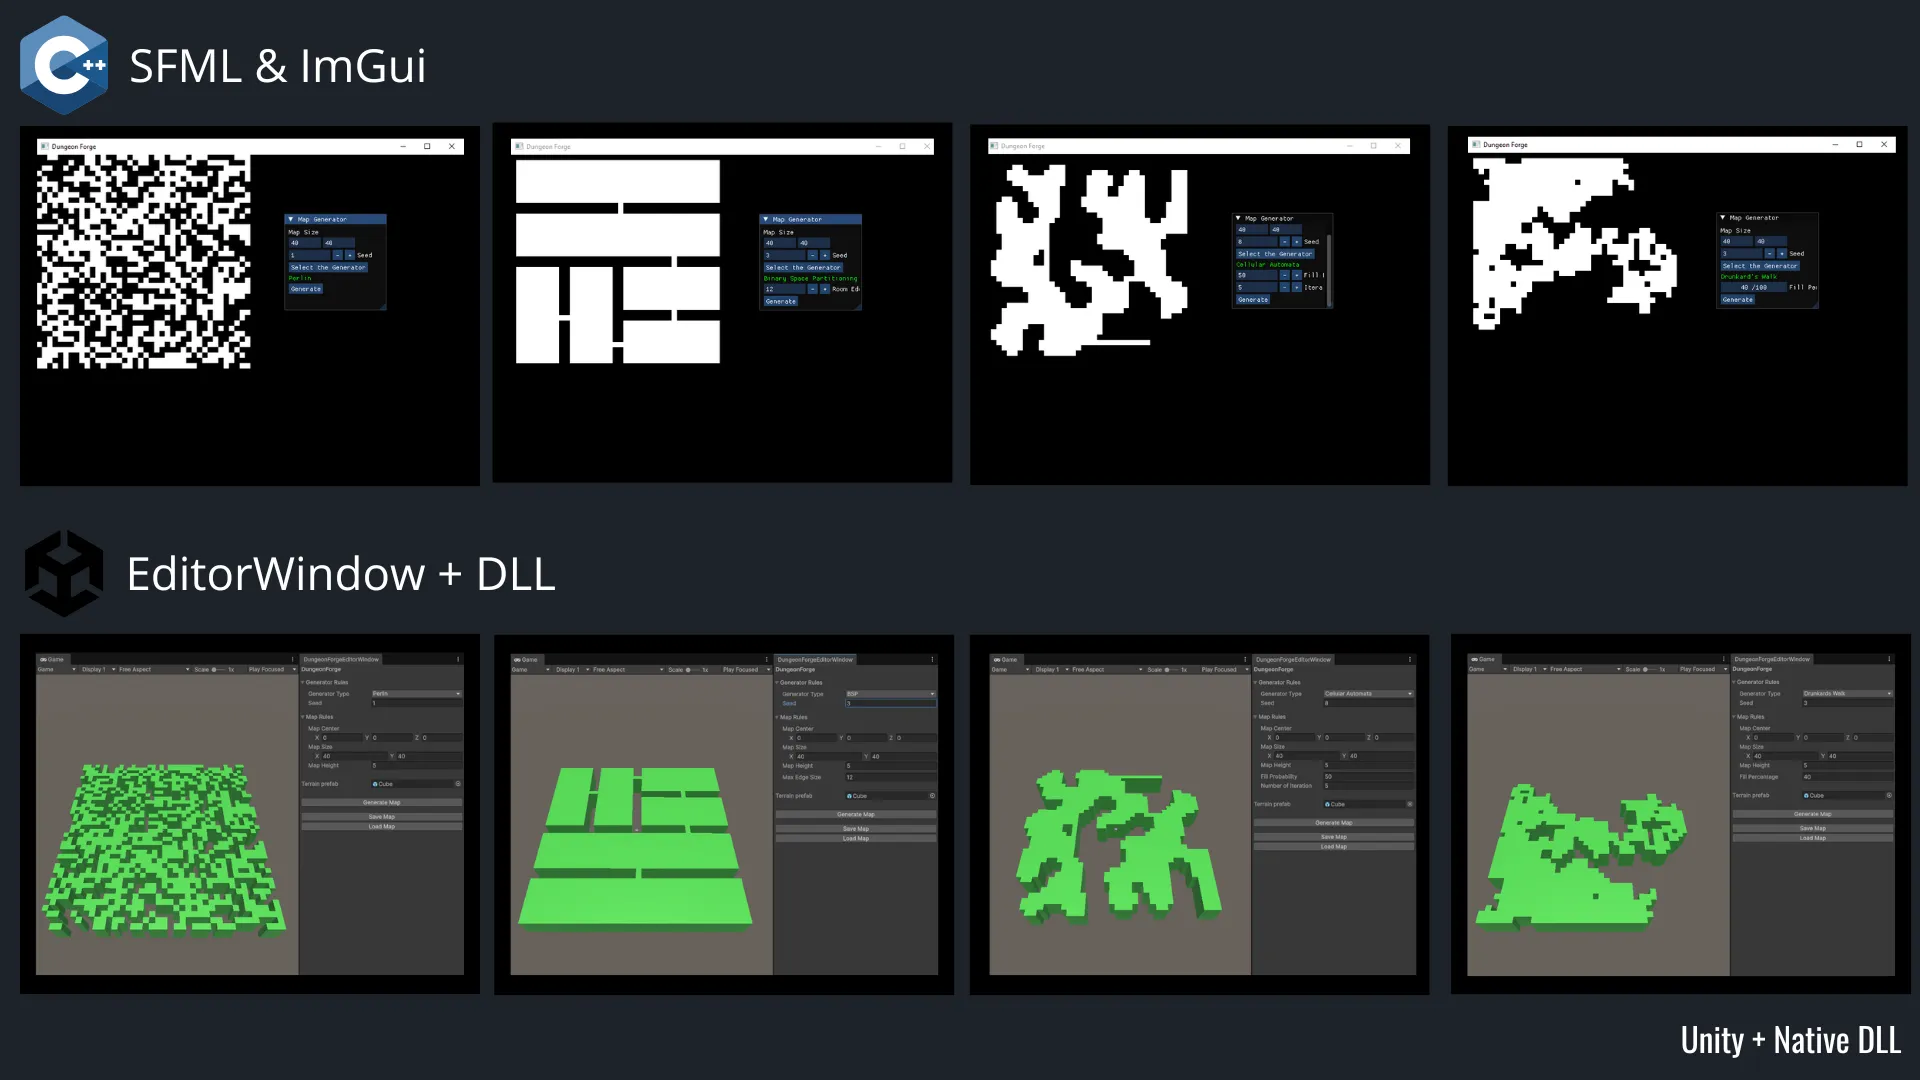
During my time at Lab4Tech, I prepared for several certifications including:
To apply what I was training for, I initiated a side project that would bridge
C++andC#in Unity.
This led me to develop a native DLL for Unity focused on procedural generation; a subject I had already explored in depth.Created on September 2025 -
Unity Character System - AlchemisTeddy
When building a character-driven game, the core systems that govern player interaction are probably the most important part of the experience.
They define the entire feel of the game.In this technical deep dive, we’ll deconstruct a well-structured, component-based character architecture built in Unity.
We’ll analyze how it leverages a point-and-click NavMeshAgent for movement, a custom camera controller, an event-driven input system, and a robust, interface-based framework for interactions and persistence.Let’s begin by dissecting the core components that define the player’s immediate experience starting with the
3Cs (Character, Camera, Controls).Created on September 2025 -
Lab - AlchemisTeddy 🧪🐻
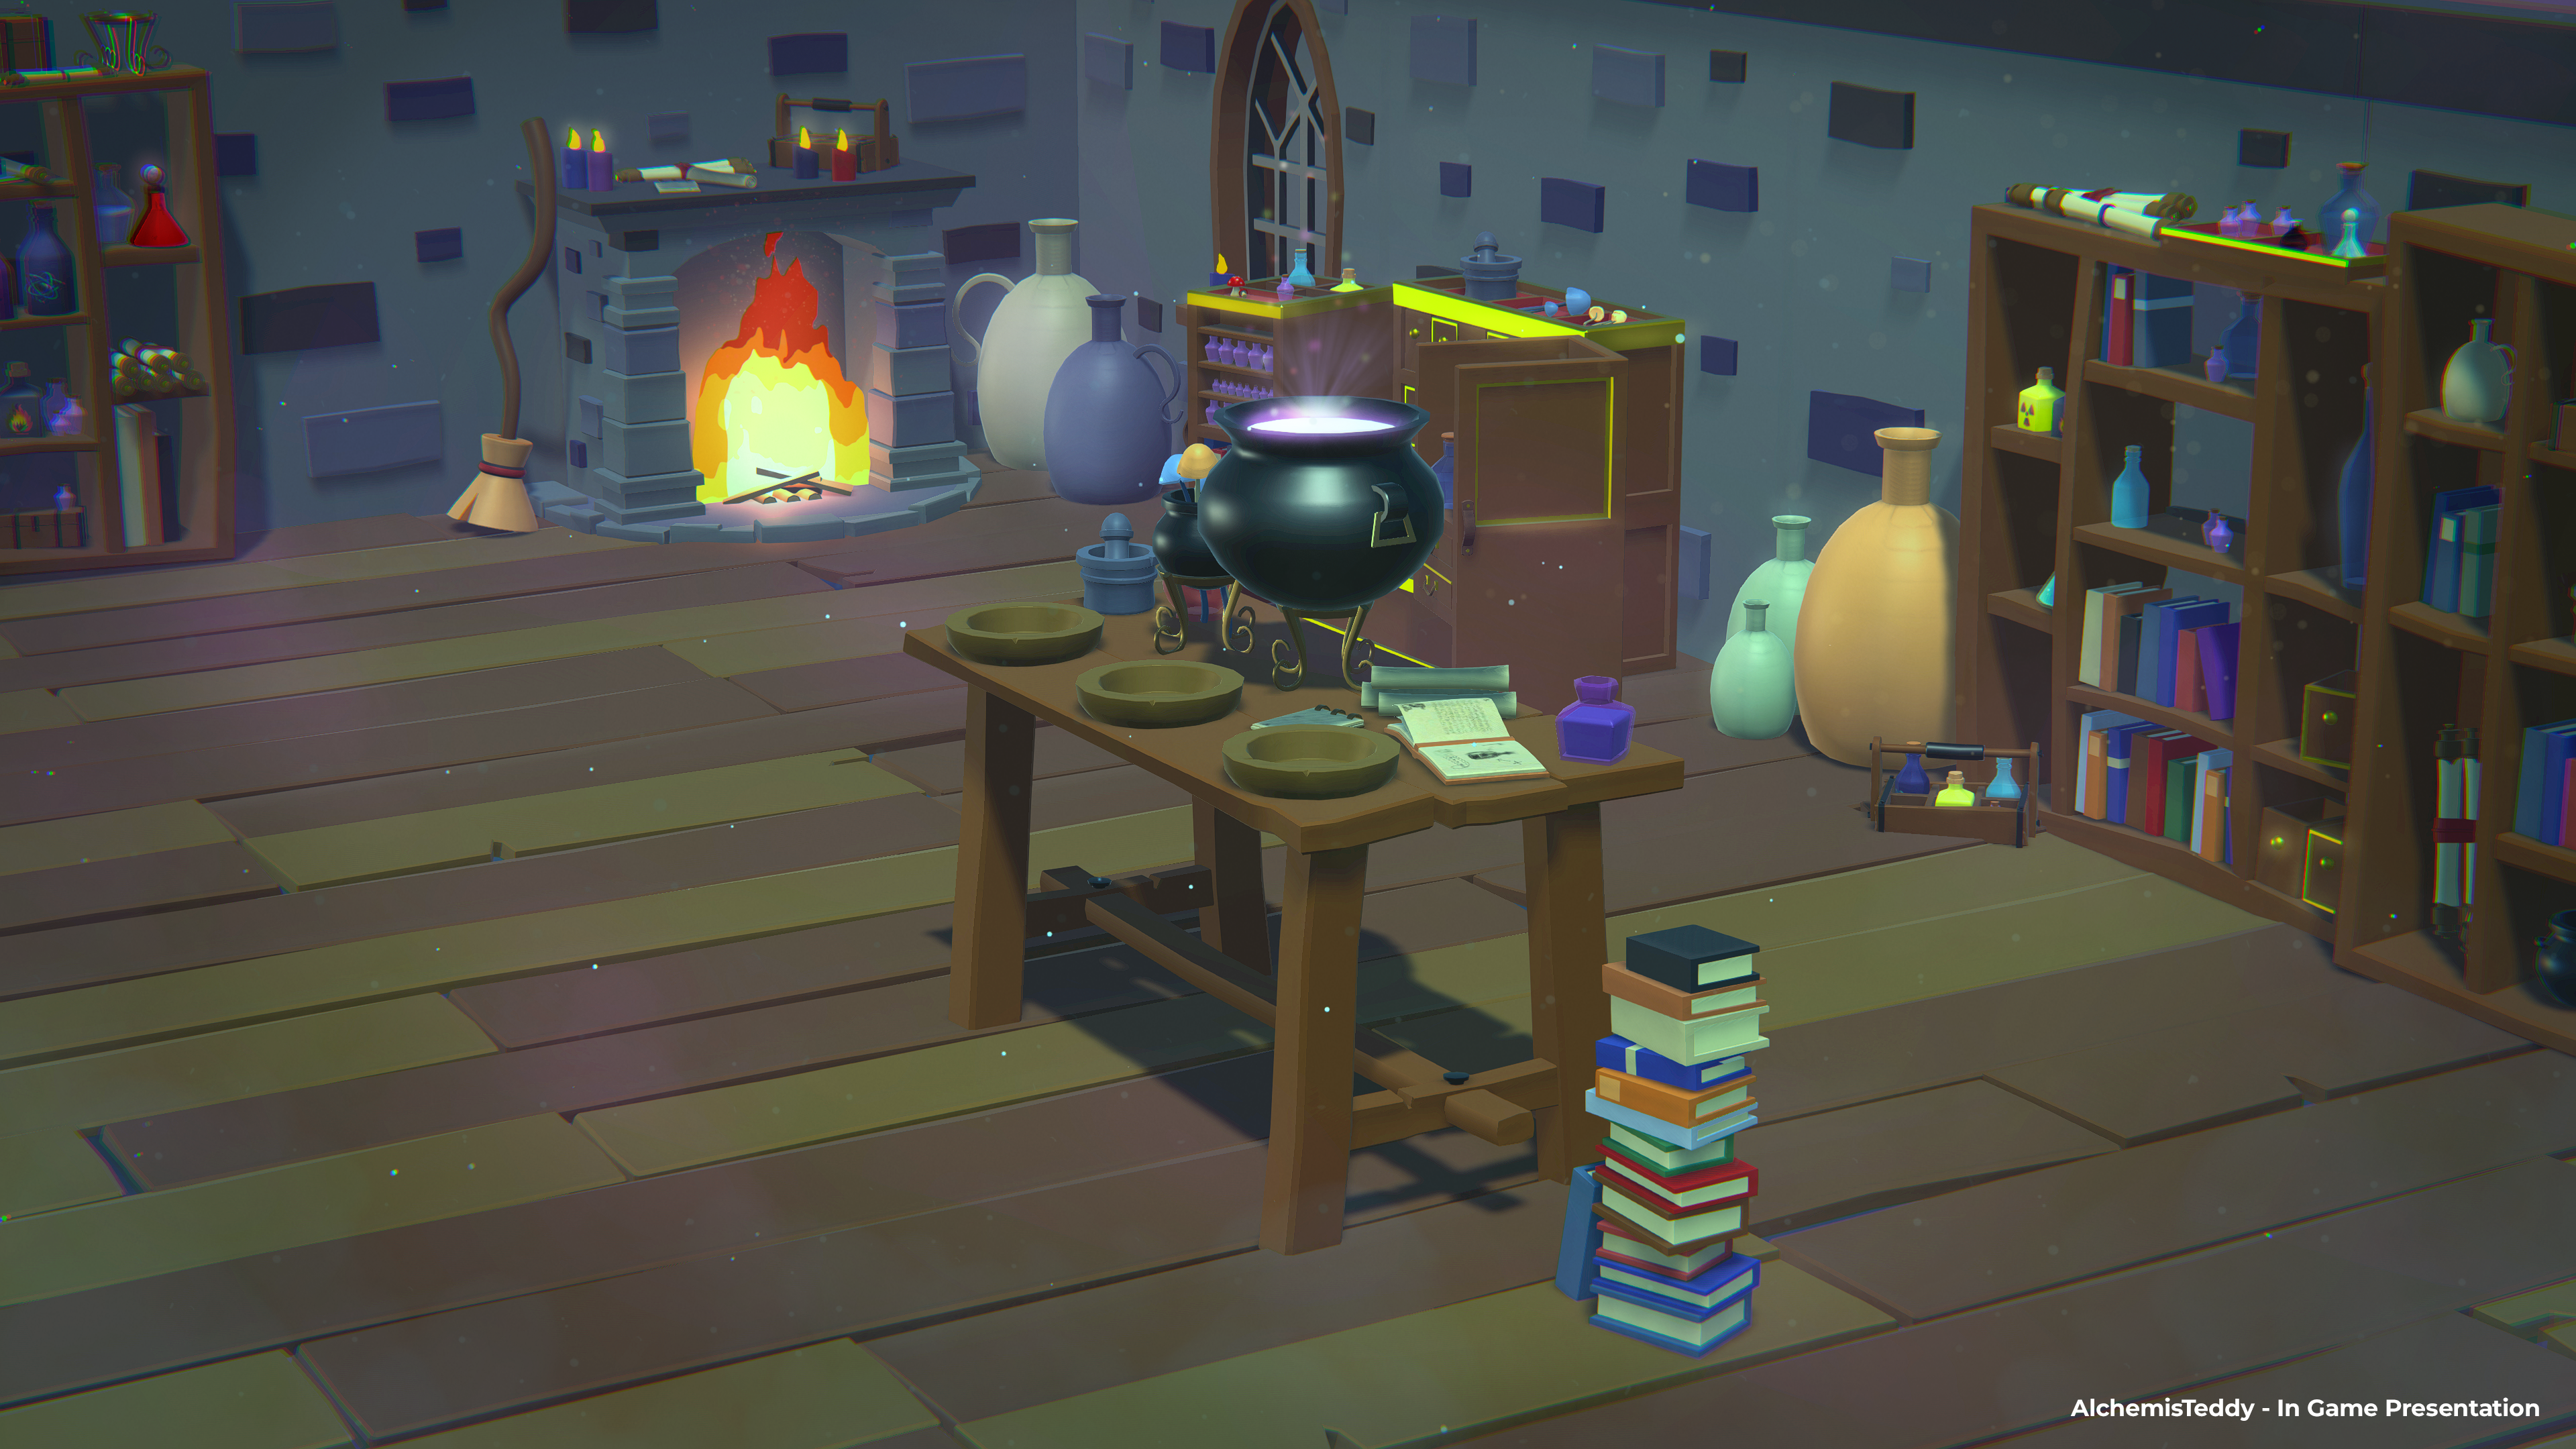
Welcome to AlchemisTeddy’s Lab, a whimsical experiment where alchemy meets teddy-bear charm. This project was created in just five days during the Swiss Game Academy, with the challenge of building a functional and visually engaging prototype under tight time pressure.
Explore our environment in this Sketchfab viewer, spin, zoom, and get a closer look at the details.
You’ll also find links to other creations that blend art, programming, and technical artistry.The Challenge
To showcase the importance of collaboration, we structured our workflow around functionality first.
This meant defining the essential features early on, ensuring that gameplay and interaction always had priority.The Process
- Programming & Features: I outlined the required mechanics and implemented them step by step.
- Art & Concepts: My teammate provided base sketches and models, which we refined together for integration.
- Iteration & Polish: Each asset was tested, adjusted, and enhanced with hand-painted details to make interactive objects stand out and improve the overall player experience.
Closing Thoughts
This project reminded us how much collaboration fuels creativity.
In just five days, AlchemisTeddy’s Lab grew from sketches on paper into a playful interactive world and we had a lot of fun bringing it to life.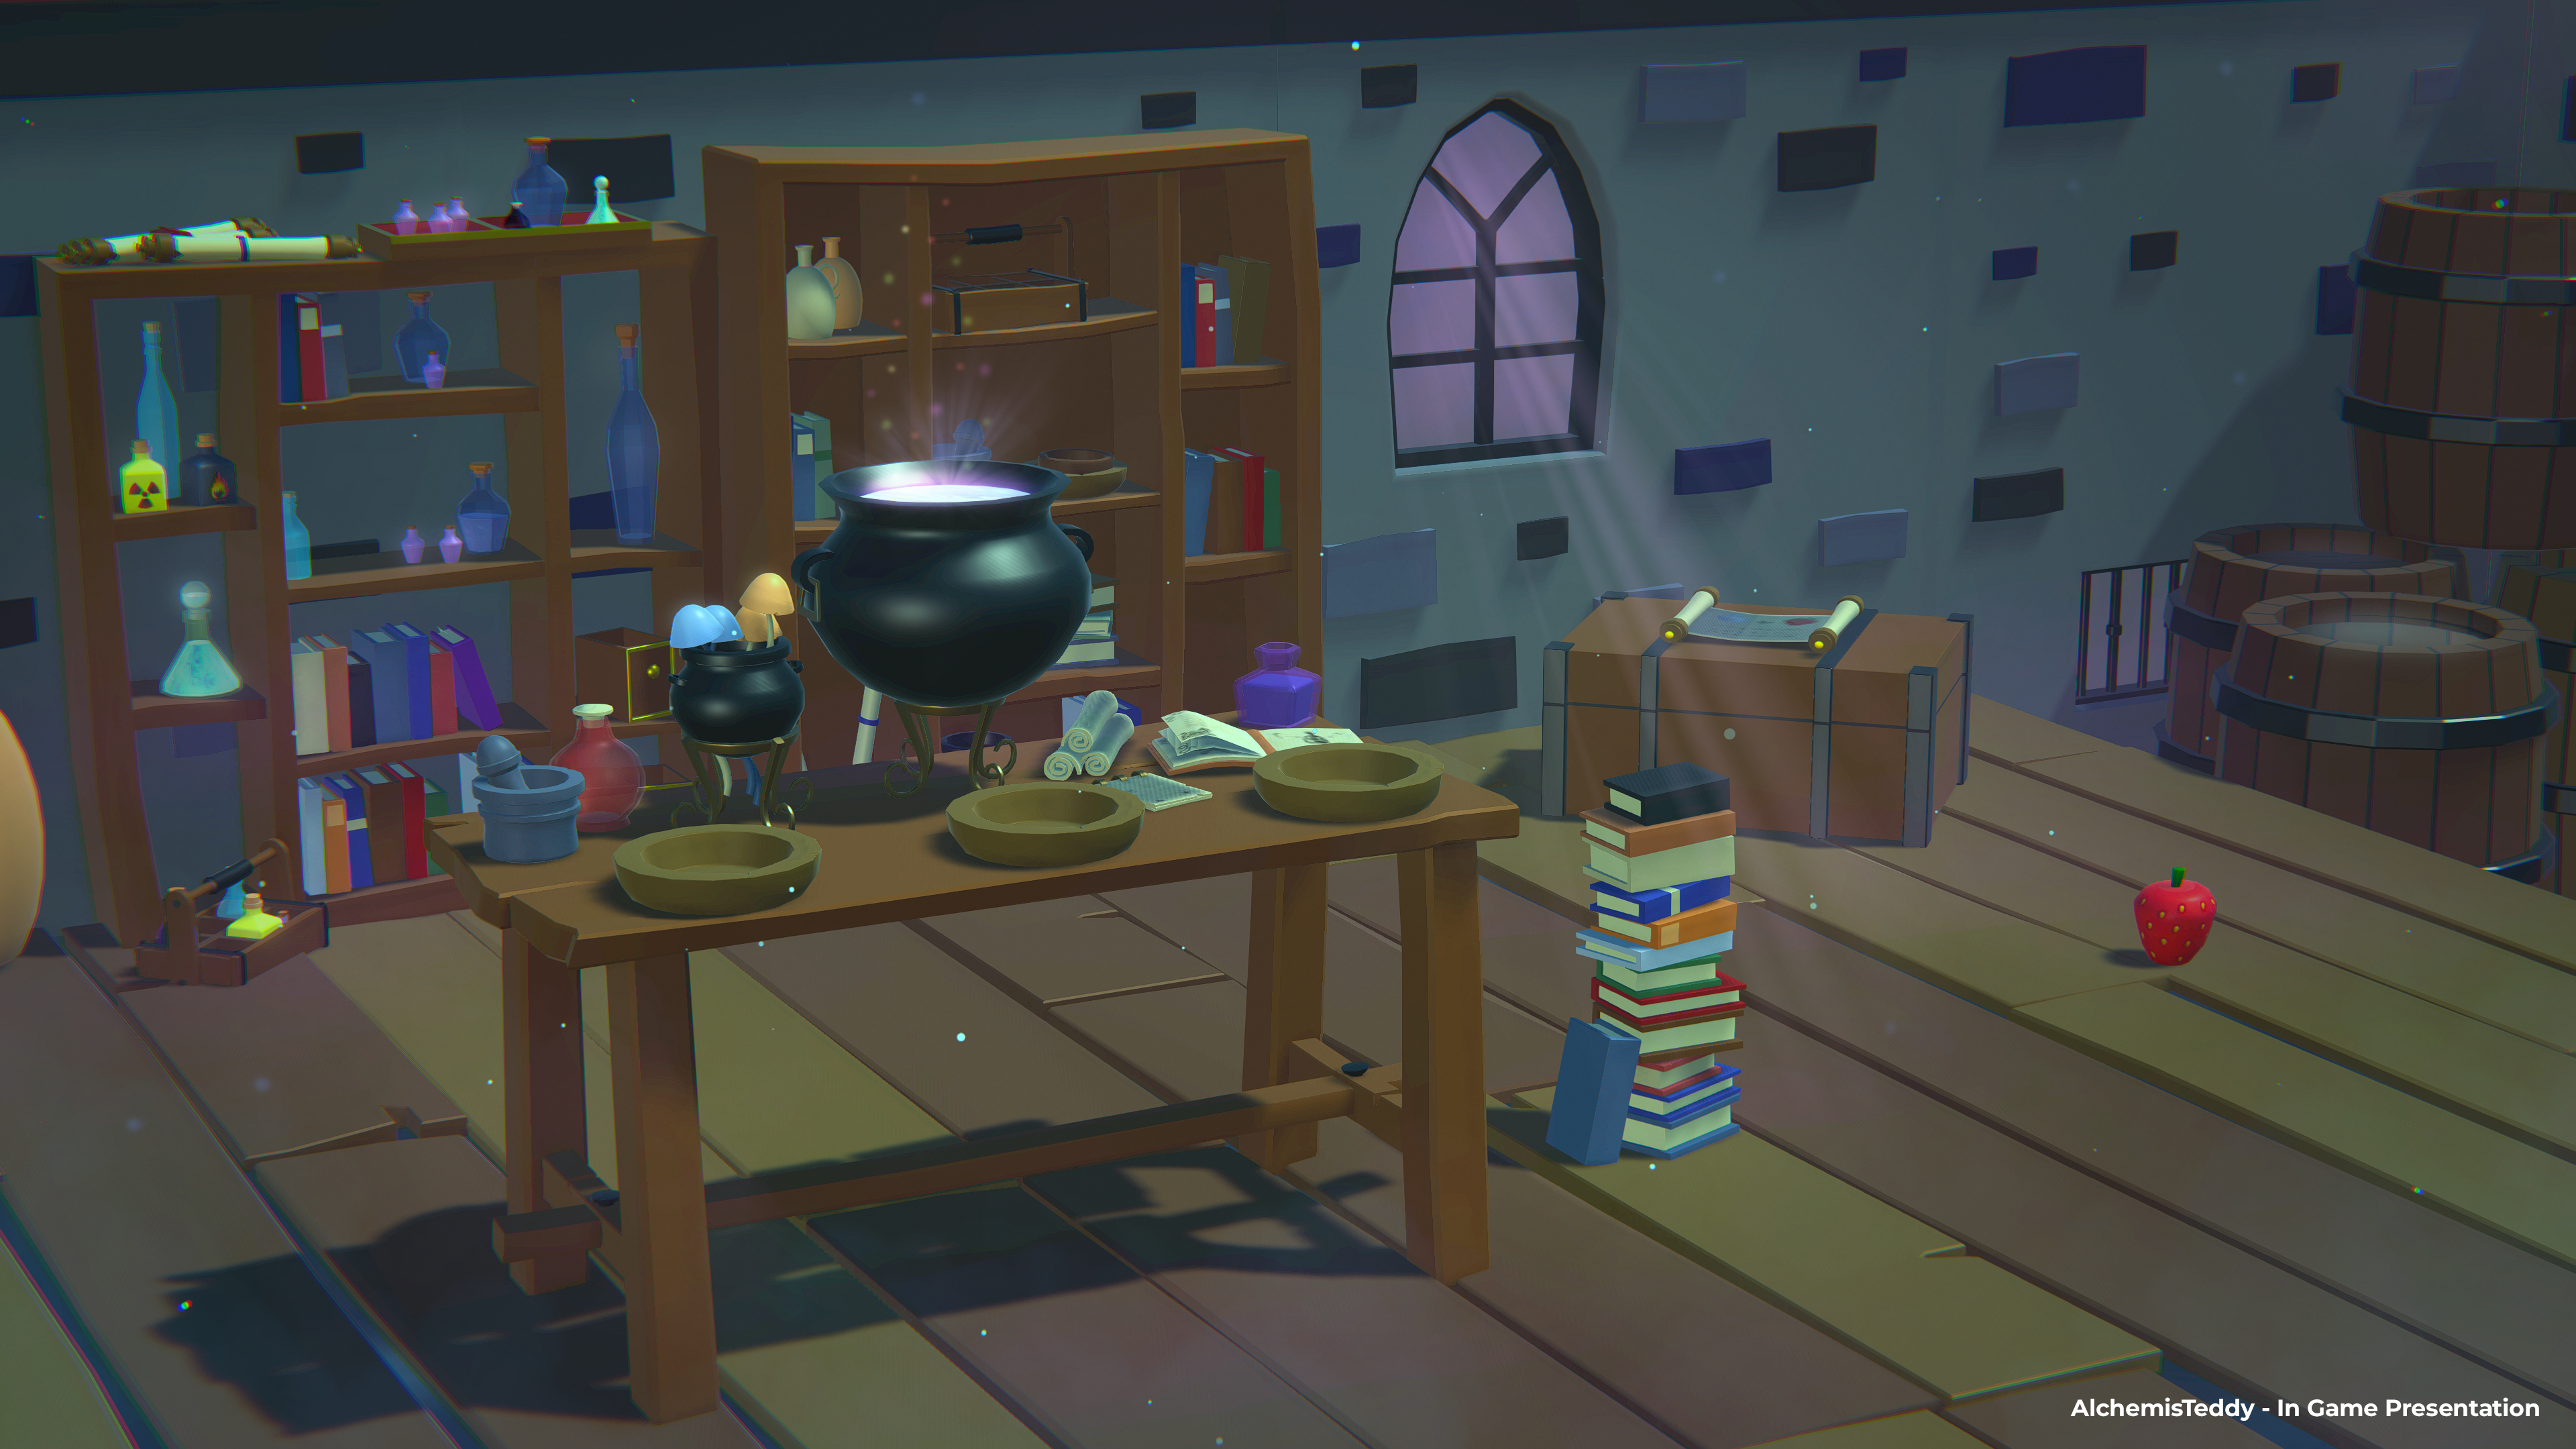


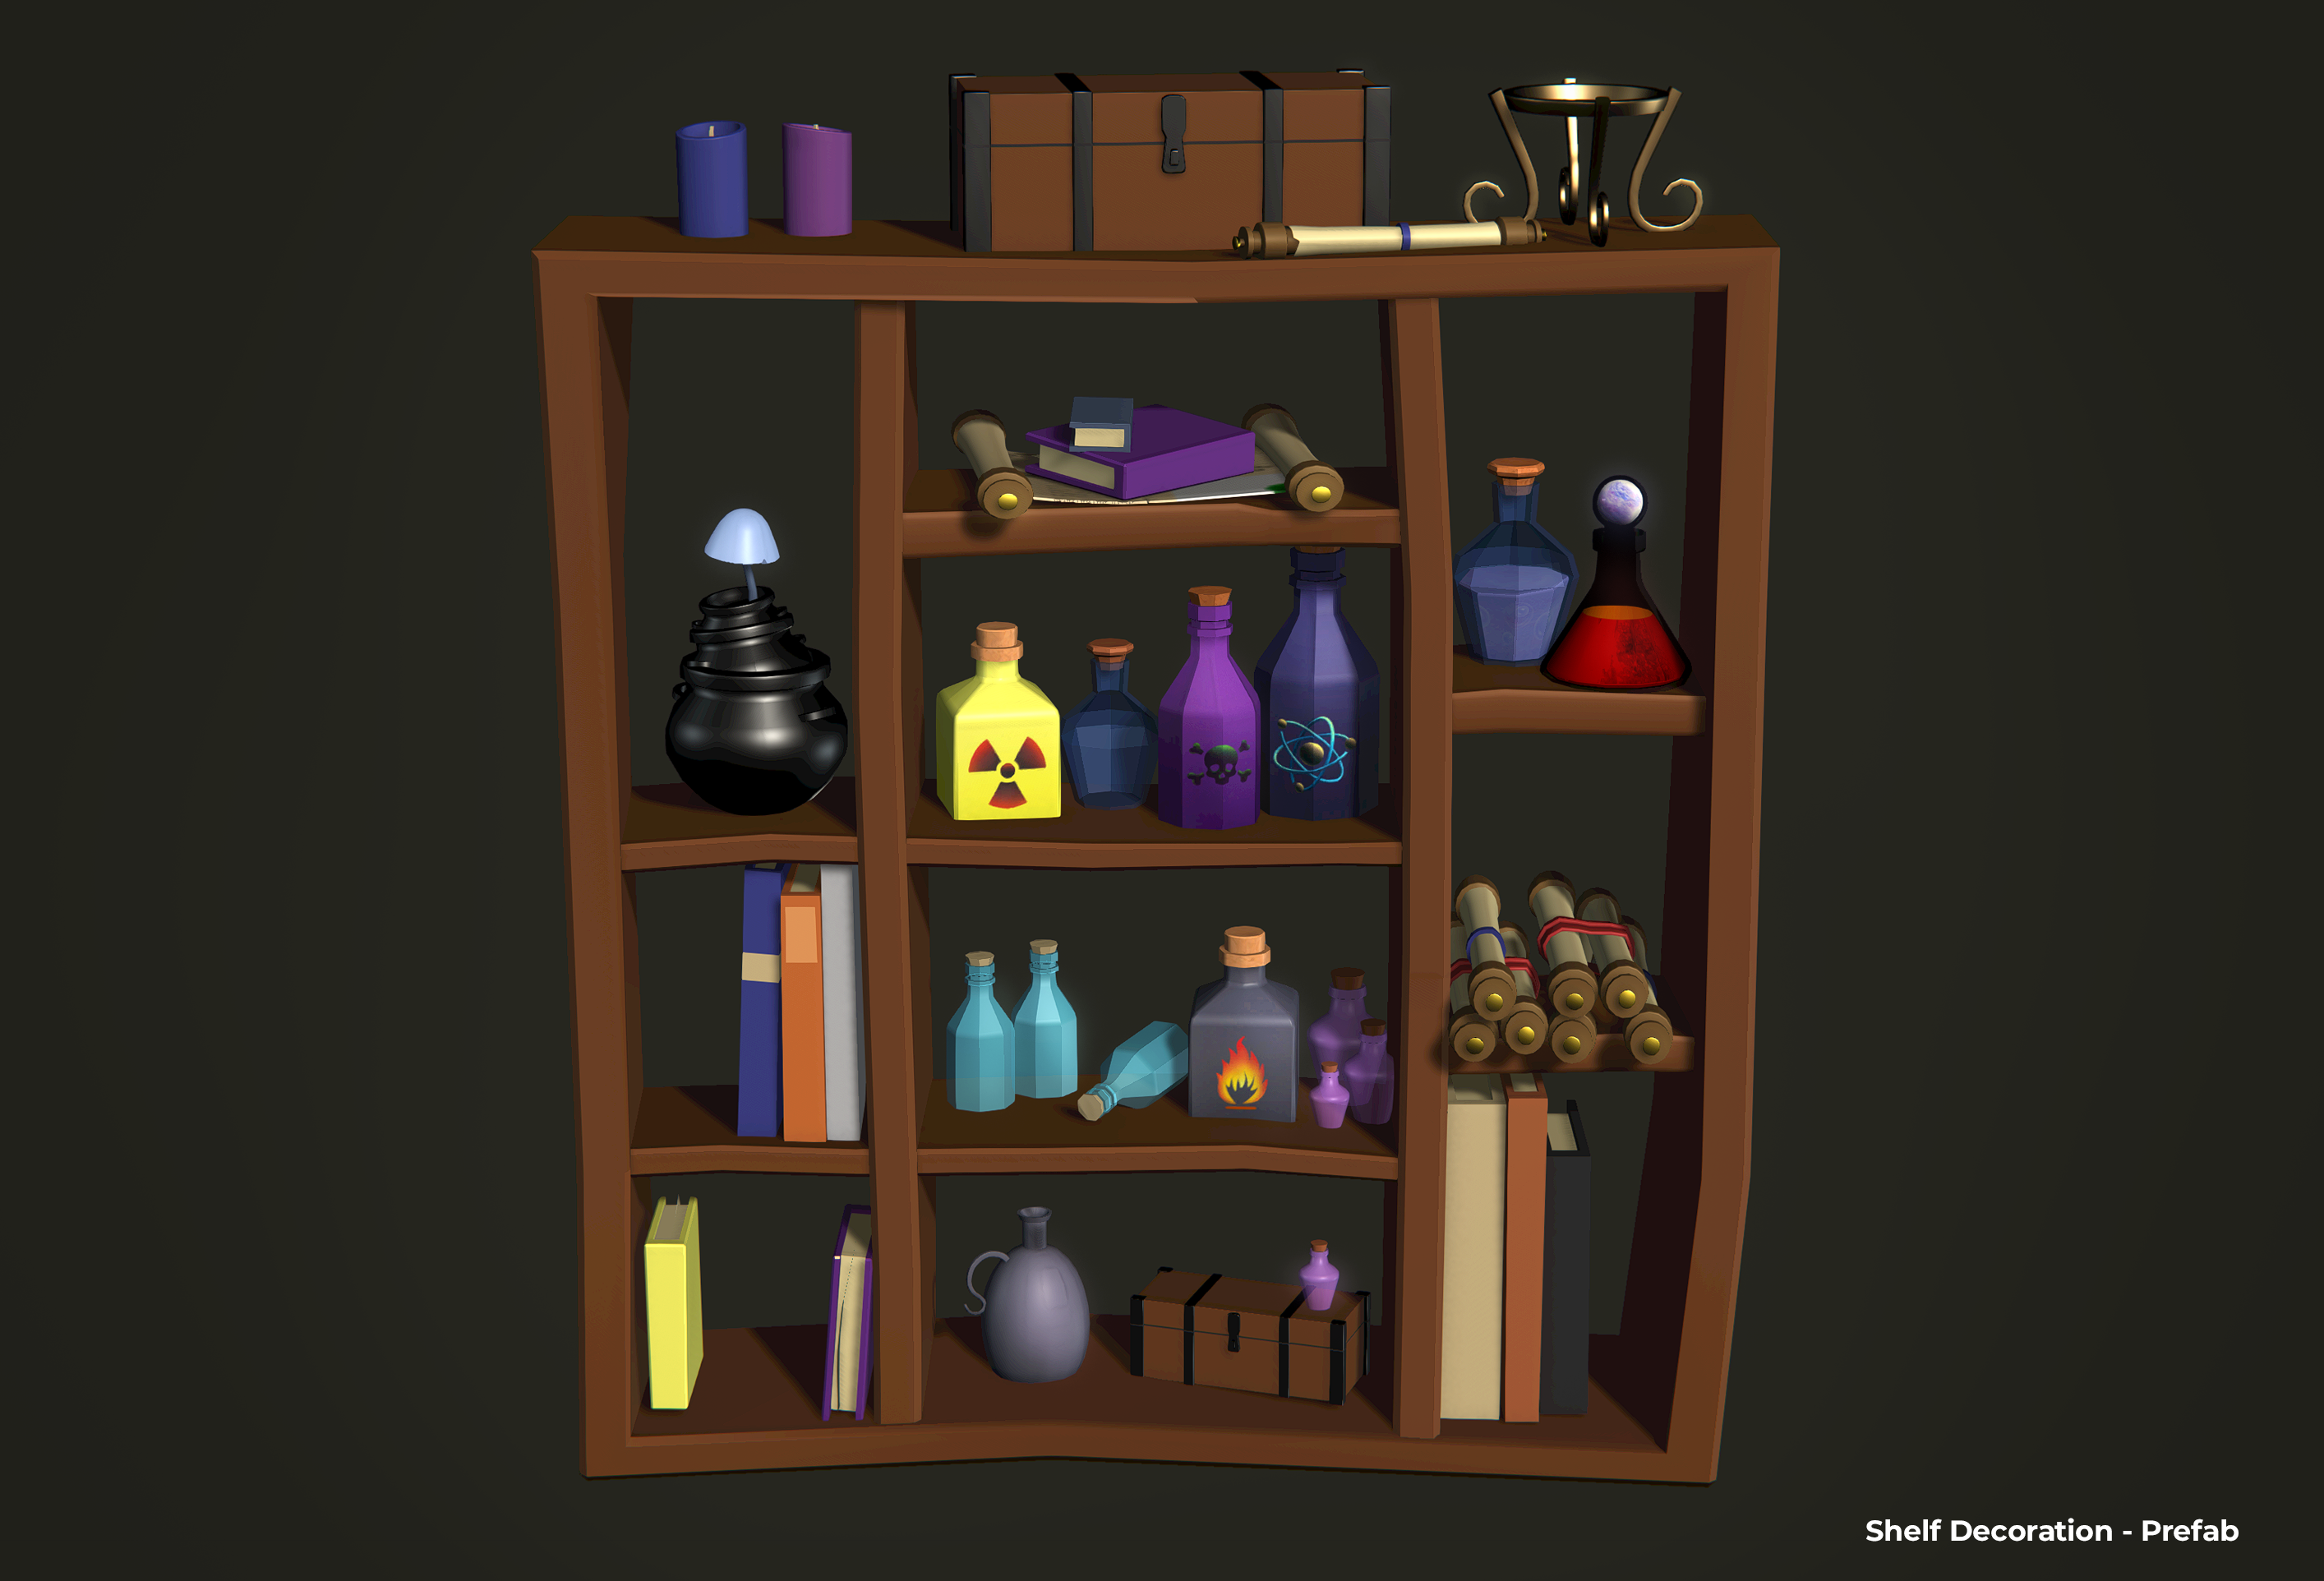
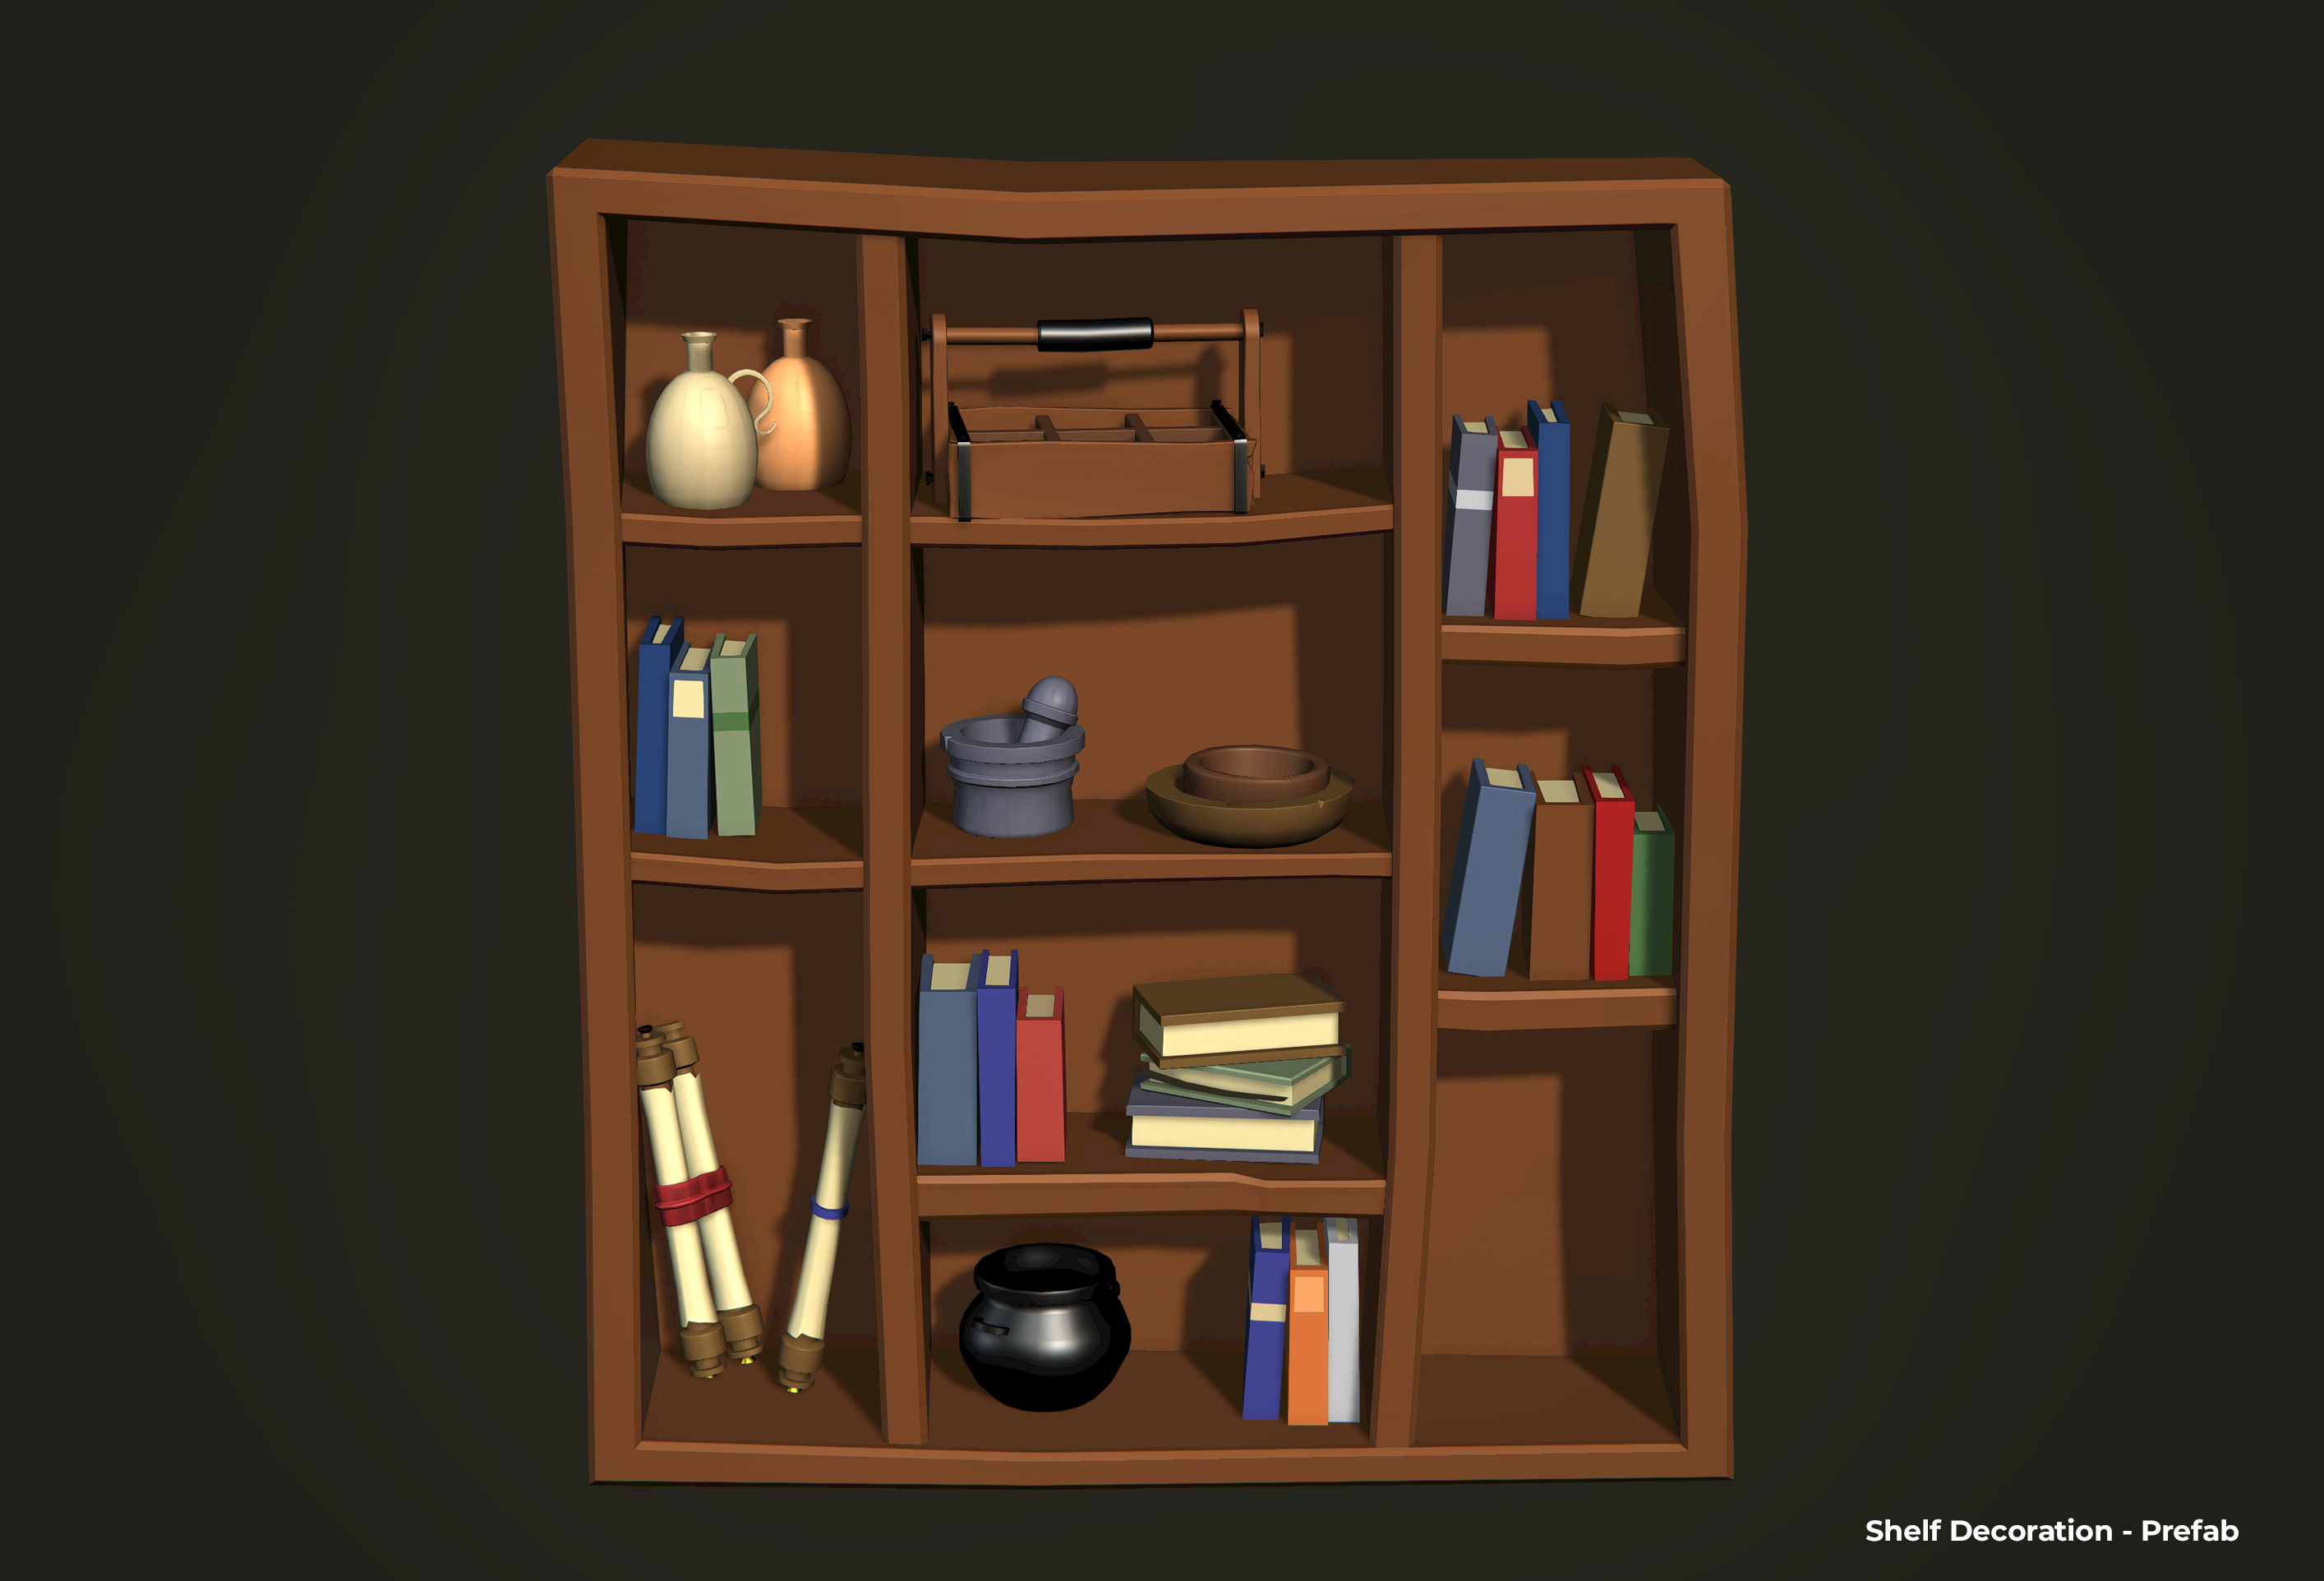 Created on September 2025
 -
Unity Tips - Creating a Stencil See-Through Effect in Unity 6
In many top-down or isometric games, walls can obstruct the player’s view of the action.
A common solution is to make obstructing geometry transparent or temporarily cut away when it blocks the line of sight.In this post, I’ll cover how I implemented a see-through wall system in Unity 6, combining HLSL shaders, URP configuration, and a lightweight C# layer management script.
I’ll also share performance considerations and ideas for extending this technique.
Stencil Setup with HLSL
The core of this effect relies on the stencil buffer.
We define a shader that marks walls in the stencil pass, giving us control over which parts of the geometry should later be rendered differently.Shader "Unlit/Cutter" { Properties { [IntRange] _StencilID ("Stencil ID", Range(0,255)) = 0 } SubShader { Tags { "RenderType"="Opaque" "Queue"="Geometry-1" "RenderPipeline"="UniversalPipeline"} Pass { Blend Zero One ZWrite Off Stencil { Ref [_StencilID] Comp Always Pass Replace } } } }This shader doesn’t render visible pixels; it only writes stencil values.
Later, the URP pipeline uses these values to selectively apply transparency.Configuring the URP Renderer
Next, I extended the URP Asset Renderer.
Two Renderer Features were added:- Cutter Pass → Applies the stencil writes.
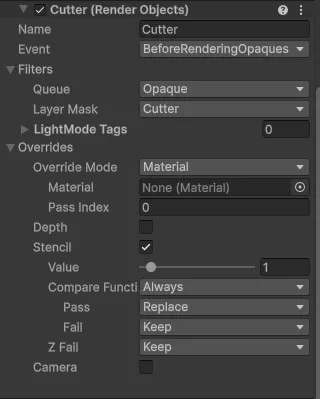
- SeeThrough Pass → Overrides wall rendering when the stencil is active.
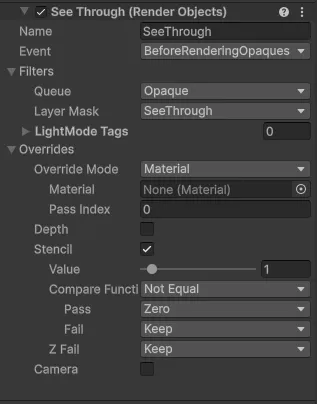
This allows walls to remain fully opaque by default, but become see-through as soon as the script switches their layer.
Runtime Layer Switching
To control which walls become transparent, I wrote a simple C# script. It checks the player’s position relative to wall colliders and assigns them to either the opaque layer or the see-through layer.
void Update()
{
    float playerZ = m_player.transform.position.z;
    float playerY = m_player.transform.position.y;

    foreach (Collider wallCollider in m_wallColliders)
    {
        // Y-axis rule: if the player is above the wall, always keep it opaque
        if (playerY > wallCollider.bounds.max.y - m_playerAboveWallThreshold)
        {
            wallCollider.gameObject.layer = m_opaqueLayer;
            continue;
        }

        // Z-axis rule: if the wall is in front of the player, make it see-through
        if (wallCollider.bounds.min.z < playerZ || wallCollider.bounds.max.z < playerZ)
        {
            wallCollider.gameObject.layer = m_seeThroughLayer;
        }
        else
        {
            wallCollider.gameObject.layer = m_opaqueLayer;
        }
    }
}
This ensures walls in front of the camera fade out, while walls behind or under remain visible.
Player Setup
The final piece of the system is the Cutter object.
In this implementation, it’s a simple sphere attached to the player character and assigned to theCutterlayer.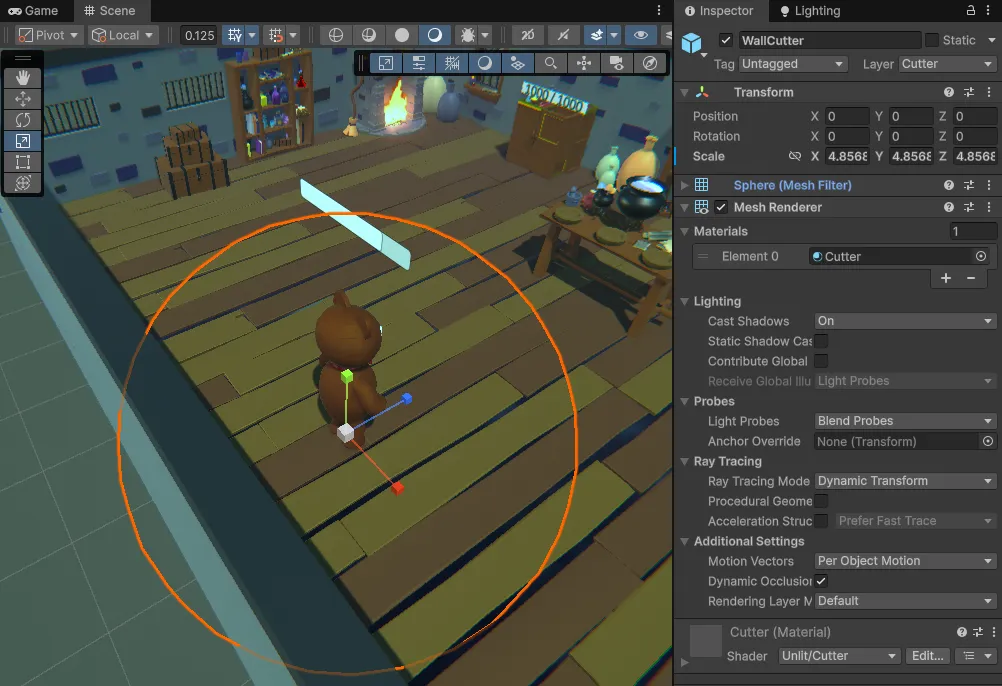
As the player moves, this sphere continuously updates the stencil buffer, ensuring that any obstructing walls are correctly masked out in real time.
Retrospective
Performance Considerations
While this system works well in small to mid-scale levels, there are a few things to watch out for:
- Physics iteration cost → Iterating through many wall colliders in
Update()can become expensive. A spatial partitioning structure (e.g., Physics.OverlapSphere) could reduce checks. - Overdraw → Transparent walls increase GPU overdraw. Using cutout shaders or depth-based dithering could mitigate this if necessary.
- Stencil conflicts → If your project already uses the stencil buffer for UI, outlines, or decals, allocate unique IDs to avoid collisions.
- Batching → Switching layers may break static batching. Consider using material property overrides instead of layers if batching is critical.
Possible Extensions
There are multiple ways this effect could be extended depending on the game’s needs:
- Smooth transitions → Instead of instantly swapping materials, interpolate alpha or use a dithering fade for a cleaner look.
- Multiple players/units → Extend the script to handle visibility relative to multiple characters.
- Line-of-sight system → Instead of relying solely on axis checks, perform raycasts from the camera to the player for more precise occlusion.
- Artist control → Expose thresholds (distance, opacity curve, fade speed) in the inspector so designers can tweak per-level.
Conclusion
This system is relatively lightweight but dramatically improves readability in games where the camera doesn’t follow the player directly. By combining stencil operations, URP renderer features, and runtime logic, we can create a wall-cutting effect that feels seamless to both designers and players.
For production, I’d recommend iterating on the fade mechanics and exploring GPU-based approaches for larger levels—but as a foundation, this approach is flexible, efficient, and easy to extend.
Created on September 2025 -
Unity Tips - New Input System - Mouse Events
Working with Unity’s new Input System can sometimes feel frustrating at first, even though the long-term benefits in terms of cross-platform support are significant.
A useful tip I want to share is how to update Unity’s older approach for handling mouse events so that it remains compatible with the new Input System.Previously, this could be done with simple MonoBehaviour methods such as:
private void OnMouseEnter()
{
    // Example: Debug.Log($"Mouse is over {this.name}");
}

private void OnMouseExit()
{
    // Example: Debug.Log($"Mouse has exited {this.name}");
}
With the new Input System, a few additional steps are required.
First, the script must include
using UnityEngine.EventSystemsso that the pointer events can be detected.Second, the class needs to implement the interfaces
IPointerEnterHandlerandIPointerExitHandler.For example:
using UnityEngine;
using UnityEngine.EventSystems;

/// <summary>
/// Represents an item that exists in the game world and can be picked up.
/// </summary>
[RequireComponent(typeof(Collider))] // Ensures this object always has a collider
public class WorldItem : MonoBehaviour, ICollectable, IPointerEnterHandler, IPointerExitHandler
{
    // Class implementation
}
These interfaces require the following methods to be implemented:
public void OnPointerEnter(PointerEventData eventData) { // Example: Debug.Log($"Mouse is over {this.name}"); } public void OnPointerExit(PointerEventData eventData) { // Example: Debug.Log($"Mouse has exited {this.name}"); }Finally, make sure the camera has a
PhysicsRaycastercomponent attached and that you have anEventSystemsin your hierarchy.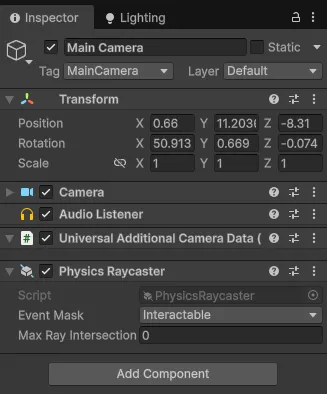
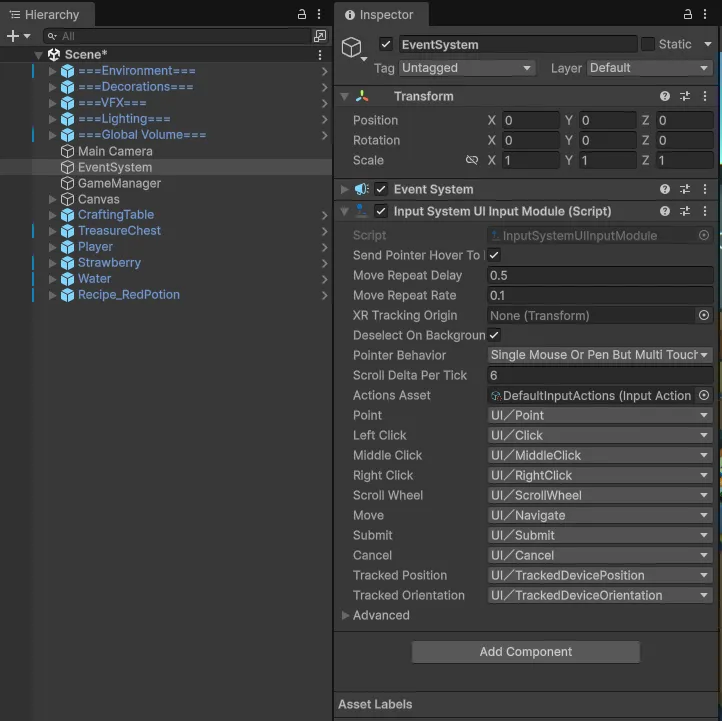
Once these steps are completed, the script will recognize mouse interactions in the same way it did before the new Input System was introduced.
The same update is required for all methods regarding Mouse events such as
IPointerClickHandler&OnPointerClick()IPointerDownHandler&OnPointerDown()IPointerUpHandler&OnPointerUp()
The list of interfaces related to Mouse Events can be found here
I hope this proves useful.
Created on September 2025 -
Bottles Shader & Script - AlchemisTeddy 🧪🐻
Developed as part of the asset range of AlchemisTeddy, a set of bottles combines hand-painted and shader-driven approaches. Five bottles have subtle shading variations, each featuring a specific hand-painted detail. In addition, two bottles use a custom shader.

The shader was designed with flexibility in mind: it simulates a nebulous liquid that can be adjusted for fill level, allowing the same model to represent multiple potion types.
The artist provided custom noise textures, which are integrated into the shader to ensure visual differentiation across the bottles.The entire set looks like this:
This workflow highlights how art and code decisions were made together to achieve both creative direction and technical efficiency. The bottles are optimized for real-time use and form part of a larger playable project (WIP).
Script
The bottles include a custom
Wobble.csscript that drives small liquid-like movements based on the object’s motion.- Motion-based input: The script tracks both linear velocity (movement in space) and angular velocity (rotation changes).
- Procedural wobble: These values are converted into subtle sine-wave oscillations on the X and Z axes.
- Shader communication: At runtime, the script passes the wobble values to the material via the
WobbleXandWobbleZshader properties.

This setup ensures that the bottle contents appear reactive, tilting, sloshing, and “settling” naturally as the object moves in the scene. The wobble intensity is clamped and gradually recovers over time, giving a convincing physical feel without requiring expensive fluid simulations.
Shader
The custom shader handles the liquid simulation inside the bottles:
- Fill-level control allows designers to reuse the same asset for multiple potion states.
- Custom noise textures (hand-painted) add variation across bottles while still fitting the same visual style.
- Integration with the wobble script makes the shader feel dynamic and physically reactive, without the overhead of actual fluid dynamics.


This shader-driven workflow lets a single mesh and material cover many potion types. Efficient for memory and performant in real-time.
Conclusion
The bottles showcase how hand-painted detail and procedural motion can be combined into one asset. Instead of static props, they behave like interactive game objects: wobbling, tilting, and visually differentiating through shader variation.

This workflow demonstrates a scalable approach: artists define the creative direction through textures and colors, while programmers add physical responsiveness and shader logic. Together, the result is both performant and immersive, ready for integration into a larger playable project.
Created on September 2025