-
MarbleMaze: Event-Driven Manager Architecture
MarbleMaze is coordinated by more than 20 singleton managers — audio, levels, currencies, lives, customisation, achievements, notifications, cloud save, scene transitions, and more. None of them hold a direct reference to another. Instead, they publish and subscribe to C#
Action<T>events, leaving each system completely replaceable in isolation. This post is an architectural walkthrough of how the pieces fit together.
The Singleton Backbone
Every manager follows the same lightweight pattern: a static
Instanceproperty, a null-check guard inAwakethat destroys duplicates, and noDontDestroyOnLoad:public static LevelManager Instance { get; private set; } private void Awake() { if (Instance != null && Instance != this) { Destroy(gameObject); return; } Instance = this; }DontDestroyOnLoadis intentionally absent. Each scene owns its own manager objects. Scene loading and unloading handles the lifetime — a manager is only alive while its scene is loaded.SceneControllermanages which scenes are loaded at any given moment, so managers never need to protect themselves from early destruction.
Bootstrap: CoreManager
The entry point of the whole game is
CoreManager.Start:void Start() { GoogleUpdateManager.Instance?.CheckForUpdate(); SavingManager.Instance.LoadSession(); SceneController.Instance .NewTransition() .Load(SceneDatabase.Slots.Menu, SceneDatabase.Scenes.StartMenu) .Perform(); }Three things happen in sequence: a Play Store update check, a full session restore from disk (which populates all managers with persisted state), and the first scene transition. The rest of the game unfolds from events and user input —
CoreManagernever touches anything again.
No Direct Manager References: The Event Contract
The defining constraint is that managers do not call methods on each other. Instead, each publishes what it knows and subscribes to what it needs.
A concrete example: when the player loses a life, three systems need to react — the in-game HUD needs to update its heart icons, the difficulty engine needs to know for the next level, and
PlayerMovementneeds to expand its ground-detection radius. None of those systems callLifeManagerdirectly.LifeManager.RemoveLifefires two events and both updates propagate outward:public void RemoveLife() { if (currentLife > 0) { currentLife--; CoinManager.Instance.ReduceCurrencyAmount(CoinType.HEART, 1); } LevelManager.Instance.IncreaseLivesLostToThisLevel(); OnLifeRemoved?.Invoke(); }CoinManager.ReduceCurrencyAmountthen firesOnCoinChanged:OnCoinChanged?.Invoke(type, coins[type], previousCoins[type]);CoinManager.OnCoinChanged→LifePannel.UpdateCurrencyValue(HUD)LevelManager.OnLifeLostToThisLevel→PlayerMovement(ground radius)LifeManager.OnLifeRemoved→LifePannel.OnLifeRemoved(shake/flash animation)A single player death fans out to three independent subsystems with no coupling between any of them.
The Event Map
Event Publisher Subscribers OnCoinChanged(CoinType, int, int)CoinManagerAll CurrencyPannelinstances,LifePannelOnCoinSet(CoinType, int)CoinManagerAll CurrencyPannelinstances (snap, no animation)OnHeartTimerTick(TimeSpan)CoinManagerHeartPannelManager(live countdown)OnCoinTimerTick(TimeSpan)CoinManagerRewarded video button cooldown UI OnLifeRemovedLifeManagerLifePannel, game-over checkOnLifeLostToThisLevel(int)LevelManagerPlayerMovement(adaptive radius)OnStarCountChanged(int)LevelManagerStarPannel(in-game star counter)OnPowerUpStateChanged(PowerUpState)PowerUpManagerPowerUpButtonManager, audioOnCloudSaveCompletedCloudSaveManagerUserInfoManager(toast notification)OnCloudLoadCompletedCloudSaveManagerSavingManager(session restore trigger)OnAuthenticationReadyLoginManagerCloudSaveManager,AchievementManagerAll events are plain C#
Action<T>orActiondelegates — no UnityEvent overhead, no message-passing framework, no ScriptableObject event channels. The subscribers register inOnEnableand deregister inOnDisable, so scene unloading automatically cleans up every subscription.
Fluent Builder: SceneController
Scene transitions follow a Fluent Builder pattern.
SceneTransitionPlanaccumulates the load/unload list and options through chained calls, then executes whenPerform()is called:SceneController.Instance .NewTransition() .Load(SceneDatabase.Slots.Content, SceneDatabase.Scenes.Game) .Unload(SceneDatabase.Scenes.GamesMenu) .WithOverlay() .Perform();The builder methods each return
this, enabling the chain:public SceneTransitionPlan Load(SceneDatabase.Slots slot, SceneDatabase.Scenes scene, bool setActive = true) { ScenesToLoad[slot.ToString()] = scene.ToString(); if (setActive) ActiveScene = scene.ToString(); return this; } public SceneTransitionPlan WithOverlay() { Overlay = true; return this; } public void Perform() { SceneController.Instance.StartCoroutine( SceneController.Instance.ExecutePlan(this)); }Performhands the plan toExecutePlan, which runs the full async pipeline: fade-in overlay → unload scenes → optionalResources.UnloadUnusedAssets()→ load scenes additively → set active scene → fade-out overlay. TheisBusyguard prevents overlapping transitions:private IEnumerator ExecutePlan(SceneTransitionPlan plan) { if (isBusy) yield break; isBusy = true; yield return StartCoroutine(ChangeSceneRoutine(plan)); }SceneDatabase.SlotsandSceneDatabase.Scenesare enums that make call sites type-safe — no raw strings in the codebase.
Pattern Inventory
Every major design pattern in the codebase serves a specific architectural goal:
Pattern Where Why Strategy IDataService/JsonDataServiceSwap storage backend without touching call sites State Machine PlayerMovement,PowerUpManager,FlapingDoorsAnimationControlled transitions, no illegal state combinations Composite OrderedCondition(tutorial)Sequence sub-conditions without nesting coroutines Fluent Builder SceneController.NewTransition()Readable multi-step scene transitions at call sites Observer All Action<T>eventsZero coupling between publishers and subscribers Factory GridFactory,PhysicalMazeGeneratorCentralize complex object construction Singleton All managers Single source of truth per system, discoverable via Instance
Dependency Flow: Session Startup
The startup sequence illustrates how the architecture handles a complex multi-system initialization without any direct wiring:
CoreManager.Start() └─ SavingManager.LoadSession() ├─ RestorePlayerDataFromFile() │ └─ CoinManager.SetCurrencyAmount(CoinType.HEART, n) │ └─ OnCoinSet → CurrencyPannel.SetCurrencyValue() [all subscribed panels] ├─ RestoreGameDataFromFile() │ └─ LevelManager.levelDataDictionnary populated └─ RestoreTutorialDataFromFile() └─ TutorialManager flags set └─ CloudSaveManager (async, via OnAuthenticationReady event) └─ ForceCloudLoad() if needed └─ ApplyCloudPayload() └─ SavingManager.ForceLocalOverwrite<T>() └─ OnCloudLoadCompleted → SavingManager.LoadSession() [second pass with cloud data]CoreManagertriggers the chain with one line. Cloud sync happens independently and asynchronously — if it completes before the first scene loads, managers get cloud data; if it completes after, a secondLoadSessioncall updates them in-place and events propagate the changes to any already-open UI.
What This Enables
The zero-coupling rule has two practical payoffs:
Isolated testing — any manager can be removed from a scene without breaking others. The null check (
CoinManager.Instance?.ReduceCurrencyAmount(...)) is the only concession to this; it prevents crashes in scenes that only load a subset of managers.Predictable event ordering — because no manager calls another’s methods directly, there are no hidden call chains to trace. The subscriber list is the entire blast radius of any event. When a bug appears in the HUD, the search space is every subscriber of
OnCoinChanged— a known, finite list — rather than “somewhere in the systems that write to CoinManager.”
Created on February 2026 -
MarbleMaze: Bézier Curve Currency Animations
When a player collects coins or stars at the end of a level, the icons don’t just vanish — they arc smoothly across the screen to their respective HUD counter. This post covers the full implementation: the math behind the curves, the staggered batch system, the custom easing function, and how the completion callbacks wire together to drive the counter update.
The Math: Quadratic Bézier Curves
A quadratic Bézier curve is defined by three control points and a parameter
t ∈ [0, 1]:P(t) = (1-t)² · A + 2(1-t)t · B + t² · C- A — the start point (where the icon spawns: the star or coin on-screen position)
- B — the control point (determines the shape of the arc)
- C — the end point (the HUD counter the icon flies toward)
The curve passes through A at t=0 and C at t=1, but is pulled toward B without touching it — exactly the right behaviour for a looping arc animation. The implementation evaluates this formula every frame using
Mathf.Pow:rect.position = Mathf.Pow(1 - t, 2) * A + 2 * (1 - t) * t * B + Mathf.Pow(t, 2) * C;
Data Model: CurrencyAnimationRequest
Each animation batch is described by a plain serializable class. The inspector wires up the sprite, start positions, and destination counter at design time:
[System.Serializable] public class CurrencyAnimationRequest { public Sprite sprite; public List<RectTransform> startPoints = new List<RectTransform>(); public RectTransform endPoint; public int amount; }startPointsis a list so multiple spawn origins can be used — for a level with three stars, each icon can originate from a different on-screen star position.amountis set at runtime fromLevelManagerdata just before the animation plays.
Batch Orchestration: PlayRoutine
UICurrencyAnimator.Playaccepts a list of requests (coins and stars simultaneously) and a completion callback. The orchestrating coroutine sums the total icon count up front, then fires all request sub-coroutines in parallel:public void Play(List<CurrencyAnimationRequest> requests, System.Action onComplete = null) { StartCoroutine(PlayRoutine(requests, onComplete)); } private IEnumerator PlayRoutine( List<CurrencyAnimationRequest> requests, System.Action onComplete) { int totalIcons = 0; foreach (var request in requests) { if (request.amount > maxCurrencySpawn) request.amount = maxCurrencySpawn; totalIcons += request.amount; } if (totalIcons == 0) { onComplete?.Invoke(); yield break; } int completedIcons = 0; foreach (var request in requests) { StartCoroutine(AnimateRequest(request, () => { completedIcons++; if (completedIcons == 1) CoinManager.Instance.UpdateCounts(); if (completedIcons >= totalIcons) onComplete?.Invoke(); })); } }A shared
completedIconscounter is captured in each lambda closure. The HUD counter updates as soon as the first icon lands — giving immediate feedback — andonCompletefires only once all icons from all requests have finished.maxCurrencySpawncaps the batch at 10 icons regardless of how many coins were earned, keeping the screen readable.
Staggered Spawning: AnimateRequest
Each request spawns its icons one at a time with a
delayBetweenyield between them. The control point B is calculated per-icon with a random offset on top of a fixedarcHeight, so no two icons follow exactly the same path:private IEnumerator AnimateRequest(CurrencyAnimationRequest request, System.Action onIconComplete) { for (int i = 0; i < request.amount; i++) { RectTransform start = request.startPoints.Count > 1 ? request.startPoints[i % request.startPoints.Count] : request.startPoints[0]; Image icon = Instantiate(iconPrefab, canvasRect); RectTransform rect = icon.rectTransform; icon.sprite = request.sprite; rect.position = start.position; Vector2 randomOffset = Random.insideUnitCircle * scatterRadius; Vector3 A = start.position; Vector3 C = request.endPoint.position; Vector3 B = A + (Vector3)randomOffset + Vector3.up * arcHeight; StartCoroutine(AnimateIcon(rect, icon, A, B, C, onIconComplete)); yield return new WaitForSeconds(delayBetween); } }Key details:
- Start point cycling —
i % startPoints.Countdistributes icons across multiple spawn origins evenly. - Control point construction — B sits above A by
arcHeightworld units, then scattered within a circle of radiusscatterRadiususingRandom.insideUnitCircle. The result is a fan of distinct arcs all converging on the same HUD destination. - Each icon is parented to
canvasRect(the root CanvasRectTransform) so its world-space position maps correctly onto the screen regardless of layout.
Per-Frame Curve Evaluation: AnimateIcon
The actual flight happens in a manual time-accumulation loop rather than a DOTween call, keeping the Bézier evaluation explicit and avoidance of allocation from tween objects:
private IEnumerator AnimateIcon(RectTransform rect, Image icon, Vector3 A, Vector3 B, Vector3 C, System.Action onComplete) { float time = 0f; while (time < duration) { float t = time / duration; t = EaseInOutCubic(t); rect.position = Mathf.Pow(1 - t, 2) * A + 2 * (1 - t) * t * B + Mathf.Pow(t, 2) * C; time += Time.deltaTime; yield return null; } Destroy(icon.gameObject); onComplete?.Invoke(); }tis normalized to[0,1]then passed throughEaseInOutCubicbefore being fed into the Bézier formula. The easedtaccelerates out of A and decelerates into C, while the raw curve geometry creates the arc — the two concerns are cleanly separated.
Custom Easing: EaseInOutCubic
Rather than relying on an animation library’s preset, the easing is implemented directly using the standard cubic formula:
private float EaseInOutCubic(float t) { return t < 0.5f ? 4f * t * t * t : 1f - Mathf.Pow(-2f * t + 2f, 3f) / 2f; }- For
t < 0.5:4t³— cubic ease-in, starts slow and accelerates. - For
t ≥ 0.5:1 - (-2t+2)³/2— cubic ease-out, decelerates symmetrically into the destination.
The result is an icon that launches gently, reaches peak speed at the midpoint of the arc, then glides smoothly into the HUD counter.
Wiring It Up: EndPannelManager
EndPannelManagerowns twoCurrencyAnimationRequestfields configured in the inspector (one for coins, one for stars). AtStart()it populates theiramountfields fromLevelManager:private void Start() { coinAnimationRequest.amount = levelManager.CurrencyEarnedThisLevel; starAnimationRequest.amount = levelManager.CurrentStarCount; levelText.text = $"Level {levelManager.CurrentLevelIndex}"; if (levelManager.CurrentLevelData.numberOfStars >= 3) { AudioManager.Instance?.PlayWinSound(); if (GoogleReviewManager.Instance != null) GoogleReviewManager.Instance.RequestReview(); } }The animation is triggered separately (not on Start) so the end panel can display first, then launch icons once the player taps Continue. On completion the callback drives the scene transition:
public void StartCurrencyAnimation()
{
    PannelVisuals.SetActive(false);
    currencyAnimator.Play(
        new List<CurrencyAnimationRequest> { coinAnimationRequest, starAnimationRequest },
        () => ReturnToGamesMenu()
    );
}
Passing both requests in a single
Playcall means coin and star icons fly simultaneously — thecompletedIconscounter inPlayRoutineensuresReturnToGamesMenufires only after every icon from both batches has landed.
HUD Counter: CurrencyPannel
Each HUD counter subscribes to
CoinManagerevents for live updates. When the first icon lands,CoinManager.UpdateCounts()firesOnCoinChanged, whichCurrencyPannelreceives:protected virtual void OnEnable() { coinManagerRef = CoinManager.Instance; coinManagerRef.OnCoinSet += SetCurrencyValue; coinManagerRef.OnCoinChanged += UpdateCurrencyValue; } protected virtual void UpdateCurrencyValue(CoinType type, int value, int previousValue) { if (type != m_coinType) return; text.AnimateCurrency(previousValue, value, 1.0f); }AnimateCurrencyis an extension method onTMP_Textthat tweens the displayed number from the old value to the new value over 1 second — so as the last few icons are still in flight, the counter is already counting up. The visual effect of icons arriving to “fill” the counter is an emergent result of these two independent timings rather than explicit synchronization.
Results
The full pipeline — Bézier geometry, random control-point scatter, cubic easing, staggered spawning, and event-driven counter updates — is under 170 lines of code with no animation library dependency. The only runtime allocations are the
Imageprefab instantiations themselves, which are destroyed immediately on landing.
Created on February 2026 -
MarbleMaze: Currency & Life Regeneration
MarbleMaze tracks five currencies — coins, stars, hearts, rockets, and UFOs — through a single
Dictionary<CoinType, int>. Hearts regenerate over real-world time usingDateTimecomparison rather than running a game-time timer, which means they accumulate correctly while the app is closed. A parallel event system drives all HUD updates soCoinManagernever touches UI directly.
The Currency Store
CoinManagermaintains two parallel dictionaries — current amounts and previous amounts:private Dictionary<CoinType, int> coins = new Dictionary<CoinType, int>(); private Dictionary<CoinType, int> previousCoins = new Dictionary<CoinType, int>();previousCoinsexists solely for the HUD animation system:OnCoinChangedbroadcasts both values soCurrencyPannelcan tween the displayed number from the old value to the new one. Any time a currency is written,LevelPreviousCoinAmountlevels the two dictionaries back into sync:public void LevelPreviousCoinAmount(CoinType type) { previousCoins[type] = coins[type]; }Adding a new currency type requires only a new enum entry and a
coins.AddinStart— no other code changes.
Events: Decoupled UI Updates
CoinManagerexposes four events and no direct UI references:public event Action<CoinType, int, int> OnCoinChanged; // type, newValue, previousValue public event Action<CoinType, int> OnCoinSet; // type, value (hard set, no animation) public event Action<TimeSpan> OnHeartTimerTick; public event Action<TimeSpan> OnCoinTimerTick;OnCoinChangedcarries both the new and previous value so subscribers can decide whether to animate.OnCoinSetis used during session restore when the displayed value should snap immediately rather than tween. Every UI panel subscribes inOnEnableand unsubscribes inOnDisable— no persistent references:protected virtual void OnEnable() { coinManagerRef = CoinManager.Instance; coinManagerRef.OnCoinSet += SetCurrencyValue; coinManagerRef.OnCoinChanged += UpdateCurrencyValue; } protected virtual void OnDisable() { coinManagerRef.OnCoinSet -= SetCurrencyValue; coinManagerRef.OnCoinChanged -= UpdateCurrencyValue; }
Heart Regeneration: DateTime Arithmetic
Hearts regenerate at a fixed rate (
timeToRegainHeartInMinutes) using twoDateTimefields persisted across sessions. The core logic sits inRecalculateHearts, called every frame while the app is focused:private void RecalculateHearts() { if (coins[CoinType.HEART] >= maxHeartAmount) { coins[CoinType.HEART] = maxHeartAmount; currentMinutesUntilFullHearts = -1; return; } DateTime now = DateTime.UtcNow; TimeSpan elapsed = now - lastHeartRefillTime; int heartsToAdd = (int)(elapsed.TotalMinutes / timeToRegainHeartInMinutes); if (heartsToAdd <= 0) return; int totalHeartsAmount = Mathf.Min(coins[CoinType.HEART] + heartsToAdd, maxHeartAmount); SetCurrencyAmount(CoinType.HEART, totalHeartsAmount); // Advance the refill timestamp by exactly the time consumed lastHeartRefillTime = lastHeartRefillTime.AddMinutes( heartsToAdd * timeToRegainHeartInMinutes ); }The key is the last line:
lastHeartRefillTimeis advanced byheartsToAdd * interval, not set toDateTime.UtcNow. This preserves sub-interval remainder time — if the player was owed 1.7 hearts, the 0.7 partial interval carries forward into the next calculation rather than being discarded. The result is mathematically exact regeneration regardless of call frequency.
Refill Timer: When It Starts
The refill timer only starts when the heart count drops from the maximum:
public void ReduceCurrencyAmount(CoinType type, int amount)
{
    coins[type] -= amount;

    if (type == CoinType.HEART)
    {
        if (coins[CoinType.HEART] == maxHeartAmount - 1)
        {
            // Start refill timer ONLY when dropping from max
            lastHeartRefillTime = DateTime.UtcNow;
        }
        RecalculateHearts();

        if (coins[CoinType.HEART] == 0)
            FirebaseManager.Instance.LogEvent("no_hearts_left");
    }

    OnCoinChanged?.Invoke(type, coins[type], previousCoins[type]);
    LevelPreviousCoinAmount(type);
}
If the player already has fewer than the maximum, the existing
lastHeartRefillTimeis preserved and continues to accumulate — losing a second heart doesn’t reset the timer for the first.
Live Countdown: OnHeartTimerTick
A coroutine fires every real second and emits both timers as
TimeSpanvalues. UI panels subscribe to format and display them without any polling:IEnumerator TimerTickRoutine() { var wait = new WaitForSecondsRealtime(1f); TimeSpan remainingHeartTime = TimeUntilNextHeart(); OnHeartTimerTick?.Invoke(remainingHeartTime); TimeSpan remainingCoinVideoTime = TimeUntilNextCoinVideo(); OnCoinTimerTick?.Invoke(remainingCoinVideoTime); yield return wait; } public TimeSpan TimeUntilNextHeart() { if (coins[CoinType.HEART] >= maxHeartAmount) return TimeSpan.Zero; DateTime nextHeartTime = lastHeartRefillTime.AddMinutes(timeToRegainHeartInMinutes); return nextHeartTime > DateTime.UtcNow ? nextHeartTime - DateTime.UtcNow : TimeSpan.Zero; }The coroutine is restarted each
Updateframe so it’s always in sync with the focused-app check — the timer only ticks whileApplication.isFocusedis true.
Rewarded Video Safety Window
Hearts and coins can be granted by rewarded video ads, but rapid re-claims must be prevented. Both
RewardHeartsandRewardCoinscheck a sharedrewardedVideoSafeTimecountdown:public void RewardHearts(int amount) { if (rewardedVideoSafeTime > 0) return; rewardedVideoSafeTime = 20.0f; coins[CoinType.HEART] += amount; RecalculateHearts(); OnCoinChanged?.Invoke(CoinType.HEART, coins[CoinType.HEART], previousCoins[CoinType.HEART]); LevelPreviousCoinAmount(CoinType.HEART); SavingManager.Instance.SavePlayer(); }rewardedVideoSafeTimeis a float decremented everyUpdatetick. The 20-second window gives enough time for any pending ad callbacks to fire without triggering a double-grant if the user taps the reward button twice in quick succession. Coins have an additionallastVideoRewardTimepersisted to disk, enforcing a 4-hour cooldown across sessions:public TimeSpan TimeUntilNextCoinVideo() { DateTime nextPossibleVideo = lastVideoRewardTime.AddHours(hoursBetweenRewardedCoins); return nextPossibleVideo > DateTime.UtcNow ? nextPossibleVideo - DateTime.UtcNow : TimeSpan.Zero; }
LifeManager: In-Game Heart Representation
CoinManagertracks the full persistent heart count (up to the configured maximum).LifeManagerwraps it with an in-game cap of 3, so the player can have 15 hearts stored but only 3 on any given level:public void ResetLife() { currentLife = Mathf.Clamp( CoinManager.Instance.GetCoinAmount(CoinType.HEART), 0, 3); }ResetLifeis called at the start of each level and at the end panel before returning to the menu, socurrentLifealways reflects the current heart balance up to the in-game maximum. Losing a life reduces bothcurrentLifeand the persistentCoinType.HEARTamount simultaneously:public void RemoveLife() { if (currentLife > 0) { currentLife--; CoinManager.Instance.ReduceCurrencyAmount(CoinType.HEART, 1); } LevelManager.Instance.IncreaseLivesLostToThisLevel(); OnLifeRemoved?.Invoke(); }OnLifeRemovedis whatPlayerMovementsubscribes to in order to increase its ground-detection sphere radius after each life lost — a mechanical accessibility assist that comes naturally from the existing event without any additional coupling.
Created on February 2026 -
MarbleMaze: Deep Dive — Power-Up System, Player & DOTween Choreography
The player marble and its two power-ups — Rocket and UFO — share the same space but are fundamentally different objects. Swapping between them cleanly, without physics glitches or camera pops, required building a choreographed transition system on top of DOTween and a tightly coupled visual FSM on the player side. This post covers both, plus the movement, input, and camera systems that make the marble feel physical.
Power-Up Architecture
The core problem: when the player activates a power-up, several things must happen in a specific order with no overlap. Physics must be frozen before the swap; the camera must follow the new object before the old one disappears; the grow animation must not start until the shrink is complete.
A
Sequencefrom DOTween is the right tool — it guarantees order, allows callbacks between tween steps, and can be killed cleanly if activation is interrupted.PowerUpData and State
Each power-up is described by a
PowerUpDatastruct carrying its scene reference, duration, height offset, and cached original scale. Both are registered in aDictionary<CoinType, PowerUpData>atAwake:// PowerUpManager.cs [Serializable] public class PowerUpData { public CoinType type; public GameObject objectRef; public float duration; public float heightOffset; public int buyingValue; [HideInInspector] public Vector3 originalScale; } private void Awake() { powerUps = new Dictionary<CoinType, PowerUpData> { { rocket.type, rocket }, { ufo.type, ufo } }; foreach (var pu in powerUps.Values) { pu.originalScale = pu.objectRef.transform.localScale; // cache before hiding pu.objectRef.SetActive(false); } }Caching
originalScaleatAwake— before the object is hidden — ensures the grow animation always targets the correct designer-set scale regardless of later modifications.A three-value
PowerUpStateenum drives the manager’s public contract:public enum PowerUpState { Using, Clear, Blocked } private void SetPowerUpState(PowerUpState state) { powerUpState = state; OnPowerUpStateChanged?.Invoke(state); // UI, buttons, and EndTrigger subscribe to this }UsePowerUpguards against double-activation and dying-while-using:public void UsePowerUp(CoinType type) { if (powerUpState == PowerUpState.Using || playerState != PlayerState.Alive) return; // … ActivatePowerUp(pu); SetPowerUpState(PowerUpState.Using); }
Activation — The DOTween Sequence
ActivatePowerUpkills any in-flight tweens from a previous call before building a newSequence:private void ActivatePowerUp(PowerUpData pu) { powerUpScaleTween?.Kill(); sequence?.Kill(); sequence = DOTween.Sequence().SetTarget(this); // tagged for targeted Kill on disable Rigidbody puRb = pu.objectRef.GetComponent<Rigidbody>(); // 1. Position power-up at player's XZ, at its design height Vector3 pos = player.transform.position; pos.y = pu.heightOffset; pu.objectRef.transform.position = pos; pu.objectRef.transform.localScale = HiddenScale; // start invisible // 2. Camera switches before the player disappears PlayerCamera.SetCameraFollow(pu.objectRef); // 3. Freeze player physics during the transition playerRigidbody.isKinematic = true; // 4. Tell the player to shrink; reveal the power-up object simultaneously sequence.AppendCallback(() => { playerVisualEffects.ShouldShrink(); pu.objectRef.SetActive(true); }); // 5. Power-up grows with squash-and-stretch powerUpScaleTween = pu.objectRef.transform .DOScale(pu.originalScale * squashStretch, scaleDuration) // overshoot .SetEase(easeOut) // EaseOutBack .OnComplete(() => pu.objectRef.transform.DOScale(pu.originalScale, 0.1f) // settle ); sequence.Append(powerUpScaleTween); // 6. Unfreeze power-up physics — it can now roll/fly sequence.AppendCallback(() => puRb.isKinematic = false); }The camera transfer at step 2 — before the player shrinks — is intentional. If the camera were switched after the shrink, there would be a frame where it follows nothing. Switching first means the camera smoothly transitions to the new target while the player is still visible.
easeOut = Ease.OutBackand the 15% overshoot (* squashStretch) give the power-up a confident, elastic arrival. The quick 0.1s settle inOnCompleteavoids the tween chain being a nestedSequence— it’s a one-shot inline correction.
Deactivation — Reversing the Sequence
Deactivation mirrors activation but with inverted easing —
Ease.InBackfor the shrink feels like the power-up is being sucked away:private void DeactivatePowerUp() { powerUpScaleTween?.Kill(); sequence?.Kill(); sequence = DOTween.Sequence().SetTarget(this); var pu = powerUps[currentPowerType]; Rigidbody puRb = pu.objectRef.GetComponent<Rigidbody>(); // 1. Freeze power-up physics puRb.isKinematic = true; // 2. Teleport player to power-up's current world position; hide it player.transform.position = pu.objectRef.transform.position; player.transform.localScale = HiddenScale; // 3. Camera returns to player before the power-up disappears PlayerCamera.SetCameraFollow(player); // 4. Shrink the power-up to zero powerUpScaleTween = pu.objectRef.transform .DOScale(HiddenScale, scaleDuration) .SetEase(easeIn) // EaseInBack .OnComplete(() => pu.objectRef.SetActive(false)); sequence.Append(powerUpScaleTween); // 5. Re-enable player: show it, grow it, unfreeze physics, reset rotation sequence.AppendCallback(() => { player.SetActive(true); playerVisualEffects.ShouldGrow(); playerRigidbody.isKinematic = false; pu.objectRef.transform.rotation = Quaternion.identity; // reset any tilt }); }Teleporting the player to the power-up’s position at step 2 means the marble reappears exactly where the Rocket or UFO was — no spatial discontinuity for the player.
DOTween Cleanup
All tweens use
SetTarget(this)so they are associated with the manager:private void OnDisable() { DOTween.Kill(this); // kills all tweens targeting this component powerUpScaleTween?.Kill(); // explicit safety for the detached scale tween }DOTween.Kill(this)is a targeted kill — it only affects tweens whoseSetTargetmatchesthis. Without it, a scene reload while a tween is mid-flight would leave orphaned tweens referencing destroyed objects.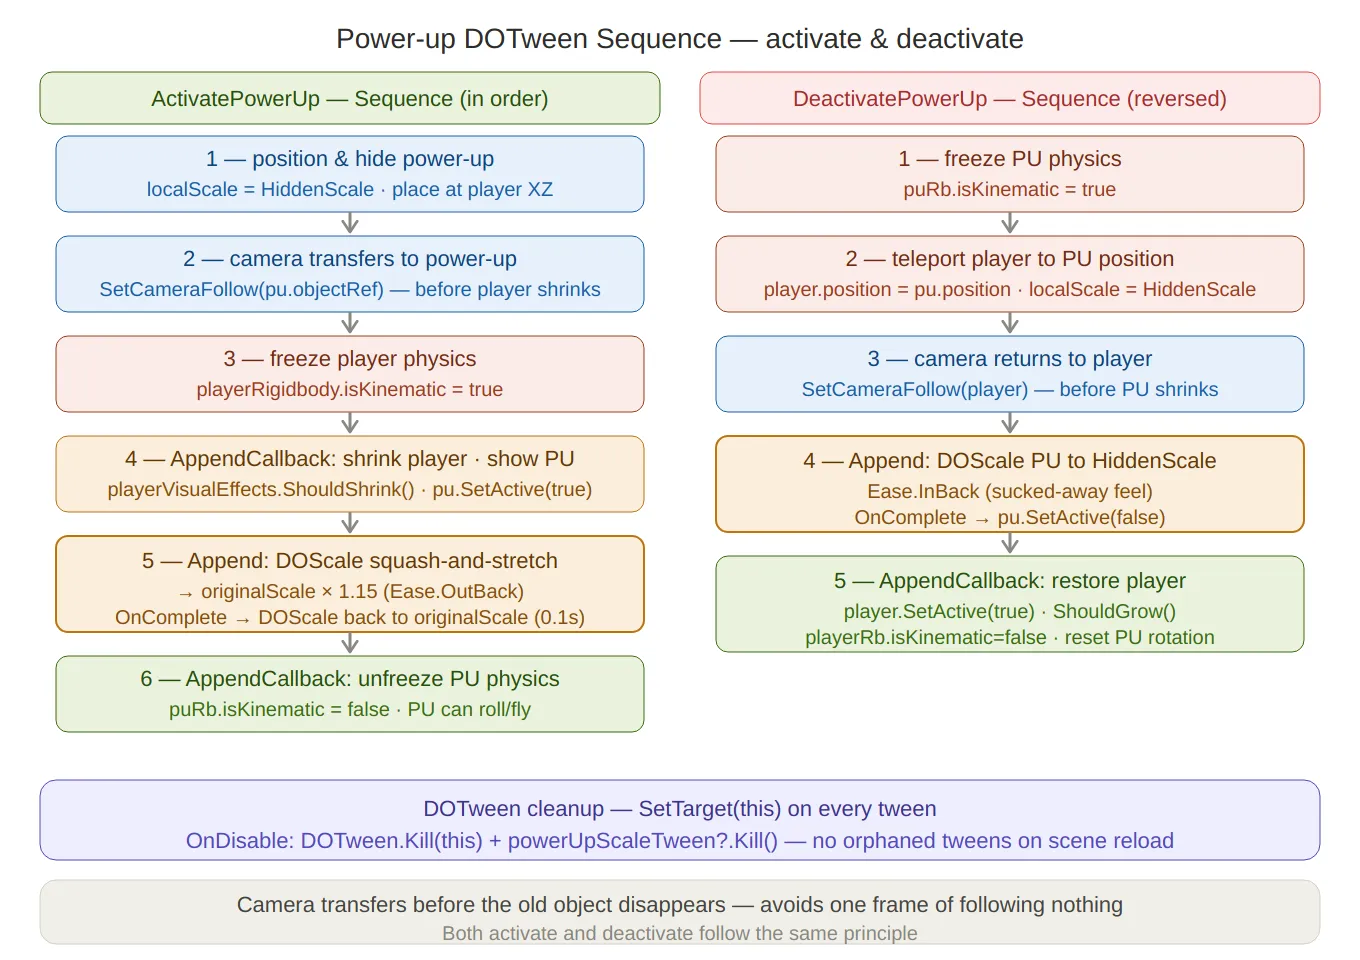
Power-up DOTween sequence — both activation (left) and deactivation (right) laid out as numbered step stacks, with the camera-transfer-first rule annotated at the bottom. The
Ease.OutBacksquash-and-stretch and the invertedEase.InBackdeactivation are both called out. TheSetTarget(this)cleanup note sits in the footer.
PlayerVisualEffects — Reusable Bidirectional Tweens
The shrink and grow animations on the marble are not separate tweens — they are the same tween played in opposite directions.
In
OnEnable, a singlescaleTweenis created, paused immediately, and configured with callbacks for both ends:// PlayerVisualEffects.cs scaleTween = transform .DOScale(originalScale, shrinkDuration) .SetEase(Ease.InOutQuad) .SetAutoKill(false) // keep alive after completion so it can be replayed .Pause() .SetLink(gameObject) // auto-kill if the GameObject is destroyed .OnRewind(OnShrinkComplete) // fires when played backwards and reaches t=0 .OnComplete(OnGrowComplete); // fires when played forwards and reaches t=1A matching
trailScaleTweendrives the trail renderer’swidthMultiplierin sync:trailScaleTween = DOTween.To( () => trailRenderers[0].widthMultiplier, value => { foreach (var tr in trailRenderers) tr.widthMultiplier = value; }, originalTrailWidth, shrinkDuration) .SetEase(Ease.InOutQuad) .SetAutoKill(false) .Pause() .SetLink(gameObject);Both are driven by a five-state FSM that responds to external
Should*flags set byPowerUpManagerandDeadZone:private enum AnimationState { Idle, Shrink, Shrunk, Grow, Blink } private void EvaluateAnimationState() { switch (state) { case AnimationState.Idle: if (shouldShrink) EnterShrink(); if (shouldBlink) EnterBlink(); break; case AnimationState.Shrunk: if (shouldGrow) EnterGrow(); break; // Shrink, Grow, Blink → waiting for tween callback, no polling needed } } private void EnterShrink() { state = AnimationState.Shrink; scaleTween.PlayBackwards(); trailScaleTween.PlayBackwards(); } private void EnterGrow() { state = AnimationState.Grow; scaleTween.PlayForward(); trailScaleTween.PlayForward(); }OnRewindandOnCompleteadvance the FSM when each direction finishes — no polling, noWaitForSeconds, no frame delay:private void OnShrinkComplete() { state = AnimationState.Shrunk; shouldShrink = false; } private void OnGrowComplete() { state = AnimationState.Idle; shouldGrow = false; }The Blink Sequence
The blink effect (played on spike death) is a nested DOTween structure — an inner loop sequence wrapped by an outer delay sequence:
private void EnterBlink()
{
    state = AnimationState.Blink;
    EnableTrail(false);

    // Inner loop: toggle renderers off/on N times
    Sequence blinkLoop = DOTween.Sequence()
        .AppendCallback(() => SetRenderers(false))
        .AppendInterval(blinkDuration)
        .AppendCallback(() => SetRenderers(true))
        .AppendInterval(blinkDuration)
        .SetLoops(blinkCount * 2);  // blinkCount full on/off cycles

    // Outer: pre-delay so the spike impulse plays out first, then blink
    blinkTween = DOTween.Sequence()
        .AppendInterval(blinkDelay)
        .Append(blinkLoop)
        .SetLink(gameObject)
        .OnComplete(() => OnBlinkCompleted());
}
SetLoops(blinkCount * 2)rather thanblinkCountbecause each full visible/invisible cycle is two half-cycles in the inner sequence.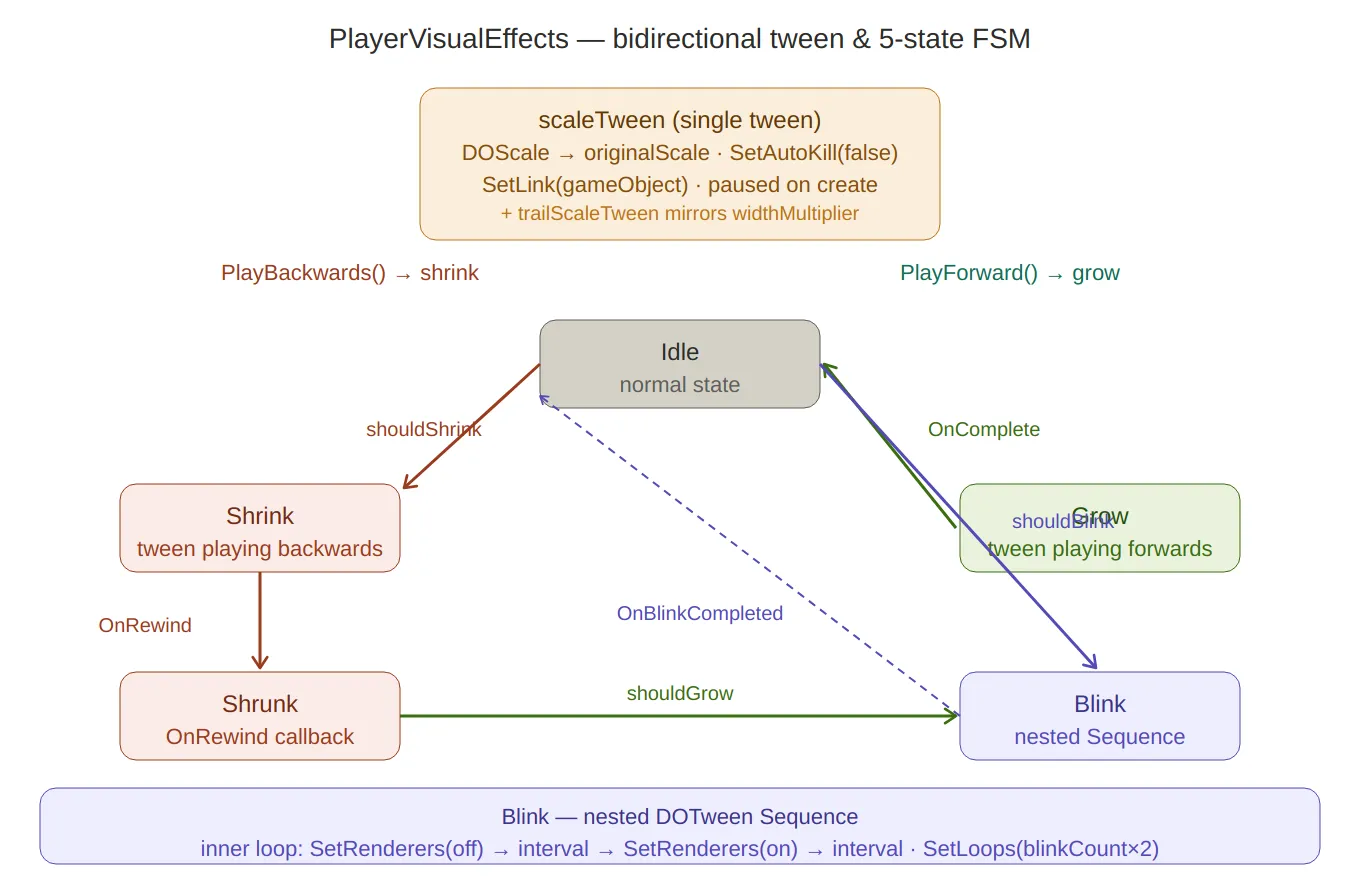
Visual effects FSM — the single bidirectional
scaleTweenat the top, then the five-state loop (Idle → Shrink → Shrunk → Grow → back to Idle, plus the Blink branch from Idle). Arrows are labelled with the trigger flags (shouldShrink,shouldGrow) and the tween callbacks (OnRewind,OnComplete). The nested blink sequence structure is explained at the bottom.
PlayerMovement — Physics & Ground Detection
Spherecast Ground Check
A
SphereCastrather than aRaycastis used for ground detection — a thin ray misses edges the marble is clearly resting on, while a sphere of radius 0.75 catches them:// PlayerMovement.cs — CheckGrounded() Ray ray = new Ray(transform.position, Vector3.down); isGrounded = Physics.SphereCast(ray, groundDetectionRadius, out hit, groundCheckDistance, groundedLayerMask);lastSafePlatformis updated every grounded frame, excluding hazard tiles and the end trigger — so the marble always respawns on solid, safe ground:if (!hit.collider.CompareTag("Hazard") && !hit.collider.CompareTag("MovingPlatform") && !hit.collider.CompareTag("End")) lastSafePlatform = hit.collider.transform;Adaptive Ground Radius
After two lives are lost on the same level, the spherecast radius expands from 0.75 to 0.95 — subtly making the marble easier to land without any visible change:
private void SetGroundRadiusHelp(int numberOfLivesLost)
{
    if (numberOfLivesLost >= 2)
        groundDetectionRadius = 0.95f;
}
This subscribes directly to
LevelManager.OnLifeLostToThisLevel, so it fires automatically with no polling.Rolling with Torque
Movement applies torque perpendicular to the input direction — physically correct for a rolling sphere and better feeling than direct force:
private void Roll() { Vector3 torque = Vector3.Cross(Vector3.up, movementInput.normalized); playerRigidbody.AddTorque(torque * torqueStrength, ForceMode.Acceleration); }ForceMode.Accelerationapplies the torque ignoring mass — the marble accelerates at the same rate regardless of scale changes during power-up transitions.Jump with Directional Help
The jump force includes a fraction of the current movement input to give the player directional control in the air. The fraction differs by surface type:
private void Jump()
{
    jumpHelpValue = currentPlatform.CompareTag("Ice") ? iceHelp : groundHelp;
    // iceHelp = 0.35f (slippery → bigger directional influence)
    // groundHelp = 0.2f (normal → smaller)

    Vector3 directionHelper = movementInput * jumpHelpValue;
    playerRigidbody.AddForce((Vector3.up + directionHelper).normalized * jumpForce,
        ForceMode.Impulse);
}
Extra gravity is applied every
FixedUpdatewhen airborne — making falls feel snappy rather than floaty:private void ApplyExtraGravity() { if (!isGrounded) playerRigidbody.AddForce(Physics.gravity * gravityScale, ForceMode.Acceleration); }Moving Platform Counter-Torque
When the marble is standing still on a moving platform, angular velocity is damped to prevent it from spinning in place as the platform slides beneath it:
if (!allowRotation && currentPlatform.CompareTag("MovingPlatform"))
    playerRigidbody.angularVelocity =
        Vector3.Lerp(playerRigidbody.angularVelocity, Vector3.zero, 0.4f);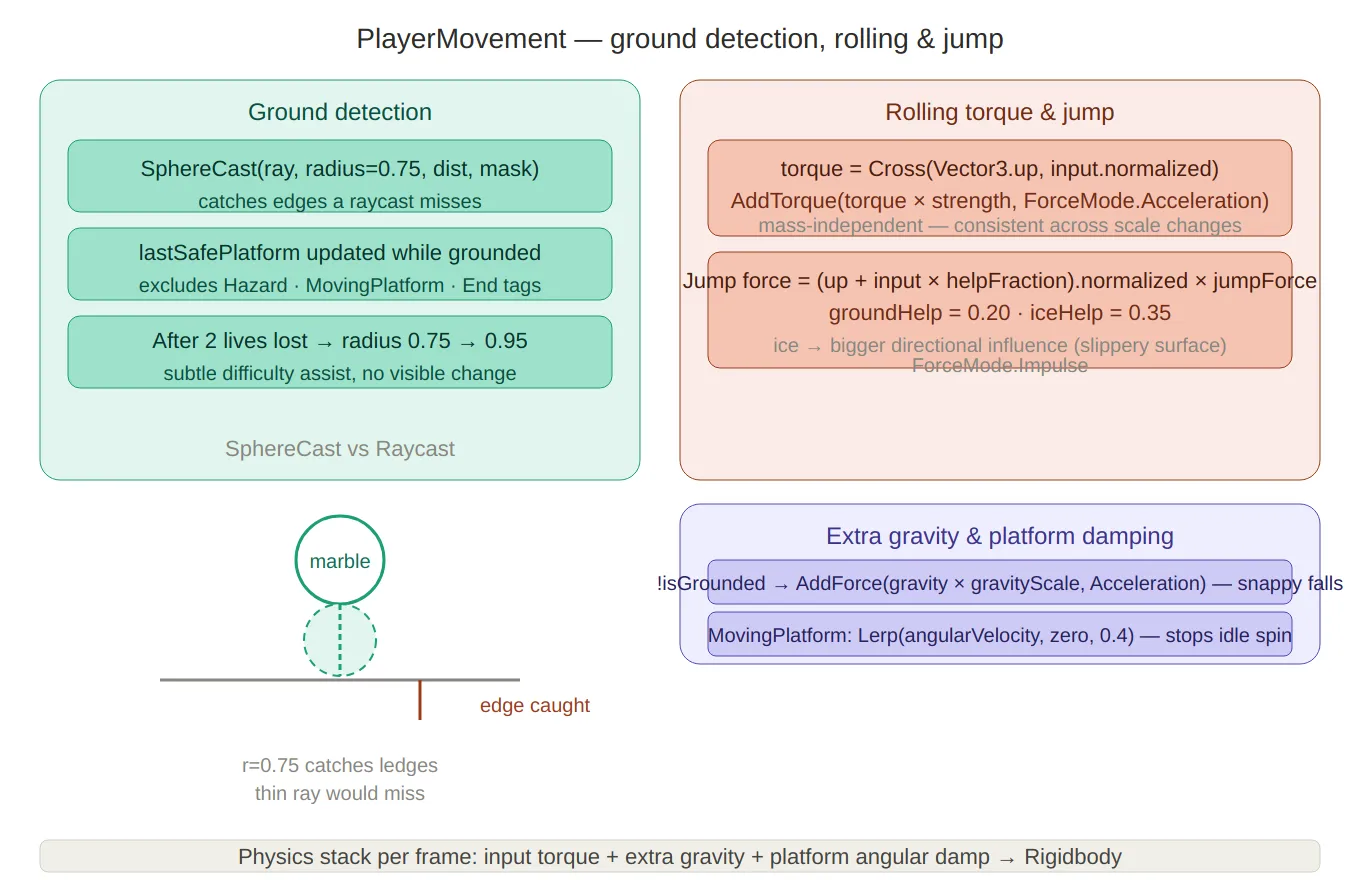
Movement & ground detection — left panel covers the spherecast (with a small visual showing the sphere catching a ledge a thin ray would miss) and the adaptive radius expansion after 2 lives lost. Right panel shows the torque cross-product formula, the
groundHelp/iceHelpdirectional jump blend, and extra gravity + platform angular damping.
PlayerController — Touch Input & Gesture Recognition
PlayerControlleruses Unity’sEnhancedTouchAPI, which provides per-finger tracking withFingerobjects andTouchPhasestates.Joystick Finger Tracking
The first finger down becomes the “joystick finger” — subsequent fingers trigger jumps immediately:
private void OnFingerDown(Finger finger)
{
    if (!InputGate.Allowed.HasFlag(AllowedInput.Touch)) return;
    if (IsPointerOverUI(finger)) return;

    if (joystickFinger == null)
    {
        joystickFinger    = finger;
        joystickStartPos  = finger.screenPosition;
        joystickStartTime = Time.timeAsDouble;
        joystickFingerDragged = false;
        return;
    }

    PerformJump(); // second finger = jump
}
Tap vs Swipe Disambiguation
On finger up, the system decides whether the gesture was a tap (trigger jump) or a drag (already sent movement) by checking three conditions simultaneously:
private void OnFingerUp(Finger finger)
{
    float duration = (float)(Time.timeAsDouble - joystickStartTime);
    float distance = Vector2.Distance(joystickStartPos, finger.screenPosition);

    bool isTapJump =
        InputGate.Allowed.HasFlag(AllowedInput.Tap) &&
        !joystickFingerDragged &&     // never moved past the deadzone
        duration <= tapMaxDuration && // < 0.25s
        distance <= tapMaxDistance;   // < 35px

    if (isTapJump) PerformJump();
    ResetJoystick();
}
The
joystickFingerDraggedflag is set inOnFingerMoveonly when the cumulative drag exceedsjoystickDeadZone(20px) — so brief accidental movements don’t suppress the jump on release.8-Cardinal Direction Snapping
Raw joystick input is snapped to the nearest of eight cardinal directions before being sent to
PlayerMovement. This makes diagonal movement feel intentional and consistent regardless of exact finger angle:// DirectionMapper.cs public static Vector2 MapTo8CardinalPoints(Vector2 analogInput, float deadzone = 0.1f) { float angle = Mathf.Atan2(analogInput.normalized.y, analogInput.normalized.x) * Mathf.Rad2Deg; if (angle < 0) angle += 360f; float snappedAngle = Mathf.Round(angle / 45f) * 45f % 360f; Vector2 snappedDirection = new Vector2( Mathf.Cos(snappedAngle * Mathf.Deg2Rad), Mathf.Sin(snappedAngle * Mathf.Deg2Rad) ); return snappedDirection * analogInput.magnitude; // preserve analog magnitude }Preserving the original
magnitudeis important — a light drag produces gentle rolling, a full drag produces maximum torque. Only the direction is snapped, not the intensity.Movement Gate Clamping
ClampMovementappliesMovementGateflags by zeroing the relevant axes — no conditional branches inPlayerMovement, just clean input before it reaches the physics system:private Vector2 ClampMovement(Vector2 input) { if (!MovementGate.Allowed.HasFlag(AllowedMovement.Forward)) result.y = Mathf.Min(result.y, 0f); if (!MovementGate.Allowed.HasFlag(AllowedMovement.Backward)) result.y = Mathf.Max(result.y, 0f); if (!MovementGate.Allowed.HasFlag(AllowedMovement.Right)) result.x = Mathf.Min(result.x, 0f); if (!MovementGate.Allowed.HasFlag(AllowedMovement.Left)) result.x = Mathf.Max(result.x, 0f); return result; }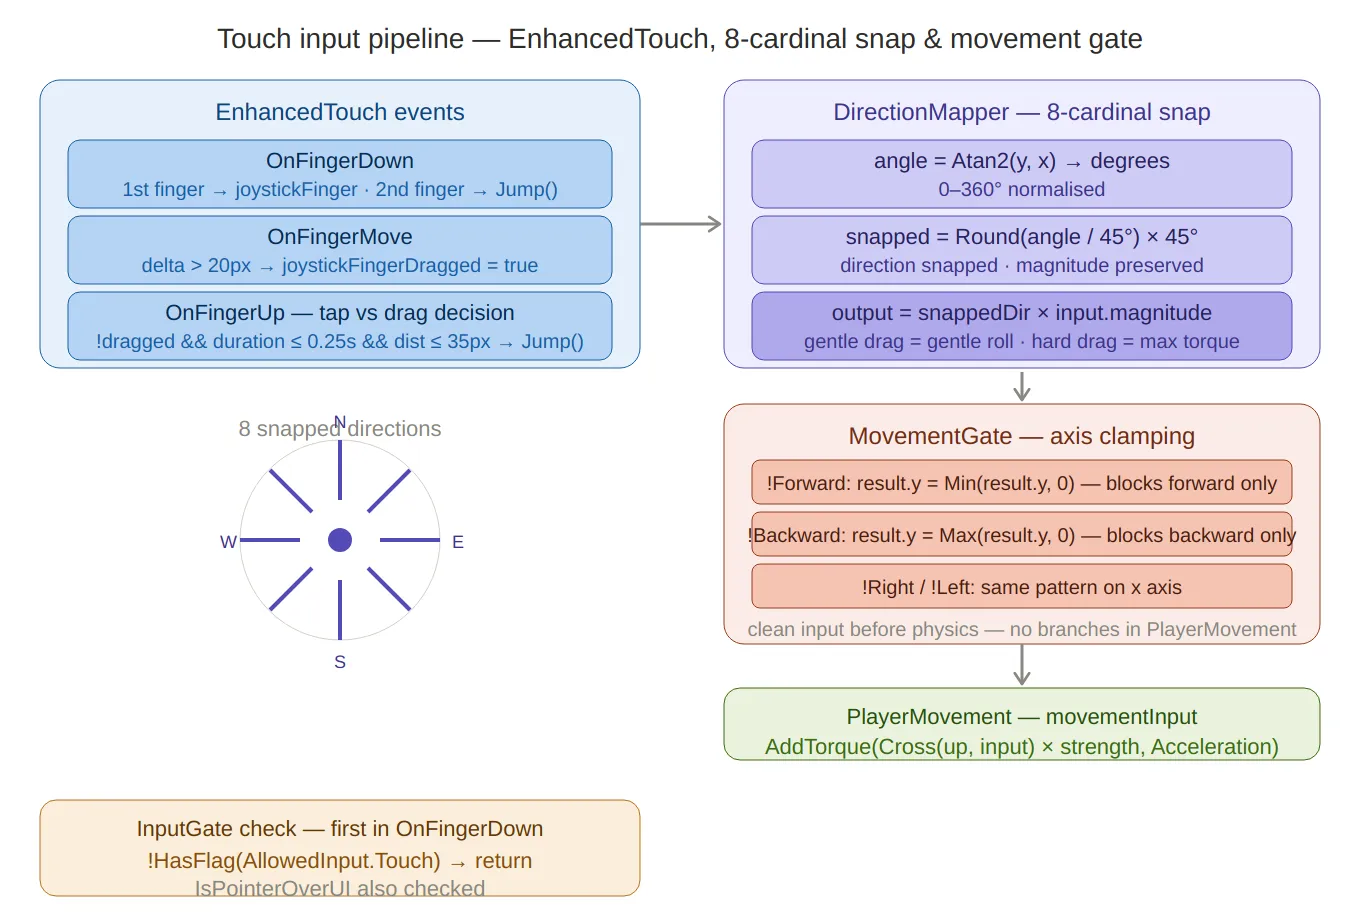
Touch input pipeline — three stages left to right:
EnhancedTouchevents (finger tracking, tap vs drag decision with the three-condition gate), the 8-cardinal direction snapper (with a compass rose visual showing the eight snapped directions), andMovementGateaxis clamping (zeroing individual axes without any conditional logic in the physics layer). TheInputGateUI check sits below as a prerequisite guard.
PlayerCamera — Follow, Shake & Grid Limits
The camera uses Cinemachine with a custom extension for grid-aware X clamping.
SetCameraFollowis a static method — any system can redirect the camera without a direct reference to thePlayerCameracomponent:public static void SetCameraFollow(GameObject objectToFollow) { cinemachineCam.Follow = objectToFollow != null ? objectToFollow.transform : null; }Camera shake drives Cinemachine’s
CinemachineBasicMultiChannelPerlinamplitude directly — a timer counts down inUpdateand sets amplitude to zero when it expires:// Jump shake: short, moderate amplitude public static void Shake(string _) { currentShakeTimer = shakeTimer; shakeAmplitude = 0.75f; } // Custom shake (e.g. end sequence rumble): duration + amplitude public static void Shake(float duration, float amplitude) { currentShakeTimer = duration; shakeAmplitude = amplitude; }X-axis camera limits are computed from the grid width at
Start, scaled by configurable percentage offsets — so the camera can only pan within the maze bounds:cameraLimitsX.x = (width - 1) * cellSize * cameraGridLimitsPercentage.x; cameraLimitsX.y = (width - 1) * cellSize * cameraGridLimitsPercentage.y; camClamp.SetXLimits(cameraLimitsX);
Summary
Component Key technique PowerUpManager.ActivatePowerUpDOTween Sequence: callback → squash scale → settle → callbackPowerUpManager.DeactivatePowerUpReverse sequence: kinematic freeze → teleport → shrink → callback DOTween.Kill(this)Targeted kill via SetTarget(this)— no orphaned tweens on scene reloadPlayerVisualEffectsscaleTweenSetAutoKill(false)+PlayForward/PlayBackwards— one tween, two directionsPlayerVisualEffectsblinkTweenNested Sequence: innerSetLoopsblink + outer delay wrapperPlayerMovement.CheckGroundedSphereCastradius 0.75 — catches edges a raycast missesAdaptive ground radius groundDetectionRadiusexpands to 0.95 after 2 lives lostRolling torque Vector3.Cross(up, input)+ForceMode.Acceleration— mass-independentJump directional help groundHelp/iceHelpfractions of movement input blended into jump forceDirectionMapperSnap angle to nearest 45° while preserving analog magnitude Tap/swipe disambiguation Three-condition gate: !joystickFingerDragged && duration <= 0.25s && distance <= 35pxClampMovementMovementGateflags zeroing axes — clean input before physicsPlayerCamera.SetCameraFollowStatic — any system can redirect without a component reference Created on February 2026 -
MarbleMaze: Save System & Data Persistence
Every mobile game needs save data that survives restarts, device swaps, and account changes. MarbleMaze has six independent data structures (game progress, player currencies, shop state, settings, tutorial flags, achievements) persisted through a Strategy pattern —
IDataService/JsonDataService— so the storage backend can be swapped without touching a single call site. On top of that, a Unity Cloud Save layer handles cross-device sync using a versioned payload and aSemaphoreSlim-guarded conflict resolution pipeline.
The Strategy Interface: IDataService
The entire save stack rests on a three-method interface:
public interface IDataService { bool Save<T>(T data, string fileName, bool overwrite = false); T Load<T>(string fileName); void Delete(string fileName); void ClearAllData(); }SavingManagerholds a singleIDataServicefield and constructs the implementation inAwake:private IDataService dataService; private void Awake() { // ... dataService = new JsonDataService(); }Nothing downstream ever references
JsonDataServicedirectly. Swapping to a binary, encrypted, or cloud-direct backend is a one-line change here.
JSON Persistence: JsonDataService
JsonDataServiceuses Newtonsoft.Json (not Unity’s built-inJsonUtility) for full support ofDictionary,DateTime, and polymorphic types. Path resolution is platform-aware via conditional compilation:private string GetFolderPath(string folderName) { #if UNITY_EDITOR return Path.Combine(Application.dataPath, folderName); #else return Path.Combine(Application.persistentDataPath, folderName); #endif }In the editor, files land inside
Assets/Data/(visible in the Project window for inspection). On device, they go toApplication.persistentDataPath— the OS-protected sandbox path that survives app updates.The save path includes automatic folder creation:
public bool Save<T>(T data, string fileName, bool overwrite)
{
    string path = GetFilePath(fileName);

    if (!Directory.Exists(GetFolderPath("Data")))
        Directory.CreateDirectory(GetFolderPath("Data"));

    try
    {
        if (File.Exists(path) && !overwrite)
            return false;

        string json = JsonConvert.SerializeObject(data, Formatting.Indented);
        File.WriteAllText(path, json);
        return true;
    }
    catch (System.Exception e)
    {
        Debug.LogError($"Could not save data to {path}: {e.Message}");
        return false;
    }
}
Six Data Structures
SavingManagerholds one typed field per data category:Field Type Contents currentGameDataGameDataLevel dictionary, difficulty debt, global modifier currentPlayerDataPlayerDataAll 5 currency amounts, DateTimetimers, skin/color indexcurrentSkinShopDataSkinShopDataDictionary<string, bool>per-item lock state by stable string IDcurrentSettingsDataSettingsDataAudio on/off, music on/off, vibration on/off currentTutorialDataTutorialDataCompletion flags for 4 tutorials, gift claim flags currentAchievementDataAchievementData6 integer counters (levels, perfect, marbles, premium, rockets, UFOs) Each has a corresponding
SaveXDataInFileandRestoreXDataFromFilemethod. Granular saves (SaveGame,SavePlayer,SaveShop) allow only the changed category to be written to disk rather than flushing all six files on every action.
Generic Read API: SavingManager
Any manager that needs to read saved state calls a single generic method:
public T Get<T>() where T : SaveableData
{
    if (typeof(T) == typeof(GameData))    return currentGameData as T;
    if (typeof(T) == typeof(PlayerData))  return currentPlayerData as T;
    if (typeof(T) == typeof(SkinShopData)) return currentSkinShopData as T;
    if (typeof(T) == typeof(TutorialData)) return currentTutorialData as T;
    if (typeof(T) == typeof(AchievementData)) return currentAchievementData as T;
    return null;
}
Call sites are one line with no casting required:
PlayerData p = SavingManager.Instance.Get<PlayerData>();
Bootstrap: LoadSession and SaveSession
On startup,
CoreManagercallsSavingManager.Instance.LoadSession(), which restores all six categories in sequence and pushes their values into the relevant managers:public void LoadSession() { RestoreGameDataFromFile(GameDataFileName); RestorePlayerDataFromFile(PlayerDataFileName); RestoreSkinShopDataFromFile(SkinDataFileName); RestoreSettingsDataFromFile(SettingsDataFileName); RestoreTutorialDataFromFile(TutorialDataFileName); RestoreAchievementDataFromFile(AchievementDataFileName); }Each
Restoremethod creates a default object when the file is missing — so first-time installs work without any special-case code. Missing files setisDataPresent = false, whichCloudSaveManagerreads to decide whether to force a cloud load on the next authentication.SaveSessionis the symmetric full flush, used when writing to the cloud:public void SaveSession() { SaveGameDataInFile(GameDataFileName); SavePlayerDataInFile(PlayerDataFileName); SaveCustomizationShopDataInFile(SkinDataFileName); SaveSettingsDataInFile(SettingsDataFileName); SaveTutorialDataInFile(TutorialDataFileName); SaveAchievementDataInFile(AchievementDataFileName); if (CloudSaveManager.Instance != null) CloudSaveManager.Instance.BuildPayload(); }At the end of
SaveSession,BuildPayload()bundles all six structures into a singleCloudSavePayloadstamped with an incrementing version number.
Cloud Save: Versioned Payload and Conflict Resolution
The cloud key is a single JSON document containing all five persisted structures plus a monotonically increasing
versionfield and the device identifier:[Serializable] public class CloudSavePayload : SaveableData { public string deviceId; public long version; public PlayerData player; public SkinShopData skinShop; public GameData game; public TutorialData tutorial; public AchievementData achievement; }Conflict resolution in
SaveWithConflictResolutionAsyncuses aSemaphoreSlim(1,1)to prevent concurrent uploads from racing each other:private readonly SemaphoreSlim saveSemaphore = new(1, 1); private async Task SaveWithConflictResolutionAsync() { await saveSemaphore.WaitAsync(); try { CloudSavePayload localPayload = currentPayload; CloudSavePayload cloudPayload = await LoadFromCloudAsync(); if (cloudPayload != null) { if (cloudPayload.version > localPayload.version) { // Cloud is ahead — apply it and abort the upload ApplyCloudPayload(cloudPayload); lastKnownCloudVersion = cloudPayload.version; isDirty = false; return; } if (localPayload.version == cloudPayload.version) return; // Nothing to do } await SaveToCloudAsync(localPayload); lastKnownCloudVersion = localPayload.version; OnCloudSaveCompleted?.Invoke(); } catch (Exception e) { OnCloudOperationFailed?.Invoke(e); } finally { saveSemaphore.Release(); } }The resolution rule is simple: higher version wins. If the cloud version is ahead (another device played since the last sync), the cloud payload is applied locally and the upload is skipped. If versions match, the data is already in sync so no upload is needed. Only when the local version is strictly newer does the upload proceed.
Automatic Sync Triggers
Cloud save runs automatically on two triggers:
Time-based:
CloudSaveManager.Updateaccumulates real play time usingTime.deltaTime. When total accumulated time (stored inPlayerPrefsacross sessions) exceedssaveIntervalHours,TrySaveAllToCloudfires and resets the counter.Event-based (dirty flag):
LevelManagercallsCloudSaveManager.Instance.MarkDirty()everylevelsPerCycle * 2level completions:if (index % (levelsPerCycle * 2) == 0) CloudSaveManager.Instance.MarkDirty();The
Updateloop checksisDirtyon every frame — when set, a cloud save runs on the next tick regardless of the time accumulator. This ensures milestone progress is never lost even in short sessions.
Account Change Detection
When the user authenticates,
CloudSaveManagercompares the current UnityPlayerIdagainst the last known ID stored inPlayerPrefs. A mismatch means a different account logged in on the same device:string currentPlayerId = AuthenticationService.Instance.PlayerId; string lastPlayerId = PlayerPrefs.GetString(LastPlayerIdKey, ""); bool isNewPlayer = currentPlayerId != lastPlayerId; if (isNewPlayer) { SavingManager.Instance.DeleteAllData(); lastKnownCloudVersion = -1; await ForceCloudLoad(); OnCloudLoadCompleted?.Invoke(); }Local data is wiped and replaced with the account’s cloud state.
OnCloudLoadCompletedtriggersSavingManager.LoadSession(), which pushes the fresh data into all managers before the first scene loads.
Created on February 2026 -
MarbleMaze: Deep Dive — Timed Hazard Systems & Environment
Every tile hazard in MarbleMaze has two jobs: look good and not be frustrating. Looking good means smooth, readable motion. Not being frustrating means the player can always tell when it’s safe to cross. This post covers the shared interface that makes both properties consistent across every hazard type, the AnimationCurve-driven state machines behind each one, and everything else the environment does to the marble.
The ITimedHazard Interface
All three active hazard types — flapping doors, moving platforms, and spikes — implement the same interface:
// ITimedHazard.cs
public interface ITimedHazard
{
    void SetState(bool isInverted); // initialise to a phase offset
    float CycleDuration { get; }    // full open+close cycle in seconds
    bool IsSafe();                  // is it safe to cross right now?
}
Three methods, three distinct purposes:
SetStateis called once at spawn time byPhysicalMazeGenerator. TheisInvertedflag offsets the hazard to the midpoint of its cycle — used to prevent every hazard on a level starting in the same phase simultaneously.CycleDurationexposes the total loop time so external systems (audio cues, AI) can reason about timing without inspecting internals.IsSafelets any code — the player, a power-up, an AI navigator — ask whether the hazard is currently passable, again without knowing its internal state.Checkerboard Phase Assignment
The phase offset is assigned by
PhysicalMazeGeneratorusing a bitwise parity check on the cell’s grid coordinates:// PhysicalMazeGenerator.cs — SpawnGround() if (ground.TryGetComponent<ITimedHazard>(out var hazard)) { bool isInverted = ((x + y) & 1) == 1; hazard.SetState(isInverted); }(x + y) & 1is the parity of the coordinate sum —0for even,1for odd. On a grid, adjacent cells always have opposite parities, so every neighbouring hazard starts in the opposite phase. The result: hazards naturally alternate without any explicit coordination between instances.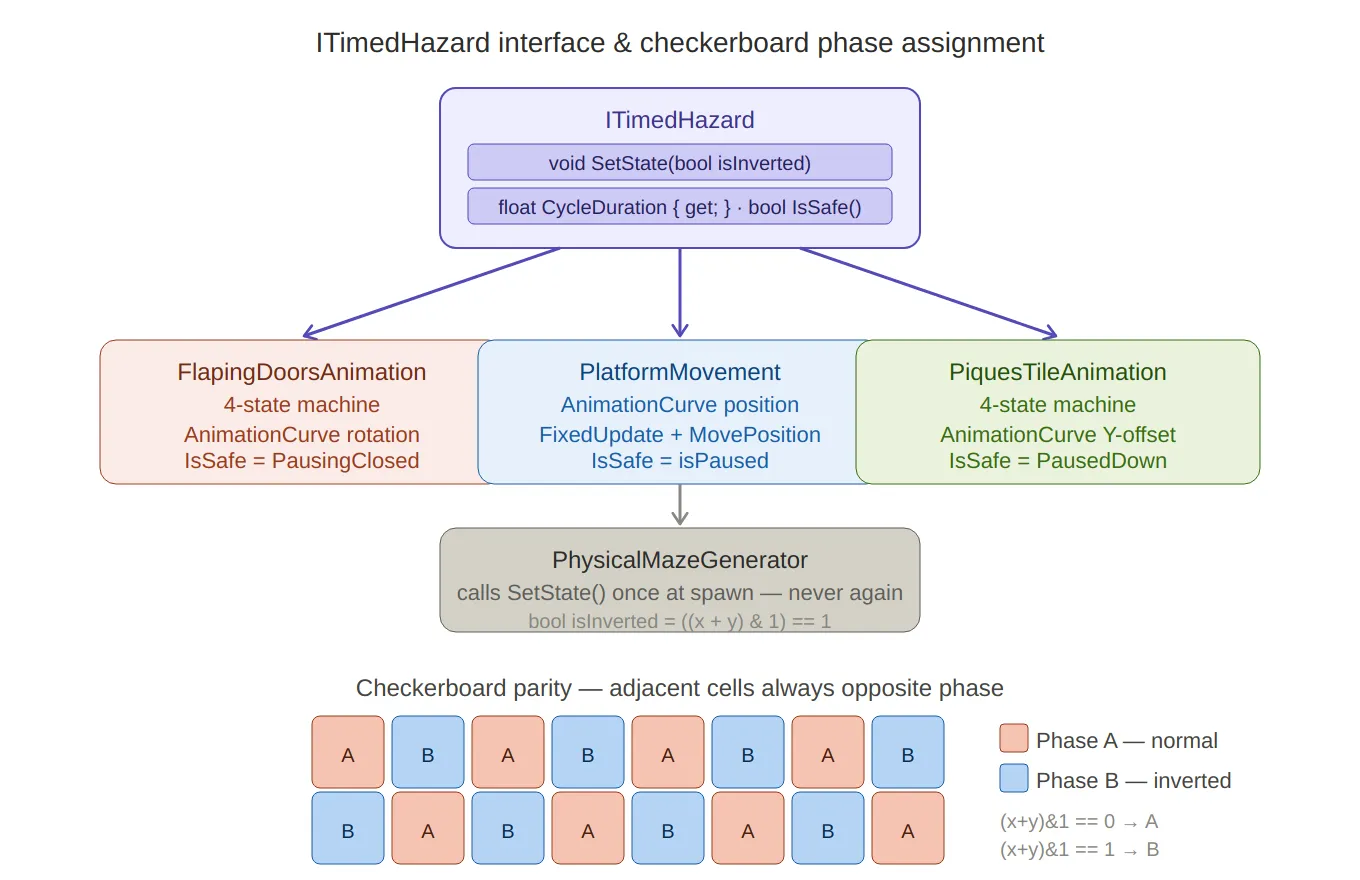
ITimedHazard + checkerboard — the interface sits at the top with its three methods, branching down to all three implementors (doors, platforms, spikes) with their key characteristics. Below, the checkerboard grid renders visually as alternating coral (Phase A) and blue (Phase B) cells, making the
(x+y)&1parity trick immediately obvious — adjacent cells are always the opposite colour.
Flapping Doors
The flapping door is the most complex hazard. It has four distinct states and two independent moving parts — a left and right door panel that mirror each other’s rotation.
The State Machine
// FlappingDoors.cs public enum DoorState { Opening, PausingOpen, Closing, PausingClosed } private DoorState state = DoorState.Opening; private float stateTimer;UpdateincrementsstateTimerevery frame and dispatches to state-specific logic:private void Update() { stateTimer += Time.deltaTime; switch (state) { case DoorState.Opening: if (!isOpening) { OnDoorOpening?.Invoke(); isOpening = true; } Animate(openCurve, openDuration, DoorState.PausingOpen); break; case DoorState.Closing: isOpening = false; Animate(closeCurve, closeDuration, DoorState.PausingClosed); break; case DoorState.PausingOpen: if (stateTimer >= openPauseDuration) NextState(); break; case DoorState.PausingClosed: if (stateTimer >= closePauseDuration) { OnPauseEnded?.Invoke(); NextState(); } break; } }NextStateuses a switch expression to advance only the two pause states — the animated states (Opening,Closing) advance themselves insideAnimatewhent >= 1:private void NextState() { stateTimer = 0f; state = state switch { DoorState.PausingOpen => DoorState.Closing, DoorState.PausingClosed => DoorState.Opening, _ => state }; }AnimationCurve-Driven Rotation
The actual motion is evaluated from an
AnimationCurveasset — not a hardcoded lerp. This means the designer can shape the easing entirely in the inspector: slow-in fast-out, bounce, anticipation — any curve Unity’s editor can express:private void Animate(AnimationCurve curve, float duration, DoorState next) { float t = Mathf.Clamp01(stateTimer / duration); float value = curve.Evaluate(t); leftDoor.localRotation = leftClosedRotation * Quaternion.Euler(0f, 0f, value * flapAngle); rightDoor.localRotation = rightClosedRotation * Quaternion.Euler(0f, 0f, -value * flapAngle); if (t >= 1f) { state = next; stateTimer = 0f; } }Both doors rotate symmetrically from their closed positions — left door by
+flapAngle, right door by-flapAngle. Pre-cachingleftClosedRotationandrightClosedRotationinStartmeans the rotation is always expressed relative to the designer-placed starting orientation, not accumulated over frames.IsSafereturnstrueonly when the doors are fully closed and stationary:public bool IsSafe() => state == DoorState.PausingClosed; public float CycleDuration => openDuration + openPauseDuration + closeDuration + closePauseDuration;Phase Initialisation
SetStateplaces the door at the midpoint of its cycle when inverted:public void SetState(bool isInverted) { if (isInverted) { state = DoorState.Closing; stateTimer = CycleDuration / 2; } else { state = DoorState.Opening; } }Starting at
CycleDuration / 2with the timer already advanced means the door effectively begins halfway through its second half — interleaving cleanly with its non-inverted neighbours.DoorAngularPush — Physics Interaction
When the player marble is caught between a closing door, a separate
DoorAngularPushcomponent applies a radial impulse force scaled by proximity to the door’s hinge:// DoorAngularPush.cs — OnCollisionStay if (doorsAnimation.State == FlapingDoorsAnimation.DoorState.Opening && !hasCollided && !otherDoor.hasCollided) { float distanceFromCenter = Mathf.Abs(playerPos.x - parentPos.x); float normalized = 1f - Mathf.Clamp01(distanceFromCenter / maxEffectiveDistance); float direction = Mathf.Sign(playerPos.x - parentPos.x); Vector3 force = new Vector3( direction * pushForce * normalized, pushForce * normalized, 0f ); collision.rigidbody.AddForce(force, ForceMode.Impulse); hasCollided = true; }normalizedis the inverse of normalised distance — 1.0 at the centre, 0.0 atmaxEffectiveDistance. A marble sitting directly under the hinge gets the full push; one at the edge gets almost none. ThehasCollidedflag ensures only one impulse fires per open cycle; it resets via theOnPauseEndedevent from the animation:private void OnEnable() => doorsAnimation.OnPauseEnded += EnableCollision; private void OnDisable() => doorsAnimation.OnPauseEnded -= EnableCollision; private void EnableCollision() => hasCollided = false;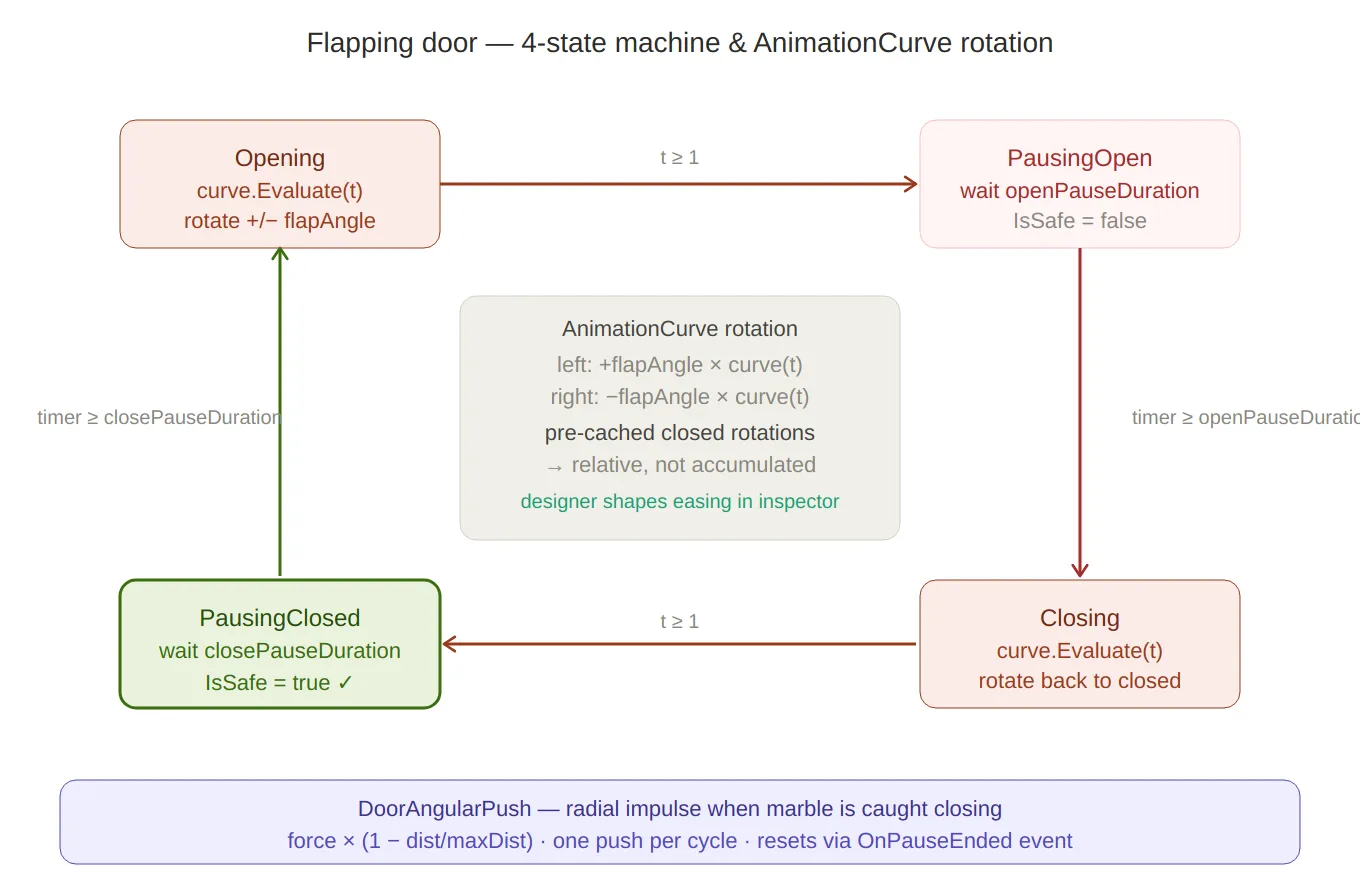
Door state machine — the four states arranged in a clockwise loop (Opening → PausingOpen → Closing → PausingClosed), with transition labels on each arrow. The centre panel explains the
AnimationCurverotation math — pre-cached closed rotations, mirrored±flapAngle, relative not accumulated.IsSafe = trueis highlighted in green only onPausingClosed. TheDoorAngularPushformula sits at the bottom.
Moving Platforms
Platforms use the same
ITimedHazardinterface and the sameAnimationCurvepattern, but applied to position rather than rotation — and running inFixedUpdateto stay in sync with the physics engine.// PlatformMovement.cs [RequireComponent(typeof(Rigidbody))] public class PlatformMovement : MonoBehaviour { [SerializeField] private AnimationCurve movementCurve; // 0–1 normalised offset [SerializeField] private float cycleDuration = 4f; [SerializeField] private float movementAmplitude = 3f; [SerializeField] private float pauseDuration = 0.25f; public event Action<bool> OnPlatformActive; // true = moving, false = pausedAwakesets the Rigidbody toInterpolatemode — essential for smooth visual motion when the physics tick rate is lower than the render rate:private void Awake() { rb = GetComponent<Rigidbody>(); rb.isKinematic = true; rb.interpolation = RigidbodyInterpolation.Interpolate; }The platform’s starting position is offset by
movementAmplitudeso the animation curve travels the full2 × amplituderange symmetrically:private void Start() { startPosition = rb.position; if (isHorizonal) startPosition.x -= movementAmplitude; else startPosition.z -= movementAmplitude; rb.position = startPosition; }Curve Evaluation and Keyframe Pause Detection
Every
FixedUpdate, the timer drives a normalisedtintomovementCurve.Evaluate. After applying the position, a pass over the curve’s keyframes checks whethertis within 1ms of any keyframe time — if so, the platform pauses:private void FixedUpdate() { if (isPaused) { pauseTimer -= Time.fixedDeltaTime; if (pauseTimer <= 0f) { isPaused = false; OnPlatformActive?.Invoke(true); } else return; } timer += Time.fixedDeltaTime; float t = (timer % cycleDuration) / cycleDuration; float normalizedOffset = Mathf.Clamp01(movementCurve.Evaluate(t)); Vector3 targetPosition = startPosition; if (isHorizonal) targetPosition.x += normalizedOffset * movementAmplitude * 2; else targetPosition.z += normalizedOffset * movementAmplitude * 2; rb.MovePosition(targetPosition); foreach (Keyframe key in movementCurve.keys) { if (Mathf.Abs(t - key.time) < 0.001f) { isPaused = true; pauseTimer = pauseDuration; OnPlatformActive?.Invoke(false); break; } } }The 0.001f threshold translates to about 1ms of cycle time — tight enough to only fire at the keyframe, loose enough to not miss it at any physics tick rate. Keyframes at
t = 0andt = 1(start and end of travel) produce the pauses the designer placed in the inspector curve.rb.MovePositionis used instead of settingtransform.positiondirectly — this keeps the Rigidbody in the physics pipeline and allows the marble to be carried correctly when standing on the platform.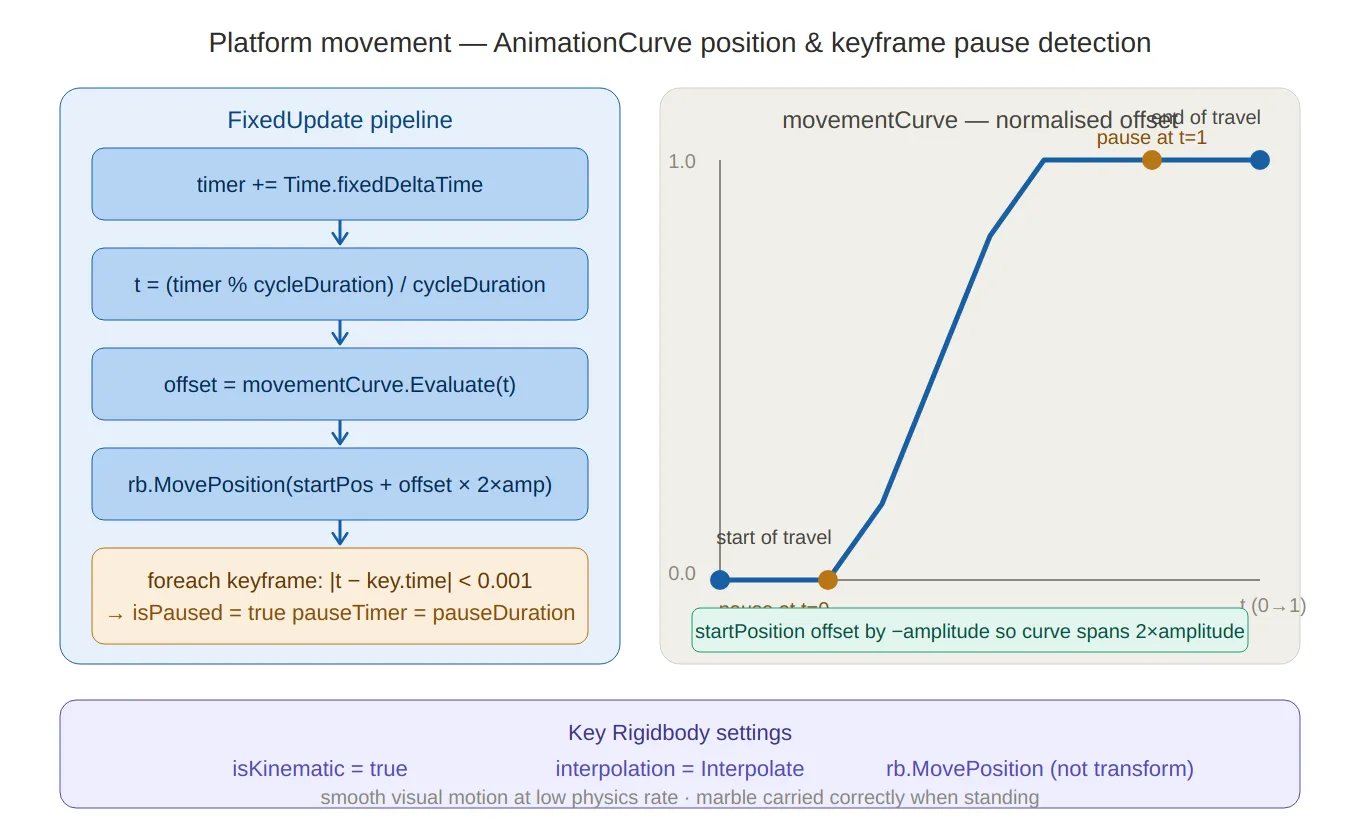
Platform movement — left side traces the five-step
FixedUpdatepipeline (timer →t→ curve evaluate →MovePosition→ keyframe pause check), right side shows an annotated S-curve chart with the0.001pause-detection threshold marked att=0andt=1. The three key Rigidbody settings (isKinematic,Interpolate,MovePosition) are called out at the bottom.
Spikes (Piques)
Spikes follow the same four-state pattern as doors, applied to vertical translation instead of rotation:
// PiquesTileAnimation.cs private enum PiquesState { Rising, PausedUp, Lowering, PausedDown } private void Animate(AnimationCurve curve, float duration, PiquesState next) { float t = Mathf.Clamp01(stateTimer / duration); float value = curve.Evaluate(t); piques.localPosition = piqueOriginalPosition + Vector3.up * piquesYOffset * value; if (t >= 1f) { state = next; stateTimer = 0f; } } public bool IsSafe() => state == PiquesState.PausedDown; public void SetState(bool isInverted) { if (isInverted) { state = PiquesState.Lowering; stateTimer = CycleDuration / 2; } else { state = PiquesState.Rising; } }piqueOriginalPositionis cached atStart, so the spike’s resting position can be freely placed in the inspector without affecting the animation math. The spikes are safe only while fully retracted (PausedDown), giving the player a clear visual window — when they’re down, cross; when they start rising, don’t.
Death Triggers
DeadZone — Fall Death
DeadZonehandles the standard fall-off-the-edge scenario usingOnCollisionEnter. It checksGameState.Playingfirst — so death can’t fire during a pause or cutscene — and guards against double-processing with theIsDyingstate check:// DeadZone.cs private void OnCollisionEnter(Collision collision) { if (GameStateManager.Instance.CurrentGameState != GameState.Playing) return; if (!collision.gameObject.CompareTag("Player")) return; if (playerMovement.State == PlayerState.IsDying) return; playerMovement.SetState(PlayerState.IsDying); LifeManager.Instance.RemoveLife(); if (LifeManager.Instance.CurrentLife > 0) playerMovement.ReplacePlayer(); // respawn else { GameStateManager.Instance.SetState(GameState.WaitingForContinue); continuePannel.SetActive(true); playerMovement.ReplacePlayer(); } }The state guard (
IsDying) prevents the same death from being processed twice if the marble clips multiple colliders in the same frame — a common problem with physics-based death zones.PiquesDeadZone — Spike Death with Impulse
Spikes use a different death zone because they should feel more violent than a simple fall. Instead of instantly respawning,
PiquesDeadZoneapplies a radial impulse that launches the marble away from the spike tile, then waits before respawning:// PiquesDeadZone.cs — OnTriggerEnter playerVisualEffects.ShouldBlink(); // start the blink effect Vector3 projectionDir = (collision.transform.position - transform.position).normalized; playerRigidbody.AddForce( new Vector3( projectionDir.x * radialForce, projectionForce, // upward component projectionDir.z * radialForce ), ForceMode.Impulse ); StartCoroutine(DeathSequenceAfterDelay(deathDelay));private IEnumerator DeathSequenceAfterDelay(float delay, bool isLastLife = false) { yield return new WaitForSeconds(delay); // let physics play out yield return new WaitForFixedUpdate(); // sync with physics step if (isLastLife) { GameStateManager.Instance.SetState(GameState.WaitingForContinue); continuePannel.SetActive(true); } playerMovement.ReplacePlayer(); }The
WaitForFixedUpdateafter the delay ensures the respawn position change happens cleanly in a physics frame, not mid-update — avoiding a one-frame jitter where the marble briefly appears at its old position.
Star Trigger
Stars are the simplest trigger in the game — three lines and they do everything they need:
// StarTrigger.cs
private void OnTriggerEnter(Collider other)
{
    if (!other.CompareTag("Player") &&
        !other.CompareTag("Ufo") &&
        !other.CompareTag("Rocket")) return;

    LevelManager.Instance?.IncreaseStarCount();
    VibrationManager.Instance?.MultiPop(3);    // 3-pulse haptic feedback
    AudioManager.Instance?.PlayStarSound();
    gameObject.SetActive(false);               // self-deactivate
}
Accepting all three player tags (
Player,Ufo,Rocket) means stars can be collected regardless of which power-up is active.SetActive(false)is used instead ofDestroy— cleaner for any future pooling system, and avoids the one-frame delayDestroyhas before the object actually disappears.
End Trigger — Level Completion Sequence
The level exit is a multi-phase coroutine that takes the marble through a cinematic sequence before transitioning to the end screen. Each phase has its own duration and easing function:
// EndTrigger.cs
private IEnumerator EndSequence(Transform player, Rigidbody rb)
{
    rb.isKinematic = true; // freeze physics for the sequence

    // Phase timings derived from a single animationDuration value
    float centerTime   = animationDuration * 0.10f;
    float levitateTime = animationDuration * 0.60f;
    float burstTime    = animationDuration * 0.30f;

    // ── 1. Snap to center of the exit tile ──
    yield return MoveOverTime(player, player.position, centerPos, centerTime, EaseInOut);

    // ── 2. Levitate: align upright, spin, rise ──
    StartCoroutine(RotateToUpright(player, alignTime)); // concurrent
    StartCoroutine(Spin(player, spinTime, 6f));         // concurrent
    StartRumble(spinTime);                              // camera shake + audio

    yield return MoveOverTime(player, levitateStart, levitateEnd, levitateTime, EaseOutSine);

    StopRumble();

    // ── 3. Burst upward ──
    PlayerCamera.SetCameraFollow(null); // detach camera
    rb.isKinematic = false;
    rb.linearVelocity = Vector3.zero;
    rb.AddForce(Vector3.up * burstForce, ForceMode.Impulse);
    PlayCometSound();

    yield return Spin(player, burstTime, 10f);

    // ── 4. Scene transition ──
    LevelManager.Instance.ProcessLevelData();
    SavingManager.Instance.SaveSession();
    SceneController.Instance.NewTransition()
        .Load(SceneDatabase.Slots.Content, SceneDatabase.Scenes.EndPannel)
        .Perform();
}
The levitate phase runs three coroutines concurrently:
RotateToUpright(Slerp to zero roll/pitch),Spin(continuous Y-axis rotation), and the mainMoveOverTime(vertical rise).yield returnwaits only on theMoveOverTime; the others run in parallel until the rise completes naturally.Custom easing functions are inline delegates rather than an external library:
private float EaseInOut(float t) => t * t * (3f - 2f * t); // smoothstep private float EaseOutSine(float t) => Mathf.Sin(t * Mathf.PI * 0.5f);MoveOverTimetakes the easing as aFunc<float, float>parameter, so each phase gets its own feel without duplicating the interpolation loop:private IEnumerator MoveOverTime( Transform t, Vector3 from, Vector3 to, float duration, Func<float, float> ease) { float elapsed = 0f; while (elapsed < duration) { t.position = Vector3.Lerp(from, to, ease(elapsed / duration)); elapsed += Time.deltaTime; yield return null; } t.position = to; }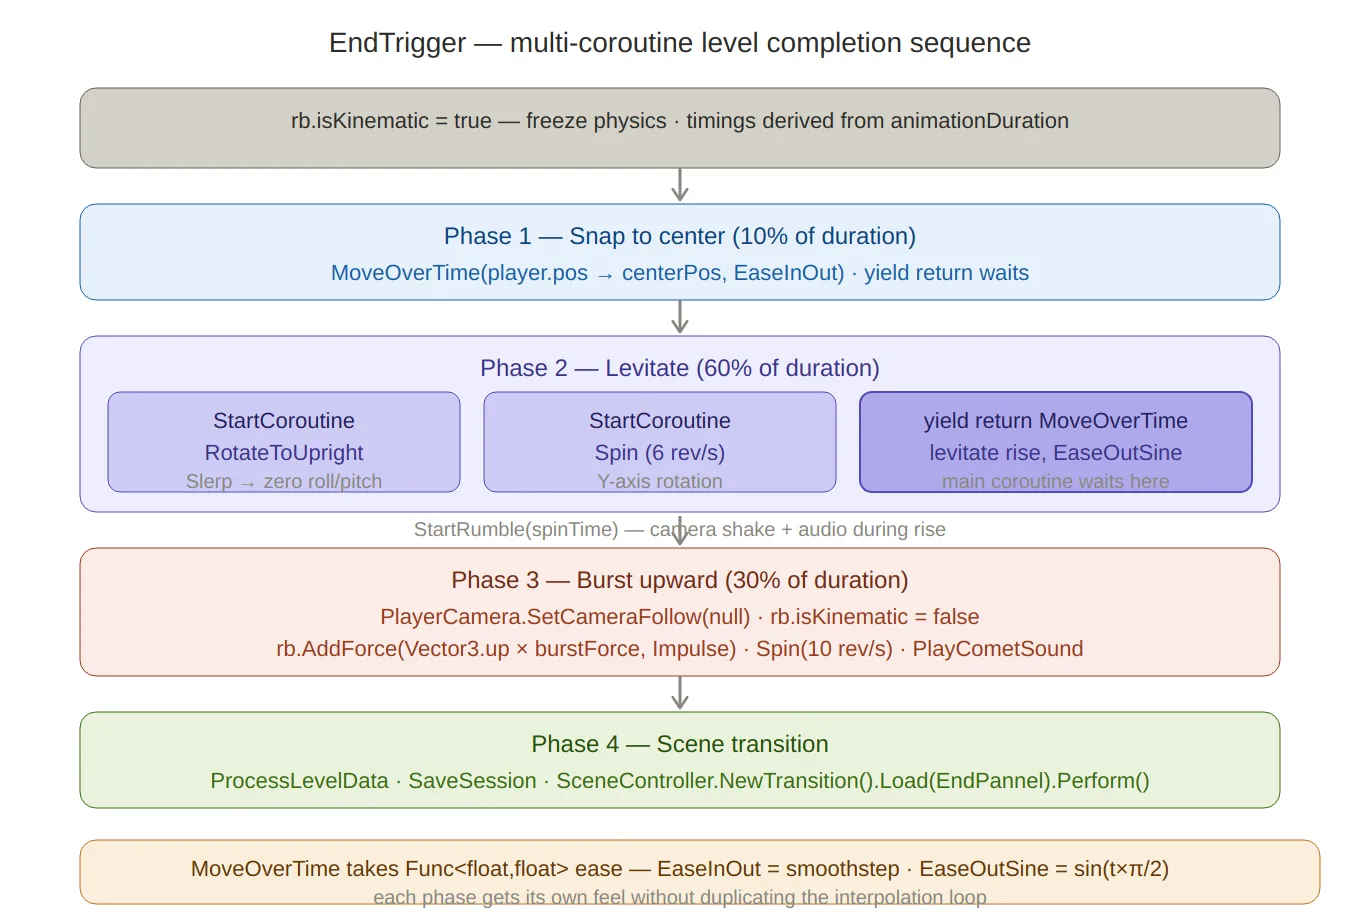
End trigger sequence — four sequential phases with timing percentages (10% / 60% / 30%), the concurrent coroutine structure in Phase 2 clearly showing three
StartCoroutinecalls running in parallel whileyield return MoveOverTimewaits on just the rise. TheFunc<float,float>easing injection pattern and both easing functions are noted at the bottom.
Summary
Component Technique Key detail ITimedHazardInterface IsSafe()+SetState()+CycleDurationCheckerboard phasing (x + y) & 1Adjacent hazards always start in opposite phases FlapingDoorsAnimation4-state machine + AnimationCurveIndependent open/close curves; Quaternion.Eulermirrored on both doorsDoorAngularPushDistance-normalized impulse One push per cycle; reset via OnPauseEndedeventPlatformMovementAnimationCurveposition +FixedUpdate0.001f keyframe pause detection; rb.MovePositionfor physics carryPiquesTileAnimation4-state machine + AnimationCurveY-offset translation; safe only during PausedDownDeadZoneOnCollisionEnterIsDyingstate guard prevents double-killPiquesDeadZoneRadial impulse + delayed respawn WaitForFixedUpdatefor clean physics-step respawnStarTriggerOnTriggerEnterMulti-tag, SetActive(false)notDestroyEndTriggerMulti-coroutine sequence Concurrent levitate phase; Func<float,float>easing injectionThe shared
ITimedHazardinterface is the architectural win here —PhysicalMazeGeneratorcallsSetStatethrough the interface at spawn time and never touches the hazards again. The checkerboard parity trick means all that phase distribution happens in one line with no runtime state to manage.Created on February 2026 -
MarbleMaze: Deep Dive — Pluggable Tutorial Condition System
Tutorials are the most fragile part of a mobile game. Write them with hardcoded input checks and you get a mess that breaks every time the UI shifts. Wire them to specific GameObjects and scene changes become a refactor. This post covers the system I built to make every tutorial step data-driven, input-agnostic, and fully configurable in the Unity inspector — without a single special-case in the core tutorial runner.
Architecture Overview
The system has four distinct layers that compose independently:
Condition Layer
  ITutorialCondition            — single-method interface: IsSatisfied()
  IContextBoundCondition        — extends with BindContext() for UI-aware conditions
  ITargetedTutorialCondition    — extends with AnchorId for inspector wiring
  10+ concrete implementations  — tap, swipe, drag, gamepad, area, ordered …

Tutorial Data Layer
  TutorialStep                  — conditions + mask + animations + input gate + events
  Tutorial                      — named sequence of steps
  TutorialManager               — coroutine runner; resolves conditions each frame

Scene Integration Layer
  TutorialContext               — registers UI anchor RectTransforms by string ID
  TutorialTrigger               — 3D physics trigger → fires manager callback
  TutorialSignalEmitter / Bus   — decoupled scene-to-manager signal channel

Input Control Layer
  InputGate / MovementGate      — flags enums; player code checks before acting
  TutorialOverlayMask           — four-panel scrim with a live spotlight cutout
The Condition Interface Hierarchy
The entire system rests on one method:
// ITutorialCondition.cs public interface ITutorialCondition { bool IsSatisfied(); }TutorialManagerpolls this every frame in aWaitUntil— it doesn’t know or care what kind of input the condition listens to. Everything else is an implementation detail.Two extension interfaces handle conditions that need to know where on screen they apply. Instead of injecting a
RectTransforminto the constructor (which would break Unity’s serialization), binding happens through an explicitBindContextcall at step start:public interface IContextBoundCondition { void BindContext(TutorialContext context, string anchorId, Canvas canvas); } public interface ITargetedTutorialCondition : IContextBoundCondition { string AnchorId { get; } // exposes the anchor ID so the manager can call BindContext }TutorialManagerchecks for both interfaces and binds them automatically — no scene-side wiring needed:// TutorialManager.cs — RunTutorial() foreach (var condition in step.completionConditions) { if (condition is IContextBoundCondition bound && condition is ITargetedTutorialCondition targeted && currentContext != null) { bound.BindContext(currentContext, targeted.AnchorId, tutorialCanvas); } }
The Condition Implementations
Simple Conditions — No Context Needed
TapAnywhereCondition— the simplest possible condition. Any press anywhere on screen:public class TapAnywhereCondition : ITutorialCondition { public bool IsSatisfied() => Pointer.current != null && Pointer.current.press.wasPressedThisFrame; }PressInputActionCondition— binds to anyInputActionasset, so any button in any Unity Input System action map can act as a tutorial gate:public class PressInputActionCondition : ITutorialCondition { [SerializeField] private InputActionReference action; public bool IsSatisfied() => action?.action?.WasPressedThisFrame() ?? false; }TapGamepadButtonCondition— enumerates every standard gamepad button. Oneswitchon a strongly typed enum, no magic strings:public class TapGamepadButtonCondition : ITutorialCondition { public enum GamepadButton { South, North, East, West, LeftShoulder, RightShoulder, LeftTrigger, RightTrigger, Start, Select } public GamepadButton button; public bool IsSatisfied() { var gamepad = Gamepad.current; if (gamepad == null) return false; return button switch { GamepadButton.South => gamepad.buttonSouth.wasPressedThisFrame, GamepadButton.Start => gamepad.startButton.wasPressedThisFrame, // … }; } }Area Conditions — Context-Bound
TapInAreaCondition— resolves the target UI element’s world corners to screen coordinates at bind time, then checks every press against that rect:public class TapInAreaCondition : ITutorialCondition, IContextBoundCondition, ITargetedTutorialCondition { [SerializeField] private string anchorId; public string AnchorId => anchorId; public float padding = 0f; private Rect screenRect; public void BindContext(TutorialContext context, string anchorId, Canvas canvas) { var rect = context?.Get(anchorId); if (rect == null) return; Vector3[] corners = new Vector3[4]; rect.GetWorldCorners(corners); Vector2 min = RectTransformUtility.WorldToScreenPoint(null, corners[0]); Vector2 max = RectTransformUtility.WorldToScreenPoint(null, corners[2]); screenRect = Rect.MinMaxRect( min.x - padding, min.y - padding, max.x + padding, max.y + padding); } public bool IsSatisfied() { var pointer = Pointer.current; if (pointer == null || !pointer.press.wasPressedThisFrame) return false; return screenRect.Contains(pointer.position.ReadValue()); } }Binding at step start rather than every frame means the world-to-screen conversion runs once per step, not once per frame — important when Unity’s layout system might otherwise recalculate corners on every dirty.
TapAndReleaseInAreaConditionadds a tap quality gate: tracks press position and time, then validates on release that the pointer didn’t move too far and the press didn’t last too long. This filters out accidental swipes that started inside the target rect:public bool IsSatisfied() { var pointer = Pointer.current; if (pointer == null) return false; if (pointer.press.wasPressedThisFrame) { pressPosition = pointer.position.ReadValue(); pressTime = Time.time; pressedInside = screenRect.Contains(pressPosition); return false; } if (pressedInside && pointer.press.wasReleasedThisFrame) { float duration = Time.time - pressTime; float distance = Vector2.Distance(pressPosition, pointer.position.ReadValue()); return screenRect.Contains(pointer.position.ReadValue()) && duration <= maxDuration // < 0.3s && distance <= maxMoveDistance; // < 40px } return false; }Swipe Conditions
SwipeConditionvalidates direction using a dot product threshold — the swipe vector must point within ~37° of the required direction (dot > 0.8) to count:public class SwipeCondition : ITutorialCondition { public Vector2 direction; public float minDistance = 100f; private Vector2 start; private bool isSwiping = false; public bool IsSatisfied() { var pointer = Pointer.current; if (pointer == null) return false; if (pointer.press.wasPressedThisFrame) { start = pointer.position.ReadValue(); isSwiping = true; } if (isSwiping && pointer.press.isPressed) { Vector2 delta = pointer.position.ReadValue() - start; if (delta.magnitude >= minDistance && Vector2.Dot(delta.normalized, direction.normalized) > 0.8f) { isSwiping = false; return true; } } if (pointer.press.wasReleasedThisFrame) isSwiping = false; return false; } }SwipeAndReleaseConditionis a tighter variant that only resolves on finger lift, preventing mid-swipe detection for drag-style interactions.Drag Conditions
DragFromToConditionandDragFromReleaseAtConditionteach drag gestures by validating that the touch originated within a start radius, traveled a minimum distance, and arrived within an end radius. Both radii and positions are resolved from aTutorialContextanchor at bind time:public void BindContext(TutorialContext context, string anchorId, Canvas canvas) { var uiAnchor = context.anchors.FirstOrDefault(a => a.id == anchorId); if (uiAnchor.rect == null) return; // start/end are local positions on the anchor RectTransform startScreen = RectTransformUtility.WorldToScreenPoint(null, uiAnchor.rect.TransformPoint(uiAnchor.startPosition)); endScreen = RectTransformUtility.WorldToScreenPoint(null, uiAnchor.rect.TransformPoint(uiAnchor.endPosition)); }The difference between the two:
DragFromToConditionresolves while the pointer is still held (teaching joystick-style drags), whileDragFromReleaseAtConditionresolves on release (teaching flick or swipe-to-confirm gestures).OrderedCondition — Composite Sequencing
OrderedConditionwraps a list of other conditions and advances through them in order. Only when the last one is satisfied does it returntrue:public class OrderedCondition : ITutorialCondition { private int currentIndex = 0; public List<ITutorialCondition> conditions; public bool IsSatisfied() { if (currentIndex >= conditions.Count) return true; if (conditions[currentIndex].IsSatisfied()) currentIndex++; return currentIndex >= conditions.Count; } }This makes it possible to build a multi-gesture tutorial step — “tap here, then swipe left” — as a single condition entry in a step, without needing extra steps in the
Tutorialdata structure.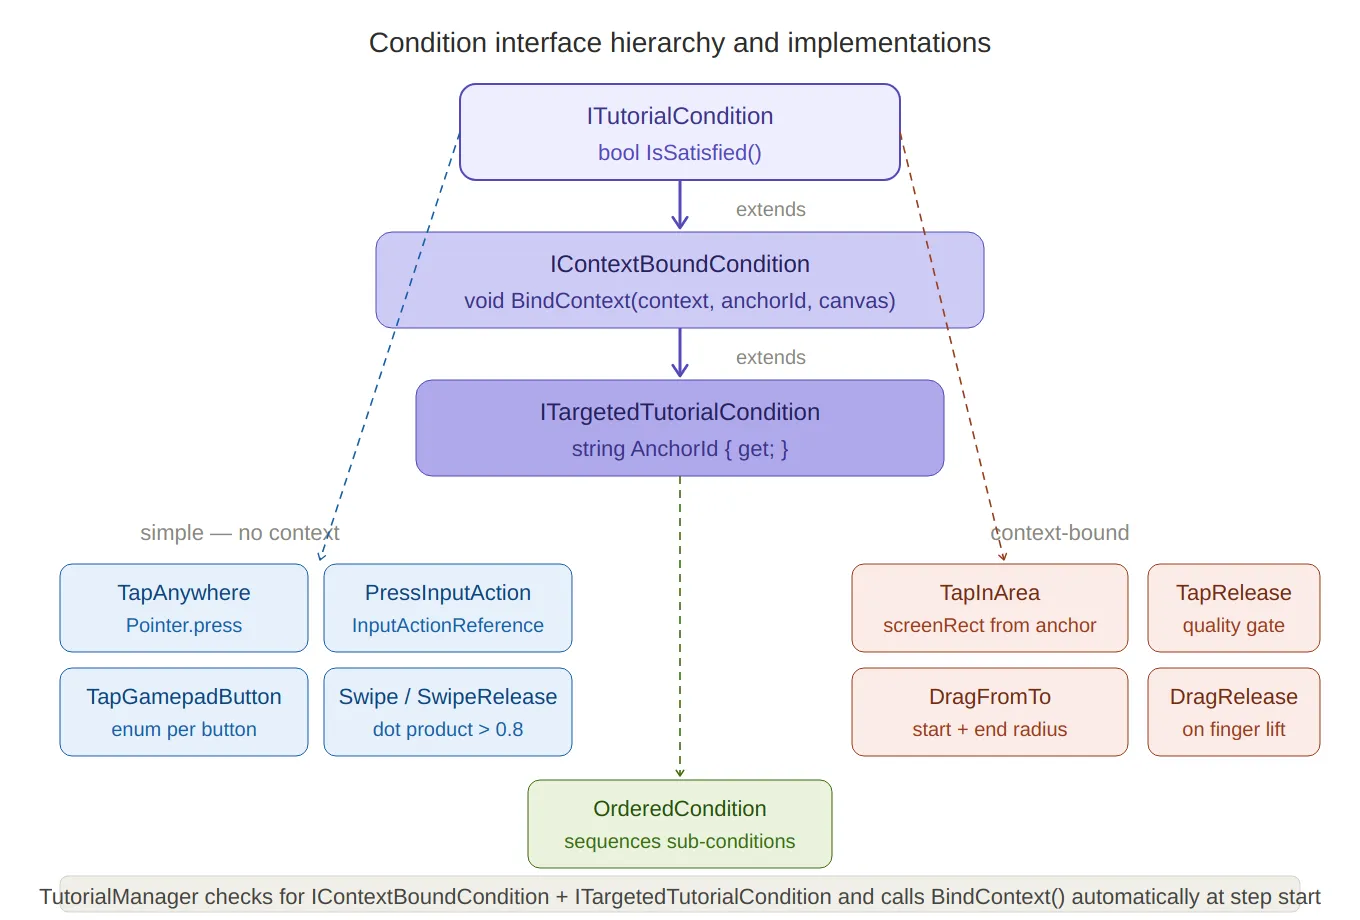
Condition interface hierarchy — the three-level inheritance chain (
ITutorialCondition→IContextBoundCondition→ITargetedTutorialCondition) at the top, with the 10+ implementations branching below: blue boxes for simple conditions (no context needed: tap anywhere, gamepad buttons, swipe) and coral boxes for context-bound ones (area tap, drag from/to).OrderedConditionsits below as the composite. The footer note explains the automaticBindContextcall.
SerializeReference — Polymorphism in the Inspector
Conditions are stored in
TutorialStepusing[SerializeReference]:// TutorialManager.cs — TutorialStep [SerializeReference] public List<ITutorialCondition> completionConditions = new List<ITutorialCondition>();[SerializeReference]is Unity’s mechanism for serializing interface and abstract class references by managed type — unlike[SerializeField], which only works with concrete types Unity knows the size of at compile time. Each list entry stores the full concrete type name alongside its fields, so adding a new condition class requires no changes toTutorialSteporTutorialManager.
The Custom Property Drawer
Serializing polymorphic types solves the data problem; the UX problem is that the default inspector shows a raw
managedReferenceValuefield with no way to pick a type. The custom drawer solves this with reflection-based type discovery:// TutorialConditionDrawer.cs static TutorialConditionDrawer() { conditionTypes = AppDomain.CurrentDomain.GetAssemblies() .SelectMany(a => { try { return a.GetTypes(); } catch { return Array.Empty<Type>(); } }) .Where(t => typeof(ITutorialCondition).IsAssignableFrom(t) && !t.IsInterface && !t.IsAbstract) .ToList(); }This runs once at editor load. Every class that implements
ITutorialConditionis automatically discovered and added to a dropdown — including any new condition type added in the future. No registration step, no attribute required:int newIndex = EditorGUI.Popup(dropdownRect, label, currentIndex, displayNames.Select(n => new GUIContent(n)).ToArray()); if (newIndex != currentIndex) { property.managedReferenceValue = newIndex == 0 ? null : Activator.CreateInstance(conditionTypes[newIndex - 1]); }Selecting a type from the dropdown instantiates it via
Activator.CreateInstanceand assigns it to themanagedReferenceValue. The drawer then draws each child field of the concrete type usingSerializedPropertyiteration — soTapInAreaCondition.anchorIdandSwipeCondition.minDistanceboth appear automatically in the inspector with their correct types and labels.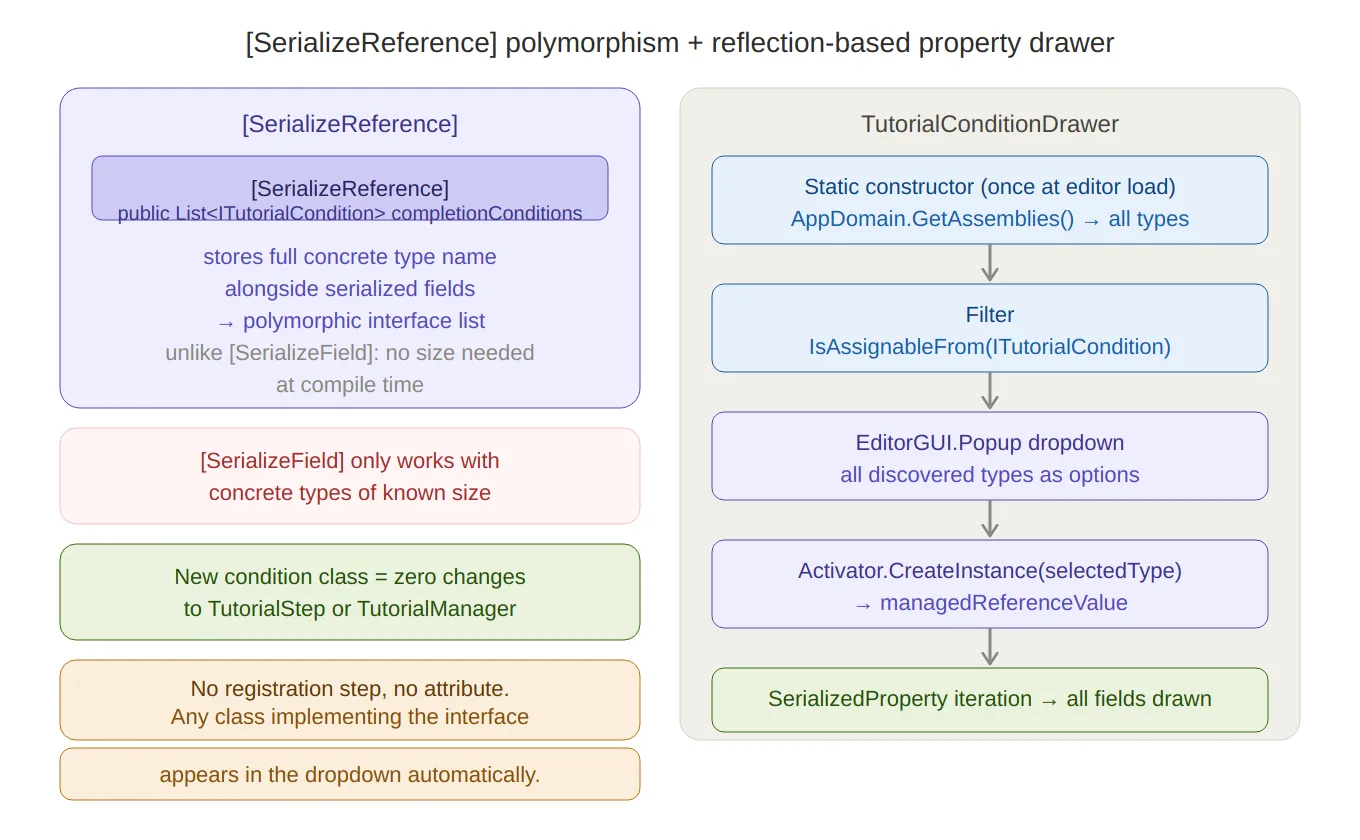
SerializeReference + property drawer — left side explains why
[SerializeReference]enables polymorphic interface lists where[SerializeField]can’t, plus the “zero changes to existing code” benefit. Right side traces the five-step drawer pipeline: static reflection scan → filter by interface → dropdown →Activator.CreateInstance→ child field iteration.
Tutorial Data Structures
A
Tutorialis a named sequence ofTutorialStepobjects:public class Tutorial { public string tutorialName; public int levelNumber; public string tutorialType; public List<TutorialStep> steps = new List<TutorialStep>(); }Each
TutorialStepcarries everything the runner needs for that beat:public class TutorialStep { public TutorialUIElement[] tutorialUIElements; // hand-prompt animations public TutorialMaskData maskData; // overlay focus target public bool autoComplete; // time-based vs condition-based public float waitTime; public ConditionLogic conditionLogic; // Any or All [SerializeReference] public List<ITutorialCondition> completionConditions; public AllowedInput allowedInput; // what inputs are gated public AllowedMovement allowedMovement; public UnityEvent onStepStart; public UnityEvent onStepComplete; }ConditionLogic.Anymeans the step completes when at least one condition is satisfied — useful for steps that can be completed by either a tap or a button press.ConditionLogic.Allrequires every condition — useful for ordered or simultaneous multi-input steps.
The Tutorial Runner Coroutine
TutorialManager.RunTutorialis a single coroutine that loops through steps. Each iteration:- Applies the overlay mask — focuses the four-panel scrim around the step’s target UI element
- Starts UI animations — plays the hand-prompt or arrow sequences defined per step
- Sets the input gate — restricts player input to what the step allows
- Fires
onStepStart— any designer-wired UnityEvent - Waits for completion — either a timer or a
WaitUntilpolling conditions - Cleans up — resets gates, stops animations, fires
onStepComplete, advances index
// TutorialManager.cs private IEnumerator RunTutorial(Tutorial tutorial) { yield return FadeTo(tutorialCanvasGroup, 1f, bgFadeInOutTime); while (currentStepIndex < tutorial.steps.Count) { var step = tutorial.steps[currentStepIndex]; // 1. Mask if (step.maskData?.enableMask == true && currentContext != null) { RectTransform target = currentContext.Get(step.maskData.focusTargetId); overlayMask.FocusOnTarget(tutorialCanvas, step.maskData.padding, target); overlayMask.gameObject.SetActive(target != null); } // 2. Animations foreach (var ui in step.tutorialUIElements) ui.elementAnimation.PlaySequence(ui.animationSequence, ui.loop); // 3. Input gate InputGate.Allowed = step.allowedInput; MovementGate.Allowed = step.allowedMovement; // 4. Step start event step.onStepStart?.Invoke(); // 5. Wait if (step.autoComplete) yield return new WaitForSeconds(step.waitTime); else { foreach (var c in step.completionConditions) // bind context-aware conditions if (c is IContextBoundCondition b && c is ITargetedTutorialCondition t) b.BindContext(currentContext, t.AnchorId, tutorialCanvas); yield return new WaitUntil(() => forceStepComplete || AreConditionsSatisfied(step)); } // 6. Cleanup InputGate.Allowed = AllowedInput.All; MovementGate.Allowed = AllowedMovement.All; foreach (var ui in step.tutorialUIElements) ui.elementAnimation.gameObject.SetActive(false); step.onStepComplete?.Invoke(); currentStepIndex++; } overlayMask.gameObject.SetActive(false); yield return FadeTo(tutorialCanvasGroup, 0f, bgFadeInOutTime); }forceStepCompleteis a flag thatTutorialTriggercan set externally to advance the step regardless of conditions — useful for physics-gated steps where the player’s marble entering a volume is the completion event.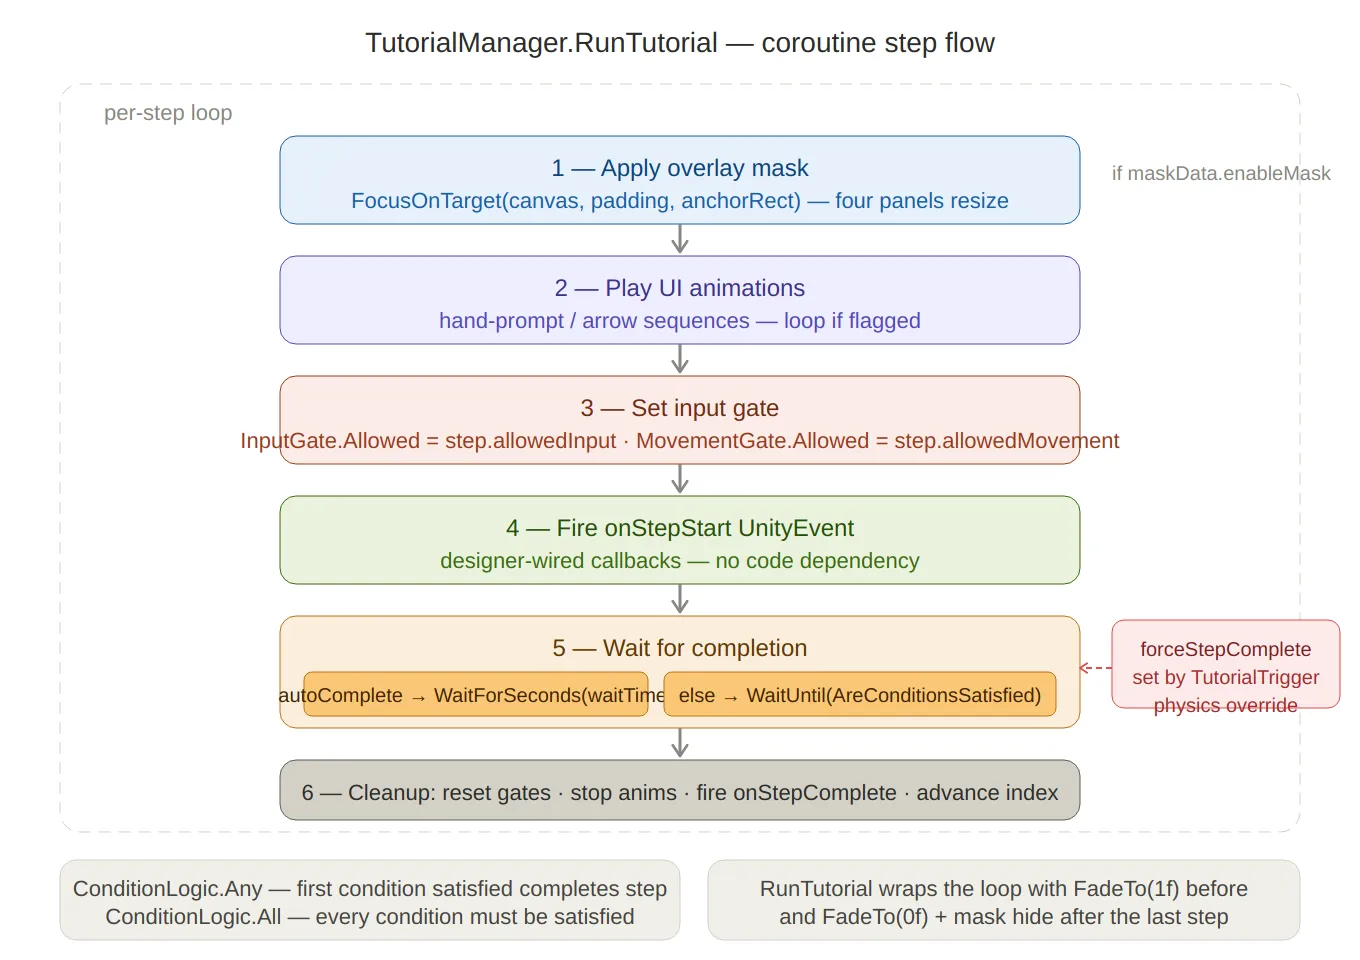
Runner coroutine flow — the six sequential steps inside the per-step loop (mask → animate → input gate →
onStepStart→ wait → cleanup), with theautoCompletebranch clearly split, and theforceStepCompletephysics override shown as a side input into the wait step.ConditionLogic.Anyvs.Allnoted at the bottom.
InputGate and MovementGate
The gate system uses C#‘s
[Flags]enum so individual inputs can be combined bitwise:[Flags] public enum AllowedInput { None = 0, Move = 1 << 0, Jump = 1 << 1, Touch = 1 << 2, Swipe = 1 << 3, Tap = 1 << 4, All = ~0 // all bits set } public static class InputGate { public static AllowedInput Allowed = AllowedInput.All; }Player input code checks the gate before acting:
// PlayerController.cs (example check)
if (!InputGate.Allowed.HasFlag(AllowedInput.Move)) return;
Setting
AllowedInput.Nonelocks all input;AllowedInput.Move | AllowedInput.Jumplets the player move and jump but disables touch/swipe — useful for a step that says “use the joystick to move here” without the player being able to tap-skip the instruction.MovementGateapplies the same pattern at the physics level, restricting directional movement independently of the input layer.
TutorialOverlayMask — Four-Panel Scrim
The overlay consists of four semi-transparent panels (Top, Bottom, Left, Right) that together cover everything on screen except the target element. Instead of moving the panels — which would require recalculating anchors — only their sizes change:
// TutorialOverlayMask.cs
public void FocusOnTarget(Canvas canvas, float padding, RectTransform target)
{
    RectTransform canvasRect = canvas.transform as RectTransform;

    Vector3[] canvasCorners = new Vector3[4];
    canvasRect.GetWorldCorners(canvasCorners);

    Vector3[] t = new Vector3[4];
    target.GetWorldCorners(t);

    // Apply padding to target corners
    Vector3 targetBL = t[0] - new Vector3(padding, padding, 0);
    Vector3 targetTR = t[2] + new Vector3(padding, padding, 0);

    ScaleTopBottom(Top,    canvasCorners[1].y, t[1].y); // canvas top  → target top
    ScaleTopBottom(Bottom, t[0].y, canvasCorners[0].y); // target bot  → canvas bot
    ScaleLeftRight(Left,   canvasCorners[0].x, t[0].x); // canvas left → target left
    ScaleLeftRight(Right,  t[2].x, canvasCorners[2].x); // target right → canvas right
}

private void ScaleTopBottom(RectTransform rect, float canvasEdgeY, float targetEdgeY)
{
    Vector2 size = rect.sizeDelta;
    size.y = Mathf.Abs(canvasEdgeY - targetEdgeY);
    rect.sizeDelta = size;
}
Each panel is anchored to its respective canvas edge and only resizes along one axis. The result is a pixel-precise rectangular spotlight that appears instantly without any animation overhead — the resize is a single
sizeDeltaassignment.
Scene Integration
TutorialContext — UI Anchor Registry
TutorialContextis aMonoBehaviourplaced in every scene that has tutorials. It registers itself withTutorialManageronAwakeand exposes a named array ofUIAnchorstructs:public class TutorialContext : MonoBehaviour { [Serializable] public struct UIAnchor { public string id; public RectTransform rect; public Vector2 startPosition; // local position on rect (for drag conditions) public Vector2 endPosition; public bool gizmos; } public UIAnchor[] anchors; private void Awake() => TutorialManager.Instance.RegisterContext(this); public RectTransform Get(string id) { foreach (var a in anchors) if (a.id == id) return a.rect; return null; } }The
gizmosflag toggles a Scene View visualisation drawn withHandles— green lines connectstartPositiontoendPositionon each anchor, making drag gesture targets visible during authoring without entering play mode.TutorialBus — Decoupled Scene Signals
Any scene element can emit a named signal without a direct reference to
TutorialManager:public static class TutorialBus { public static event Action<TutorialSignal> OnSignal; public static void Raise(string id, object payload = null) => OnSignal?.Invoke(new TutorialSignal(id, payload)); } public class TutorialSignalEmitter : MonoBehaviour { public void Emit(string signalId) => TutorialBus.Raise(signalId); }TutorialReceiver— a baseMonoBehaviour— subscribes toTutorialBus.OnSignaland filters by a designer-configured list of signal IDs:public abstract class TutorialReceiver : MonoBehaviour, ITutorialReceiver { [SerializeField] protected List<string> listenToSignalIds; protected virtual void OnEnable() => TutorialBus.OnSignal += HandleSignal; protected virtual void OnDisable() => TutorialBus.OnSignal -= HandleSignal; private void HandleSignal(TutorialSignal signal) { foreach (string id in listenToSignalIds) if (signal.id == id) OnTutorialSignal(signal); } public abstract void OnTutorialSignal(TutorialSignal signal); }TutorialTrigger — Physics-Driven Tutorial Activation
A
TutorialTriggeris a 3D collider placed in the game world. When the player’s marble (or a power-up) enters it, it fires a callback registered withGameTutorialManager:public class TutorialTrigger : MonoBehaviour { public int triggerIndex; public bool skipStep; public string tutorialId; public GameTutorialManager manager; private void Start() { if (skipStep) manager.RegisterTrigger(triggerIndex, () => TutorialManager.Instance.CompleteCurrentStep()); else manager.RegisterTrigger(triggerIndex, () => TutorialManager.Instance.StartTutorial(tutorialId)); } private void OnTriggerEnter(Collider other) { if (other.CompareTag("Player") || other.CompareTag("Ufo") || other.CompareTag("Rocket")) manager.TriggerActivated(triggerIndex); } }GameTutorialManagerstores callbacks in aDictionary<int, Action>and removes them after firing — so each trigger activates at most once, even if the marble passes through the collider again.
Scene integration — the four components arranged around
TutorialManagerat the centre:TutorialContext(UI anchor registry with gizmo preview) top-left,TutorialBus(static decoupled signal channel) top-right,TutorialTrigger(3D physics → single-fire callback) bottom-left, andTutorialOverlayMaskbottom-right rendered as an actual four-panel diagram with the spotlight cutout visible. The[Flags] InputGatenote sits between the manager and the mask.
Summary
Component Role ITutorialConditionSingle-method interface; polled every frame by the runner IContextBoundConditionOpt-in binding for conditions that need UI element positions ITargetedTutorialConditionExposes AnchorIdso the manager can callBindContextautomaticallyOrderedConditionComposite: sequences sub-conditions; multi-gesture steps without extra steps [SerializeReference]Polymorphic list serialization; no concrete type needed at the step level TutorialConditionDrawerReflection discovers all implementations; dropdown + field expansion TutorialStepPer-step data: conditions, mask, animations, gates, UnityEvents TutorialManager.RunTutorialCoroutine runner: mask → animate → gate → wait → cleanup InputGate / MovementGate[Flags]enums; per-bit input restriction checked by player codeTutorialOverlayMaskFour-panel scrim; only sizeDeltachanges — no repositioningTutorialContextPer-scene UI anchor registry; gizmo visualisation of drag paths TutorialBusStatic event bus; signals without direct references TutorialTrigger3D physics → callback; single-fire via Dictionary<int, Action>The key property of this architecture is that adding a new kind of tutorial step requires only a new
ITutorialConditionclass. The drawer discovers it automatically, the runner polls it through the interface, and the context binding happens without any new code inTutorialManager. A drag condition, a timer condition, a network-event condition — all follow the same path from inspector to runtime.Created on February 2026 -
MarbleMaze: Deep Dive — ScriptableObject-Driven Level Progression
One recurring challenge in procedural games is separating what the code does from what the designer decides. A game where tweaking difficulty requires recompiling is a game that’s painful to balance. This post covers how I used Unity’s ScriptableObject system to make every tunable parameter in MarbleMaze editable at design time — without a single code change.
The Architecture at a Glance
The system is built as three independent layers that compose at runtime:
Tile Layer
  TileDefinition_SO          — floor tile (prefab + rules)
  HazardTileDefinition_SO    — hazard tile (+ ratio, placement constraints)
  OverlayDefinition_SO       — overlays: Start, End, Star (prefab + y offset)
  TileDatabase_SO            — collects all of the above; builds lookup dictionaries

Progression Layer
  LevelArchetypeData_SO      — which hazards appear and at what base weight
  LevelCycleDefinition       — a named group of archetypes for one cycle
  LevelCycleProgression_SO   — ordered list of cycles + recovery archetype

State & Config Layer
  GeneratorParameters_SO     — base grid config (patched at runtime)
  GlobalDifficultyState_SO   — cross-session difficulty debt
  LevelDatabase_SO           — registry of hand-authored levels
No layer knows about the internals of the others. The generator receives a
TileDatabase_SOand aGeneratorParameters_SO; the progression system modifies those before the generator runs.
Three-layer architecture — the full containment diagram showing all eleven SO types grouped into their three independent layers (tile, progression, state/config), with the rule at the bottom that no layer knows the internals of another.
The Tile Layer
TileDefinition_SO — The Base Tile
Every tile type starts as a
TileDefinition_SO. This is the minimal contract: whatGroundTypeit represents, which prefab to instantiate, and whether the tile counts as walkable:// TileDefinition_SO.cs public class TileDefinition_SO : ScriptableObject { public GroundType groundType; public GameObject tilePrefab; public Color tileEditorColor; // used in the editor grid preview public bool isWalkable; public bool awllowsOverlay; // can a Star/End overlay sit on this tile? }The floor tile is a single instance of this base class — it has no spawn probability because it is the default. Every carved cell becomes a floor unless a hazard overrides it.
HazardTileDefinition_SO — Hazard Rules
Hazards extend the base tile with the information the generator needs to decide whether and how densely to place them:
// HazardTileDefinition_SO.cs
public class HazardTileDefinition_SO : TileDefinition_SO
{
    public float ratio;      // current weight — written at runtime by the difficulty system
    public float maxRatio;   // designer cap — the runtime never exceeds this

    // Placement constraint flags — control which generator pass handles this tile
    public bool requireTwoSolidNeighbours; // Pass 2: needs context
    public bool requiredLineOfThree;       // Pass 3: spawns as a 3-cell group
    public GroundType sideGroundType;      // for line tiles: the end-cap type
    public bool isHorizontal;
}
The two fields
ratioandmaxRatioencode a contract between the designer and the runtime difficulty system: the designer setsmaxRatioonce in the inspector as the maximum density that has been playtested and feels acceptable. The adaptive difficulty system then modulatesratiofreely between0andmaxRatio— it can never exceed the designer’s ceiling, no matter how much stress the player accumulates.The placement constraint flags (
requireTwoSolidNeighbours,requiredLineOfThree) tell the generator which of its three decoration passes should handle this tile type. Adding a brand-new tile type requires only a newHazardTileDefinition_SOasset and the appropriate flag — no changes to the generator code.OverlayDefinition_SO — Overlays
Overlays (Start, End, Star) sit on top of ground tiles. Each has its own prefab and a
yOffsetthat lifts it above the floor to the correct visual height:// OverlayDefinition_SO.cs public class OverlayDefinition_SO : ScriptableObject { public OverlayType overlayType; public GameObject overlayPrefab; public float yOffset; public Color overlayEditorColor; }TileDatabase_SO — The Lookup Hub
TileDatabase_SOcollects every tile and overlay into a single asset and builds O(1) runtime lookup dictionaries on load. The inspector lists are the source of truth; the dictionaries are an internal cache:// TileDatabase_SO.cs public class TileDatabase_SO : ScriptableObject { [SerializeField] private TileDefinition_SO floorTile; [SerializeField] private List<HazardTileDefinition_SO> hazardTiles; [SerializeField] private List<OverlayDefinition_SO> overlays; // Runtime dictionaries — built on OnEnable and OnValidate private Dictionary<GroundType, TileDefinition_SO> tilesByType; private Dictionary<GroundType, HazardTileDefinition_SO> hazardTilesByType; private Dictionary<OverlayType, OverlayDefinition_SO> overlaysByType; public TileDefinition_SO GetTileByGroundType(GroundType type) => tilesByType[type]; public HazardTileDefinition_SO GetHazardByGroundType(GroundType type) => hazardTilesByType[type]; public OverlayDefinition_SO GetOverlayByType(OverlayType type) => overlaysByType[type]; }Building the dictionaries happens in two places:
void OnEnable() => BuildCache(); // called when the asset loads at runtime #if UNITY_EDITOR void OnValidate() => BuildCache(); // called every time the inspector changes #endifOnValidateis critical for the editor workflow: every time a designer adds or reorders tiles in the inspector, the dictionary is rebuilt instantly without any manual refresh step.The database also exposes three LINQ-filtered views of the hazard list — one for each generator pass — so the generator never needs to know about the classification flags itself:
public IEnumerable<HazardTileDefinition_SO> SimpleHazards =>
    HazardTiles.Where(t => !t.requireTwoSolidNeighbours && !t.requiredLineOfThree);

public IEnumerable<HazardTileDefinition_SO> TwoSolidHazards =>
    HazardTiles.Where(t => t.requireTwoSolidNeighbours);

public IEnumerable<HazardTileDefinition_SO> LineHazards =>
    HazardTiles.Where(t => t.requiredLineOfThree);
The generator just calls
db.SimpleHazards,db.TwoSolidHazards, anddb.LineHazards— it never inspects the flags directly.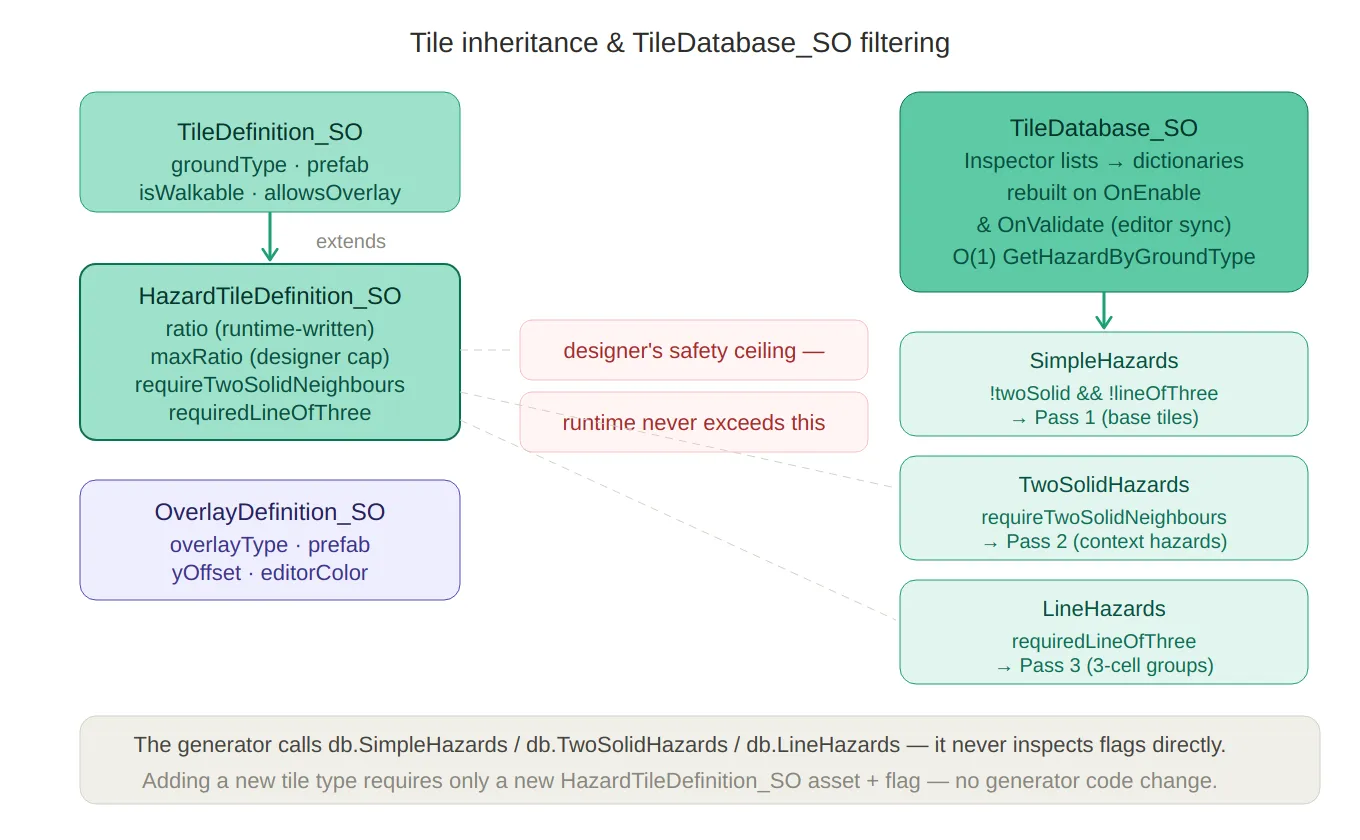
Tile hierarchy & filtering — the
TileDefinition_SO→HazardTileDefinition_SOinheritance chain on the left, with themaxRatiodesigner-ceiling callout, and on the right theTileDatabase_SOsplitting its hazard list into three LINQ-filtered views (SimpleHazards,TwoSolidHazards,LineHazards) that map directly to the three generator decoration passes.
The Progression Layer
LevelArchetypeData_SO — Hazard Composition
An archetype is the designer’s answer to the question: “What kind of level is this?” It declares which hazard types should be present, and at what relative strength:
// LevelArchetypeData_SO.cs
public class LevelArchetypeData_SO : ScriptableObject
{
    public string archetypeName; // e.g. "Ice Precision", "Platform Rush"

    [Serializable]
    public struct ModifierWeight
    {
        public GroundType groundType;
        [Range(0f, 1f)]
        public float weight; // 0 = inactive, 1 = fully weighted
    }

    public ModifierWeight[] modifiers;
    public int maxActiveModifiers = 2;
}
Weights in an archetype are relative intentions, not final ratios. The runtime multiplies each weight by
cycleT(position within the cycle) andfinalMultiplier(the adaptive difficulty value) before writing it into theTileDatabase_SO:// RuntimeLevelParameters.cs — ApplyArchetypeData() foreach (var modifier in data.modifiers) { float scaled = Mathf.Clamp01(modifier.weight * cycleT * difficultyModifier); HazardTileDefinition_SO hazardTile = tileDatabase.GetHazardByGroundType(modifier.groundType); hazardTile.ratio = Mathf.Min(hazardTile.maxRatio, scaled * hazardTile.maxRatio); }This means a designer setting
weight = 1.0on an Ice modifier is saying “make ice as prominent as the difficulty system allows”, not “always fill the level with ice”. The adaptive system governs the ceiling.LevelCycleDefinition and LevelCycleProgression_SO
Archetypes are grouped into cycles — blocks of
levelsPerCyclelevels that share a curated set of archetypes:// LevelCycleDefinition.cs public class LevelCycleDefinition { public string cycleName; // shown in the inspector public List<LevelArchetypeData_SO> allowedArchetypes; } // LevelCycleProgression_SO.cs public class LevelCycleProgression_SO : ScriptableObject { public LevelArchetypeData_SO recoveryArchetype; // injected when player is struggling public List<LevelCycleDefinition> cycles; // ordered by cycle index }The archetype for a given level is selected deterministically by position within the cycle — no randomness, so designers can reason about what the player will see at each slot:
// RuntimeLevelParameters.cs
int cycleIndex = levelIndex / levelsPerCycle;  // which cycle block
int cycleLevel = levelIndex % levelsPerCycle;  // position within the block

int archetypeIndex = cycleLevel % cycle.allowedArchetypes.Count;
return cycle.allowedArchetypes[archetypeIndex];
Once the last defined cycle is reached, the system clamps to it — so the final cycle effectively becomes the endgame loop without any extra code.
The
recoveryArchetypeis a separate asset shared across all cycles. When the difficulty engine determines the player needs relief, it substitutes this archetype regardless of what the cycle would normally assign.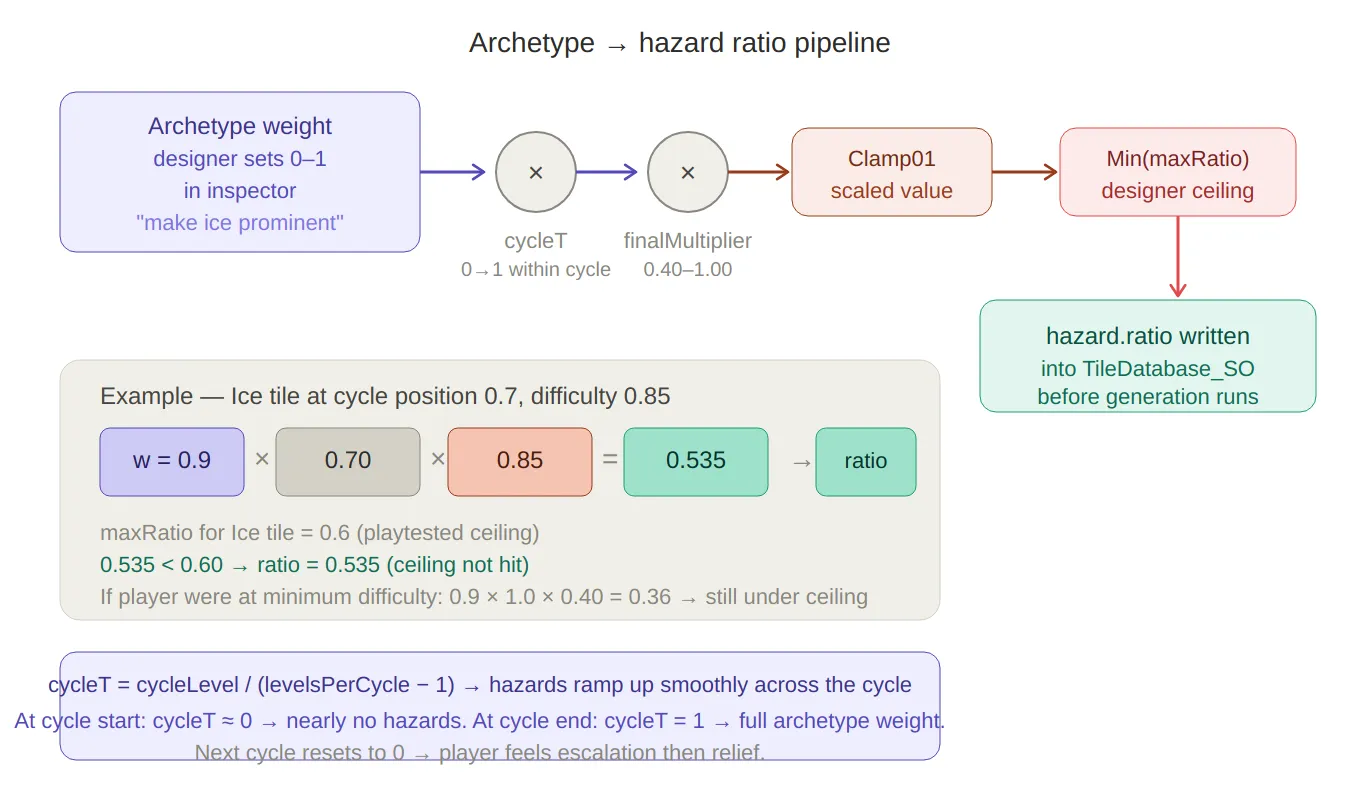
Archetype → ratio pipeline — traces how a designer’s intent (weight = 0.9) flows through cycleT and finalMultiplier, gets clamped, then hits the maxRatio ceiling before being written into the tile asset. A worked numeric example (Ice tile, cycleT = 0.7, difficulty 0.85 → ratio 0.535) makes the formula concrete.
The Config and State Layer
GeneratorParameters_SO — Base Configuration
GeneratorParameters_SOholds all the parameters the generator needs that don’t come from the progression system:// GeneratorParameters_SO.cs public class GeneratorParameters_SO : ScriptableObject { public int gridWidth = 10; public int gridHeight = 10; public bool randomEnd = true; public Vector2Int fixedEnd; public int endMaxHeightPercent = 20; public int inputSeed = -1; // -1 = random per level public TileDatabase_SO tileDatabase_SO; [Range(0, 20)] public int starCount = 3; [Range(1, 10)] public int minStarDistance = 2; }At runtime,
LevelManagerpatches this asset’s fields with values computed byRuntimeLevelProgressionbefore passing it to the generator — treating the SO as a mutable parameter bag:// LevelManager.cs — GenerateRuntimeLevel() baseParameters.gridWidth = runtimeParams.width; baseParameters.gridHeight = runtimeParams.height; baseParameters.tileDatabase_SO = runtimeParams.tileDatabase_SO; baseParameters.minStarDistance = runtimeParams.minStarDistance; baseParameters.inputSeed = -1; // always random for runtime levelsThis means the SO’s inspector values act as design-time defaults — useful for prototyping and editor testing — while the runtime always overwrites them with the computed values before generation.
GlobalDifficultyState_SO — Persistent Cross-Session State
The difficulty debt that accumulates as the player struggles is stored in a dedicated ScriptableObject, not serialized per-scene:
// GlobalDifficultyState_SO.cs
public class GlobalDifficultyState_SO : ScriptableObject
{
    public float difficultyDebt;   // 0 → no easing, 1 → max easing (20% reduction)
    public int remainingLevels;    // countdown to debt expiry
}
Using a ScriptableObject here means the debt value survives scene transitions automatically without any explicit save/load logic. It also makes the current debt directly inspectable in the Unity editor during playtesting — invaluable when validating that the difficulty curve is behaving as expected.
LevelDatabase_SO — Pre-Authored Level Registry
For tutorial levels and early handcrafted content, the
LevelDatabase_SOholds an ordered list ofLevelData_SOrecords.LevelManagerchecks this first on every level load, falling through to the procedural generator only if no authored level exists:// LevelDatabase_SO.cs public class LevelDatabase_SO : ScriptableObject { public List<LevelData_SO> levels = new List<LevelData_SO>(); public LevelData_SO GetLevelDataAtIndex(int index) => levels.Find(level => level.index == index); public void SaveLevelData(LevelData_SO data) { int existingIndex = levels.FindIndex(l => l.index == data.index); if (existingIndex >= 0) levels[existingIndex] = data; // override else levels.Add(data); levels = levels.OrderBy(level => level.index).ToList(); // keep sorted } }The database is sorted by index on every save, so
GetLevelDataAtIndexusingList.Findis always searching an ordered list — a binary search could replace this for very large databases, but at tutorial-scale sizes it is negligible.
The Editor Window — PathGeneratorWindow
All of this ScriptableObject infrastructure comes together in a custom editor window that lets me generate, preview, hand-paint, and save levels without entering play mode.
WIndow Diagram 
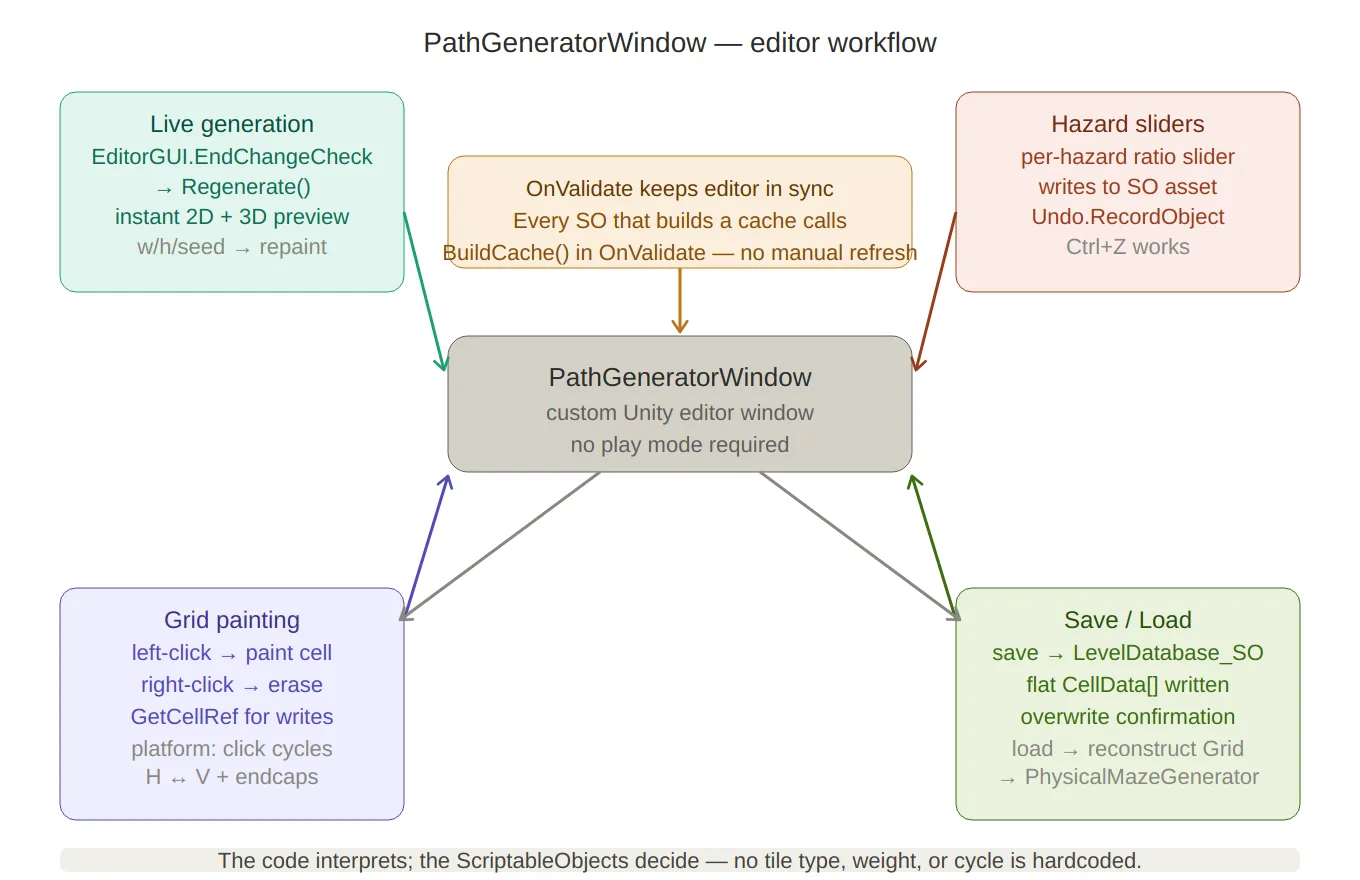
Editor window workflow — the four capabilities of PathGeneratorWindow arranged around the central window node: live generation (any setting change triggers instant regeneration), hazard sliders (write to SO assets with undo support), grid painting (ref writes with platform orientation cycling), and save/load (flattening to LevelDatabase_SO and reconstructing for scene preview). The OnValidate() cache-rebuild note sits at the top.
The window has four main capabilities:
1 — Live Generation with Instant Preview
Any change to grid settings triggers an immediate regeneration:
// PathGeneratorWindow.cs
private void DrawGridSettings()
{
    EditorGUI.BeginChangeCheck();
    parameters.gridWidth  = EditorGUILayout.IntField("Width", parameters.gridWidth);
    parameters.gridHeight = EditorGUILayout.IntField("Height", parameters.gridHeight);
    // … more fields …
    if (EditorGUI.EndChangeCheck())
        Regenerate(); // generate + repaint immediately
}

private void Regenerate()
{
    grid = PxP.PCG.Generator.GenerateMaze(levelIndex, parameters, out usedSeed);
    physicalGenerator?.Generate(grid); // also updates the 3D scene view
    Repaint();
}
2 — Per-Hazard Ratio Sliders
Each hazard tile in the
TileDatabase_SOgets its own slider in the editor. Dragging a slider writes directly to the SO asset and triggers a regeneration, so the effect on level layout is visible immediately:// PathGeneratorWindow.cs — DrawPathSettings() foreach (var hazard in db.HazardTiles) { Undo.RecordObject(hazard, "Modify Hazard Ratio"); hazard.ratio = EditorGUILayout.Slider( ObjectNames.NicifyVariableName(hazard.name), hazard.ratio, 0f, 1f); } if (EditorGUI.EndChangeCheck()) { foreach (var hazard in db.HazardTiles) EditorUtility.SetDirty(hazard); // persist slider values to disk Regenerate(); }Undo.RecordObjectregisters each change with Unity’s undo stack, so Ctrl+Z works as expected during design sessions.3 — Manual Grid Painting
For hand-authored content, the editor renders a 2D pixel-art view of the current grid and supports left-click to paint and right-click to erase:
// PathGeneratorWindow.cs — HandleGridMouseInput()
ref CellData cell = ref grid.GetCellRef(x, y);

if (e.button == 0) // left click → paint
{
    switch (paintMode)
    {
        case PaintMode.Ground:
            cell.isEmpty = false;
            cell.ground  = selectedGround;
            break;
        case PaintMode.Overlay:
            if (!cell.isEmpty)
                cell.overlay = selectedOverlay;
            break;
    }
}

if (e.button == 1) // right click → erase (overlay first, then wall)
{
    if (cell.overlay != OverlayType.None) cell.overlay = OverlayType.None;
    else                                  cell.isEmpty  = true;
}
Moving platforms get special treatment: clicking a platform tile cycles its orientation between horizontal and vertical, and automatically paints or clears the
PlatformSideend-cap cells on either side.4 — Save and Load
A finished level is saved into the
LevelDatabase_SOwith a confirmation dialog if an existing level at that index would be overwritten:// PathGeneratorWindow.cs — SaveCurrentLevel() data.gridData = new CellData[width * height]; for (int y = 0; y < height; y++) for (int x = 0; x < width; x++) data.gridData[y * width + x] = grid.GetCellRef(x, y); levelDatabase.SaveLevelData(data); EditorUtility.SetDirty(levelDatabase); AssetDatabase.SaveAssets();Loading reconstructs the
Gridfrom the flattened array and feeds it straight into thePhysicalMazeGeneratorto visualise in the scene:// PathGeneratorWindow.cs — LoadLevel() grid = new Grid(data.gridWidth, data.gridHeight); for (int y = 0; y < data.gridHeight; y++) for (int x = 0; x < data.gridWidth; x++) grid.GetCellRef(x, y) = data.gridData[y * data.gridWidth + x]; physicalGenerator?.Generate(grid);
Design Principles
A few rules held throughout the design of this system:
The code interprets; the ScriptableObjects decide. No tile type, archetype name, hazard weight, or cycle structure is hardcoded. Adding a new hazard type — say, a conveyor belt — requires a new
HazardTileDefinition_SOasset and a prefab, not a code change.Runtime state that needs to survive scenes goes into a ScriptableObject. The
GlobalDifficultyState_SOis the clearest example — debt state needs to persist across the menu scene and the game scene, and storing it in a SO costs nothing compared to wiring a DontDestroyOnLoad object or writing a custom serializer.OnValidatekeeps the editor in sync. Every SO that builds a cache does so inOnValidateas well asOnEnable, so any inspector edit immediately propagates through the system without a play-mode cycle.maxRatio is the designer’s veto. The adaptive difficulty system can freely modulate hazard density between sessions — but it can never push a hazard above the ceiling the designer set during playtesting. The cap is baked into the asset, not into a conditional in the runtime code.
Summary
Asset Purpose TileDefinition_SOFloor tile: prefab + walkability rules HazardTileDefinition_SOHazard tile: adds ratio, maxRatio, placement constraints OverlayDefinition_SOOverlay: prefab + y-offset per type TileDatabase_SOLookup hub; runtime O(1) dictionaries built from inspector lists LevelArchetypeData_SODesigner-authored hazard composition for a level type LevelCycleDefinitionNamed group of archetypes for one progression cycle LevelCycleProgression_SOOrdered cycle sequence + recovery archetype GeneratorParameters_SOBase config, patched at runtime by the difficulty engine GlobalDifficultyState_SOCross-scene persistent difficulty debt LevelDatabase_SORegistry of pre-authored levels, checked before PCG runs PathGeneratorWindowCustom editor: generate, preview, paint, save/load Created on February 2026 -
MarbleMaze: Deep Dive — GC-Friendly Grid Data Structure
The procedural generator at the heart of MarbleMaze runs every time a new level starts. On mobile, that means it needs to produce a complete maze — including hazard decoration and star placement — without triggering the garbage collector. This post is about the data structure that makes that possible.
The Problem with a Naive Approach
The obvious first instinct for a grid of cells is a 2D array of objects:
// What you might reach for first
Cell[,] grid = new Cell[width, height];
If
Cellis a class, every element is a heap-allocated object with a GC header and a pointer stored in the array. Accessing a cell involves two indirections: the array lookup gives you a reference, and the reference points to the object somewhere on the heap. On a 15×30 grid that is 450 separate heap allocations, each a potential GC target.More importantly, modifying a cell means reading the reference, following the pointer, and mutating the object in place. Since the pipeline modifies every carved cell multiple times across three decoration passes, this creates significant pointer-chasing pressure — bad for CPU cache locality, and even worse on a mobile CPU with a small L1 cache.
The solution is to make the cell a value type.
CellData — A Struct That Carries the Full Cell State
Every cell in the maze is represented by a single
CellDatastruct:// CoreData.cs [System.Serializable] public struct CellData { public bool isEmpty; // true = wall, false = walkable public GroundType ground; // Floor, Ice, Piques, MovingPlatform … public OverlayType overlay; // None, Start, End, Star public bool isEnd; public bool isHorizontal; // orientation for line-of-three hazards public bool requiresTwoSolidNeighbours; // placement constraint flag }Being a
structmeans:- There is no GC header — structs aren’t tracked by the garbage collector
- There is no heap allocation per cell — the data lives directly inside the containing array
- The entire grid is a single contiguous block of memory — CPU prefetching works efficiently when iterating row by row
- Passing a
CellDatato a method returns a copy — no accidental shared-state mutations
The
[System.Serializable]attribute is not cosmetic — it is what allows Unity to includeCellDatavalues inside aScriptableObjectarray for pre-authored level storage (covered later in the serialization section).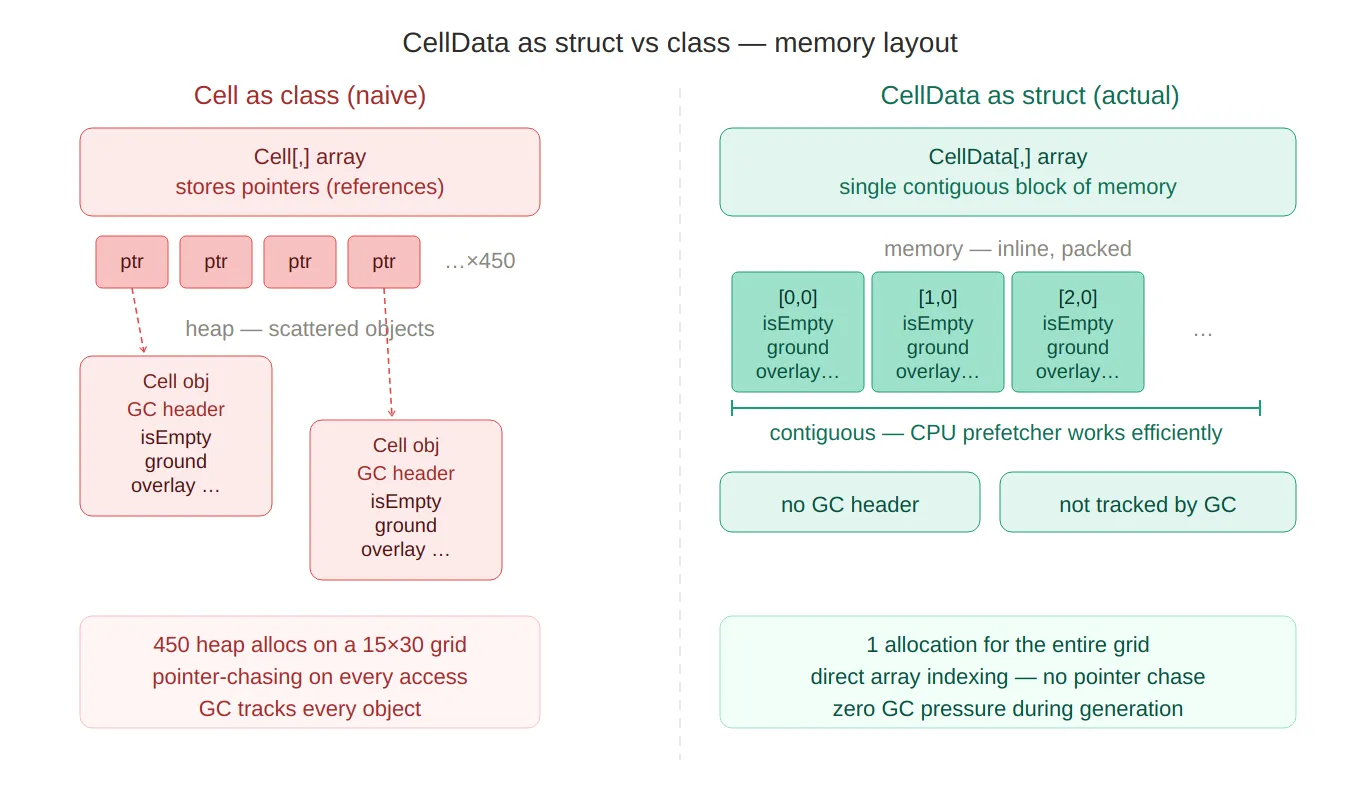
Struct vs class memory — side-by-side comparison of
Cellas a class (450 scattered heap objects, pointer chasing, GC headers) versusCellDataas a struct (one contiguous block, direct array indexing, zero GC tracking). The red vs green colour coding makes the performance story immediately legible.
Grid — The Wrapper That Provides the Interface
CellDatais a primitive. Navigating a flat 2D array by raw index everywhere would make the codebase brittle. TheGridclass wraps the 2D array and provides a clean API:// CoreData.cs public class Grid { private CellData[,] cells; public int Width => cells.GetLength(0); public int Height => cells.GetLength(1); public Grid(int width, int height) { cells = new CellData[width, height]; } public bool IsInside(int x, int y) => x >= 0 && y >= 0 && x < Width && y < Height; public bool IsInside(Vector2Int position) => IsInside(position.x, position.y); }Griditself is a class — deliberately so. The generation pipeline passes the same grid through six separate stages. IfGridwere a struct, every method call would copy the entire 2D array. As a class, it passes by reference with no copying overhead.This is the classic C# trade-off: cells are value types (cheap to store, safe to read), the container is a reference type (cheap to pass, shared ownership).
Two Accessor Patterns
The most important design decision in the
GridAPI is exposing two distinct ways to access a cell, each with a different intent.GetCell — Safe Copy for Reading
public CellData GetCell(int x, int y) => cells[x, y]; public CellData GetCell(Vector2Int pos) => cells[pos.x, pos.y];GetCellreturns a value copy of the struct. This is the right choice for read-only use: you get a snapshot of the cell’s current state that cannot accidentally modify the underlying array, and the caller can store it in a local variable without concern.// PhysicalMazeGenerator.cs — reads a copy to decide what to spawn CellData cell = grid.GetCell(x, y); if (cell.isEmpty) return; SpawnGround(cell, basePosition, x, y);GetCellRef — Direct Reference for Writing
public ref CellData GetCellRef(int x, int y) => ref cells[x, y]; public ref CellData GetCellRef(Vector2Int pos) => ref cells[pos.x, pos.y];GetCellRefreturns aref— a managed reference to the struct that lives inside the array. Mutating the returned ref modifies the array element directly, with no intermediate copy:// MazeGenerator.cs — writes directly into the array via ref ref var cell = ref grid.GetCellRef(pos); cell.isEmpty = false; cell.ground = chosen.groundType;Without
ref, the equivalent would require a copy-modify-assign round trip:// What it would look like without ref — one extra copy per write CellData cell = grid.GetCell(pos); cell.isEmpty = false; cell.ground = chosen.groundType; grid.SetCell(pos.x, pos.y, cell); // write backAcross thousands of cells and three decoration passes, eliminating that copy-assign is meaningful. More importantly, the
refpattern makes the intent explicit — the caller signals at the call site that it is about to mutate the cell, not just inspect it.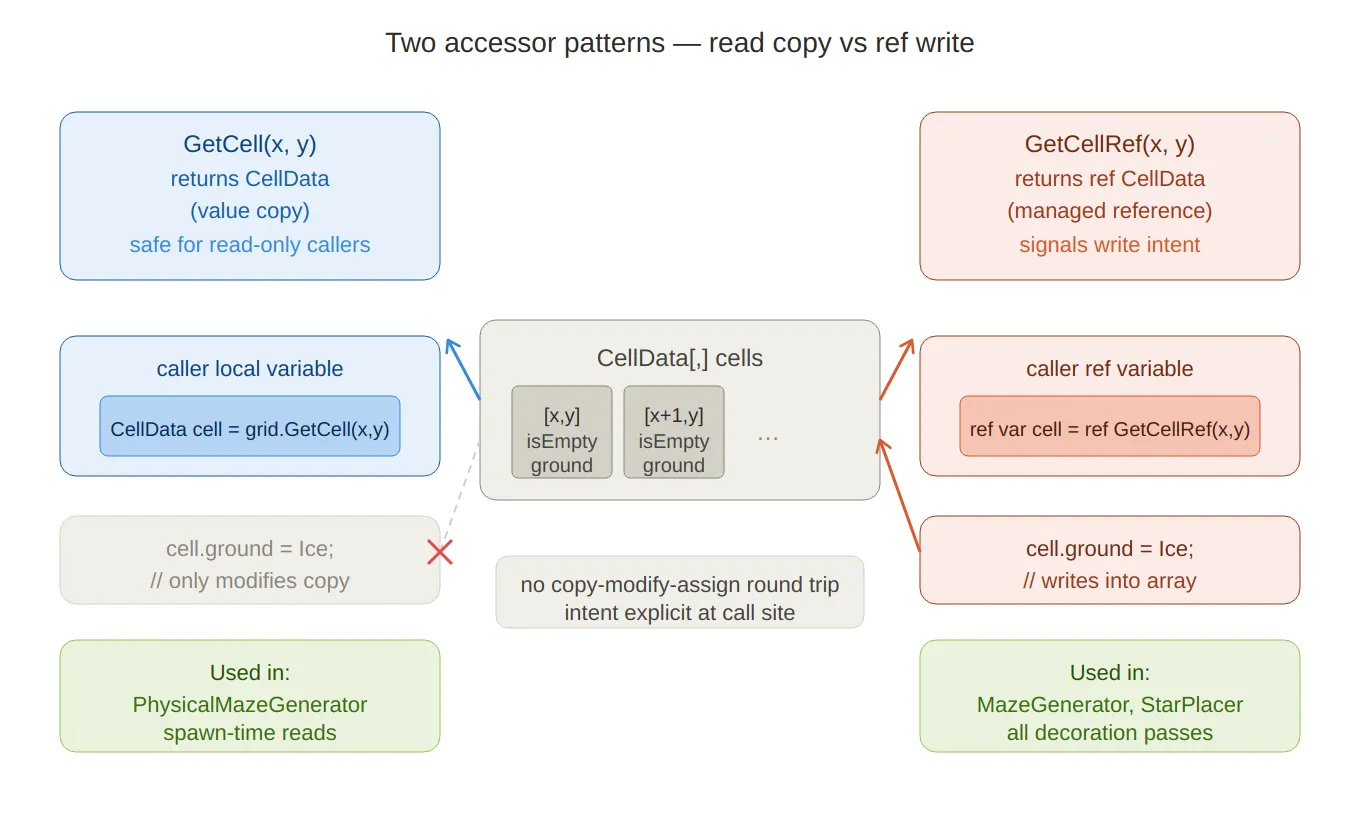
Two accessor patterns — shows
GetCellreturning a value copy to the left (safe for reads, mutations don’t reach the array) andGetCellRefreturning a managedrefto the right (writes go directly into the array, no round-trip). The crossed arrow on the left makes it clear that mutating a copy has no effect on the underlying data.
The ref Pattern in Practice
Once you see it in one place, you’ll notice it everywhere in the generator:
// GridUtils.cs — forces a floor tile at the start position
ref var cell = ref grid.GetCellRef(start.x, start.y);
cell.isEmpty = false;
cell.ground  = GroundType.Floor;
// MazeGenerator.cs — ApplyTwoSolidTiles pass ref var cell = ref grid.GetCellRef(pos); cell.ground = hazard.groundType; cell.isEmpty = false; cell.requiresTwoSolidNeighbours = true;// StarPlacer.cs — marks a cell as a star overlay grid.GetCellRef(pos.x, pos.y).overlay = OverlayType.Star;// LevelData_SO.cs — populates a new Grid from serialized data ref var cell = ref grid.GetCellRef(x, y); cell = gridData[y * gridWidth + x]; // struct assignment — full copy in one lineThe last example is worth noting: assigning one struct to another in C# copies all fields in a single instruction. There is no custom copy constructor, no hidden allocation — it is just a memory copy of the struct’s size.
Query API
Beyond the two core accessors,
Gridexposes a set of query methods for the rest of the codebase to use without knowing about the internal array layout:// 4-directional neighbours as copies — safe for constraint checks public List<CellData> GetNeighbours4(int x, int y) { … } // Filtered queries using predicates — used by archetype tools and debug windows public List<CellData> GetCellsWhere(Func<CellData, bool> predicate) { … } public List<CellData> GetCellsWithGround(GroundType groundType) { … } public List<CellData> GetCellsWithOverlay(OverlayType overlayType) { … } public List<CellData> GetNonEmptyCells() { … } public List<CellData> GetEmptyCells() { … }These return
List<CellData>— copied values, not references. They are designed for querying, not mutation. Any code that needs to modify cells uses a separate loop withGetCellRefrather than mutating out of a query result.Two methods address the specific spatial problem of finding valid positions near the level’s exit tile — used by the player-spawn system after generation:
// 8-directional neighbours of the End cell, with walkability filtering
public bool TryGetWalkableEndNeighbours(out List<Vector2Int> positions) { … }
public bool TryGetEndNeighbours(out List<(Vector2Int pos, CellData cell)> neighbours) { … }
The 8-way version exists because the exit can be placed at the edge of the maze, where strictly 4-directional adjacency might return zero walkable neighbours.
GridFactory — Initialization Convention
Before any generation runs, the grid needs a defined starting state.
GridFactory.CreateWallGridinitialises every cell as a wall (isEmpty = true) with a default floor ground type:// GridFactory.cs public static Grid CreateWallGrid(int width, int height) { Grid grid = new Grid(width, height); for (int x = 0; x < width; x++) for (int y = 0; y < height; y++) grid.SetCell(x, y, new CellData { isEmpty = true, ground = GroundType.Floor, overlay = OverlayType.None, isEnd = false }); return grid; }Starting as all-walls means the generator only ever carves open cells — it never needs to re-close one. This simplifies every downstream pass: a cell with
isEmpty == trueis unconditionally a wall, regardless of any other field values.
Serialization — Flattening to a 1D Array
Unity cannot serialize a 2D array (
CellData[,]) in aScriptableObjectdirectly. Pre-authored levels — hand-crafted layouts stored in the project — need to survive asset serialization and be reconstructable at runtime.LevelData_SOsolves this by flattening the 2D grid into a 1DCellData[]using the standard row-major index formulaindex = y * width + x:// LevelData_SO.cs [Tooltip("Flattened grid: index = y * width + x")] public CellData[] gridData;Two conversion methods handle the round-trip:
// Grid → flat array (for saving / exporting)
public void FromGrid(Grid grid)
{
    gridWidth  = grid.Width;
    gridHeight = grid.Height;
    gridData   = new CellData[gridWidth * gridHeight];

    for (int y = 0; y < gridHeight; y++)
        for (int x = 0; x < gridWidth; x++)
            gridData[y * gridWidth + x] = grid.GetCell(x, y);
}

// Flat array → Grid (for loading at runtime)
public Grid ToGrid()
{
    Grid grid = new Grid(gridWidth, gridHeight);

    for (int y = 0; y < gridHeight; y++)
        for (int x = 0; x < gridWidth; x++)
        {
            ref var cell = ref grid.GetCellRef(x, y);
            cell = gridData[y * gridWidth + x]; // struct copy — all fields at once
        }

    return grid;
}
Because
CellDatais a struct marked[Serializable], Unity’s serializer knows exactly how to write and read each field. There is no custom serializer, no JSON intermediate — just direct binary serialization of value types.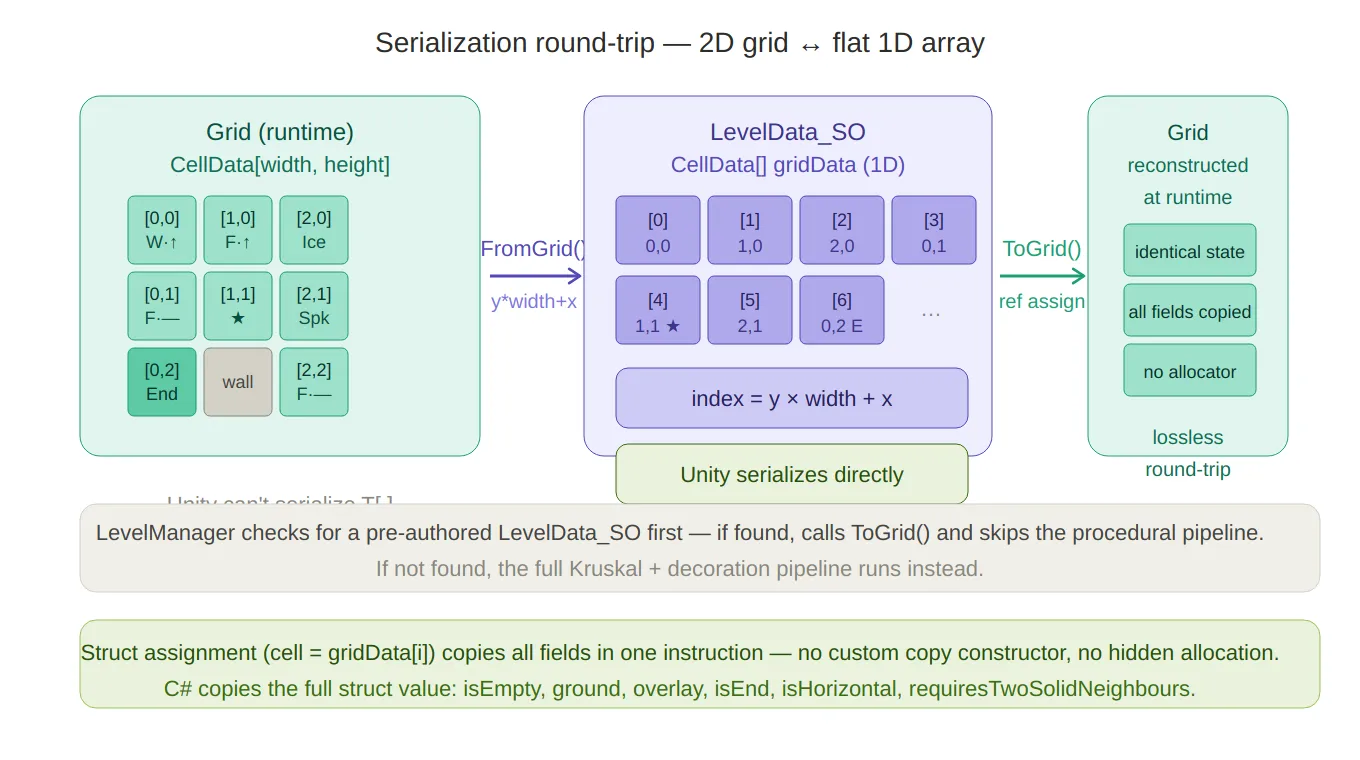
Serialization round-trip — traces the
FromGrid()path (2D → 1D withy*width+x) and theToGrid()path back, with the actual cell slots rendered so you can see which index maps to which coordinate. The bottom notes cover the struct-assignment single-instruction copy and the LevelManager fallback logic.LevelManagerchecks for a pre-authored level first; if none exists, it falls through to the procedural generator:// LevelManager.cs — GenerateRuntimeLevel() LevelData_SO existing = database.GetLevelDataAtIndex(levelIndex); if (existing != null) { usedSeed = existing.usedSeed; return existing.ToGrid(); // deserialize from flat array } // … otherwise run the procedural pipeline
Downstream Consumption — PhysicalMazeGenerator
Once the
Gridis fully populated,PhysicalMazeGeneratoriterates it to spawn Unity GameObjects. At this stage, only read copies are needed — the generation phase is over, soGetCell(notGetCellRef) is used throughout:// PhysicalMazeGenerator.cs for (int y = 0; y < height; y++) { for (int x = 0; x < width; x++) { CellData cell = grid.GetCell(x, y); // read copy — no mutation Vector3 basePosition = GridToWorld(new Vector2Int(x, y)); SpawnCell(cell, basePosition, x, y); } }One detail worth highlighting in the spawner: timed hazards (doors, platforms) need to start in alternating states so they don’t all open and close in sync. The spawner derives this from the cell’s grid position using a bitwise checkerboard pattern:
// PhysicalMazeGenerator.cs — SpawnGround()
if (ground.TryGetComponent<ITimedHazard>(out var hazard))
{
    bool isInverted = ((x + y) & 1) == 1; // true for odd-sum cells
    hazard.SetState(isInverted);
}
(x + y) & 1is a fast parity check — equivalent to(x + y) % 2 == 1but without the division. Adjacent cells always have different parities, so neighbouring hazards always start in opposite phases.
Full Lifecycle of a Grid
GridFactory.CreateWallGrid(w, h)
        │
        ▼
MazeGenerator.GenerateKruskalMaze  →  carved HashSet<Vector2Int>
        │
        ▼
GridUtils.MarkStartAndEnd          →  ref writes for Start/End overlay
        │
        ▼
MazeGenerator.ApplyMaze            →  ref writes across 3 decoration passes
        │
        ▼
StarPlacer.PlaceStars              →  ref writes for Star overlays
        │
        ▼
LevelManager.CurrentGrid           →  Grid held in memory for scene lifetime
        │
        ├── PhysicalMazeGenerator  →  GetCell reads → Instantiate GameObjects
        └── LevelData_SO.FromGrid  →  flatten to CellData[] for asset serialization
Every stage from creation to consumption uses the same
Gridinstance — passed by reference, mutated in place during generation, then read-only during consumption. No copies of the grid itself are made at any point in the pipeline.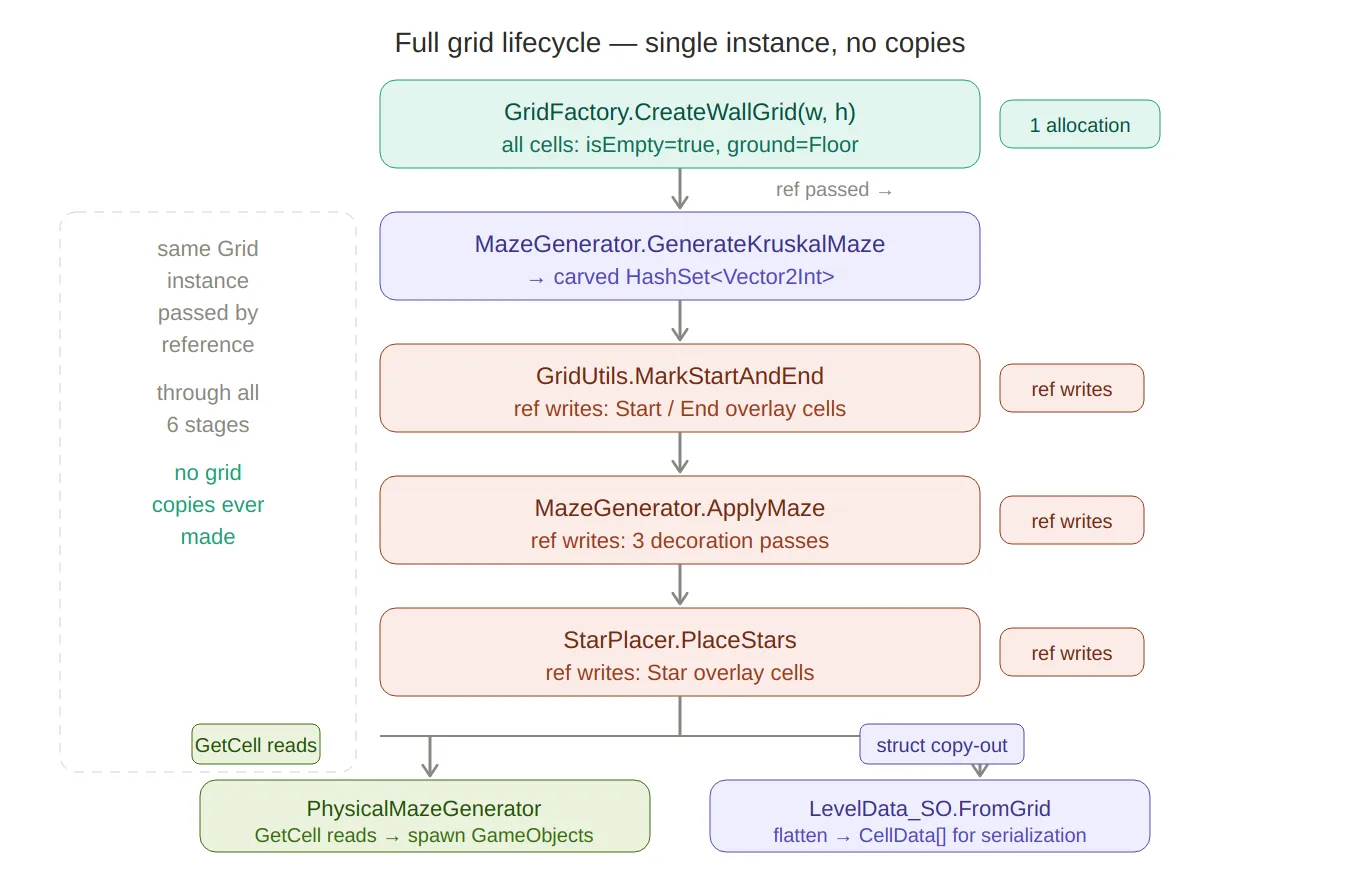
Grid lifecycle pipeline — the full six-stage flow from
CreateWallGridto the two downstream consumers (PhysicalMazeGeneratorfor read-only spawning,LevelData_SOfor serialization). The dashed bracket on the left calls out that the sameGridinstance passes through all stages — no copies of the grid itself are ever made.
Summary
Design choice Reason CellDatais astructNo per-cell heap allocation; contiguous memory; no GC pressure Gridis aclassReference semantics — same instance passes through all pipeline stages GetCellreturns a copySafe default for read-only callers; prevents accidental mutation GetCellRefreturnsrefZero-overhead in-place mutation; signals write intent at the call site [Serializable]onCellDataEnables direct Unity serialization into LevelData_SOassetFlat 1D serialization Unity can’t serialize T[,];y * width + xis the lossless round-tripAll-wall initialization Single direction of change (carve open); no need to re-wall The grid design has no moving parts — no pooling, no custom allocators, no unsafe code. The performance benefit comes purely from choosing the right built-in language feature (
struct,ref return) and using it consistently throughout the pipeline.Created on February 2026 -
MarbleMaze: Deep Dive — Adaptive Difficulty Engine
Generating infinite levels is only half the problem. The other half is making sure those levels feel appropriately hard — not so easy the player disengages, not so punishing they quit. This deep dive covers how I built an adaptive difficulty system that scales across three independent axes and responds to player performance in real time.
The Problem
A fixed difficulty curve works fine for a small set of hand-crafted levels. For a procedural game with no upper bound on level count, it falls apart. Players start the same place but their skill trajectories diverge quickly — one player breezes through the first 50 levels, another struggles at level 10. A single curve can’t serve both.
The system I built scales along three independent axes:
Axis What scales Controlled by Grid size Level dimensions (maze complexity) Level index Hazard composition Which tile types appear and how densely Cycle archetype + multiplier Difficulty multiplier How aggressively hazards are applied Player performance All three are computed in a single call at the start of each level:
// LevelManager.cs — GenerateRuntimeLevel()
RuntimeLevelParameters runtimeParams =
    RuntimeLevelProgression.GetParametersForLevel(
        levelIndex,
        tileDatabase_SO,
        levelCycleProgression_SO,
        levelsPerCycle,
        previousLivesLostToThisLevel,   // local performance
        failedTimes,                     // failure count
        globalDifficultyModifier.difficultyDebt  // cross-session debt
    );
The result is a
RuntimeLevelParametersstruct that overwrites the baseGeneratorParameters_SObefore the maze generator runs.
Axis 1 — Grid Size Progression
The most visible form of difficulty scaling is the physical size of the maze. A 5×10 grid is a short, narrow corridor. A 15×30 grid is a sprawling multi-path maze.
Size grows across five discrete phases, each lerped smoothly within its range:
// RuntimeLevelParameters.cs
int lvl = levelIndex + 1;

void LerpSize(int startLevel, int endLevel,
              int startW, int endW,
              int startH, int endH)
{
    float t = Mathf.InverseLerp(startLevel, endLevel, lvl);
    width  = Mathf.RoundToInt(Mathf.Lerp(startW, endW, t));
    height = Mathf.RoundToInt(Mathf.Lerp(startH, endH, t));
}

if      (lvl <= 10) LerpSize(1,  10,  5,  5,  10, 10);  // fixed intro size
else if (lvl <= 20) LerpSize(11, 20,  5,  7,  10, 15);  // width begins
else if (lvl <= 35) LerpSize(21, 35,  7,  10, 15, 20);  // height grows fast
else if (lvl <= 50) LerpSize(36, 50,  10, 15, 20, 25);  // both expand
else if (lvl <= 70) LerpSize(51, 70,  10, 15, 25, 30);  // height pushes further
else
{
    // Endgame: caps out around level 100
    float t = Mathf.Clamp01((lvl - 70) / 30f);
    width  = Mathf.RoundToInt(Mathf.Lerp(10, 15, t));
    height = Mathf.RoundToInt(Mathf.Lerp(25, 30, t));
}
Phase boundaries were chosen to front-load the feeling of growth — the player experiences the most dramatic change between levels 10 and 35, when height more than doubles. After level 70 the grid caps, and difficulty comes purely from hazard composition.
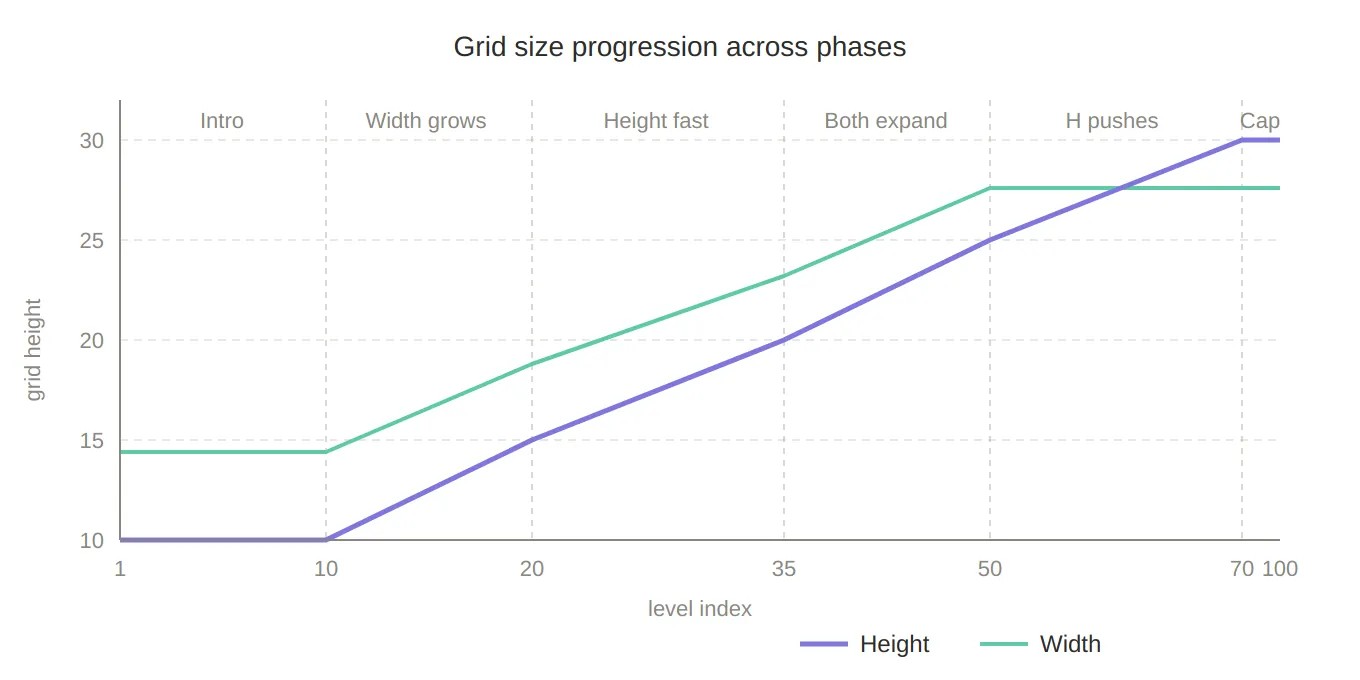
Grid size progression — a line chart showing how width and height grow across the five phases (levels 1–100), making the front-loaded height explosion between levels 10–35 visually obvious, and the cap after level 70 clear.
Star spacing also derives from height so that stars never feel trivially close on large mazes:
int minStarDistance = Mathf.Max(1, height / 3);
Axis 2 — Cycle-Based Archetype Selection
Grid size controls how much space the player navigates; archetypes control what that space is filled with. An archetype is a
ScriptableObjectthat declares which hazard types should appear in a level and at what base weight:// LevelArchetypeData_SO.cs public class LevelArchetypeData_SO : ScriptableObject { public string archetypeName; [Serializable] public struct ModifierWeight { public GroundType groundType; // Ice, Piques, MovingPlatform … [Range(0f, 1f)] public float weight; // 0 = inactive, 1 = dominant } public ModifierWeight[] modifiers; public int maxActiveModifiers = 2; }Archetypes are organised into cycles — groups of
levelsPerCyclelevels that share the same set of allowed archetypes. ALevelCycleProgression_SOholds the ordered list of cycles that the designer composes in the Unity inspector:// LevelCycleProgression_SO.cs public class LevelCycleProgression_SO : ScriptableObject { public LevelArchetypeData_SO recoveryArchetype; public List<LevelCycleDefinition> cycles; } // LevelCycleDefinition.cs public class LevelCycleDefinition { public string cycleName; // e.g. "Precision Intro" public List<LevelArchetypeData_SO> allowedArchetypes; }The archetype for any level is selected deterministically from the cycle’s allowed list — no randomness here, because the designer needs to reason about what the player will encounter at each position within a cycle:
static LevelArchetypeData_SO SelectArchetype(
    LevelCycleProgression_SO progression,
    int cycleIndex, int cycleLevel, bool isRecovery)
{
    if (isRecovery) return progression.recoveryArchetype;

    int safeCycleIndex = Mathf.Clamp(cycleIndex, 0, progression.cycles.Count - 1);
    var cycle = progression.cycles[safeCycleIndex];

    // Rotate through the allowed archetypes by position within the cycle
    int archetypeIndex = cycleLevel % cycle.allowedArchetypes.Count;
    return cycle.allowedArchetypes[archetypeIndex];
}
cycleIndex = levelIndex / levelsPerCycle— the current cycle block.
cycleLevel = levelIndex % levelsPerCycle— the position within that block.Once the last defined cycle is reached,
safeCycleIndexclamps to it, so late-game levels keep drawing from the final cycle’s archetypes indefinitely.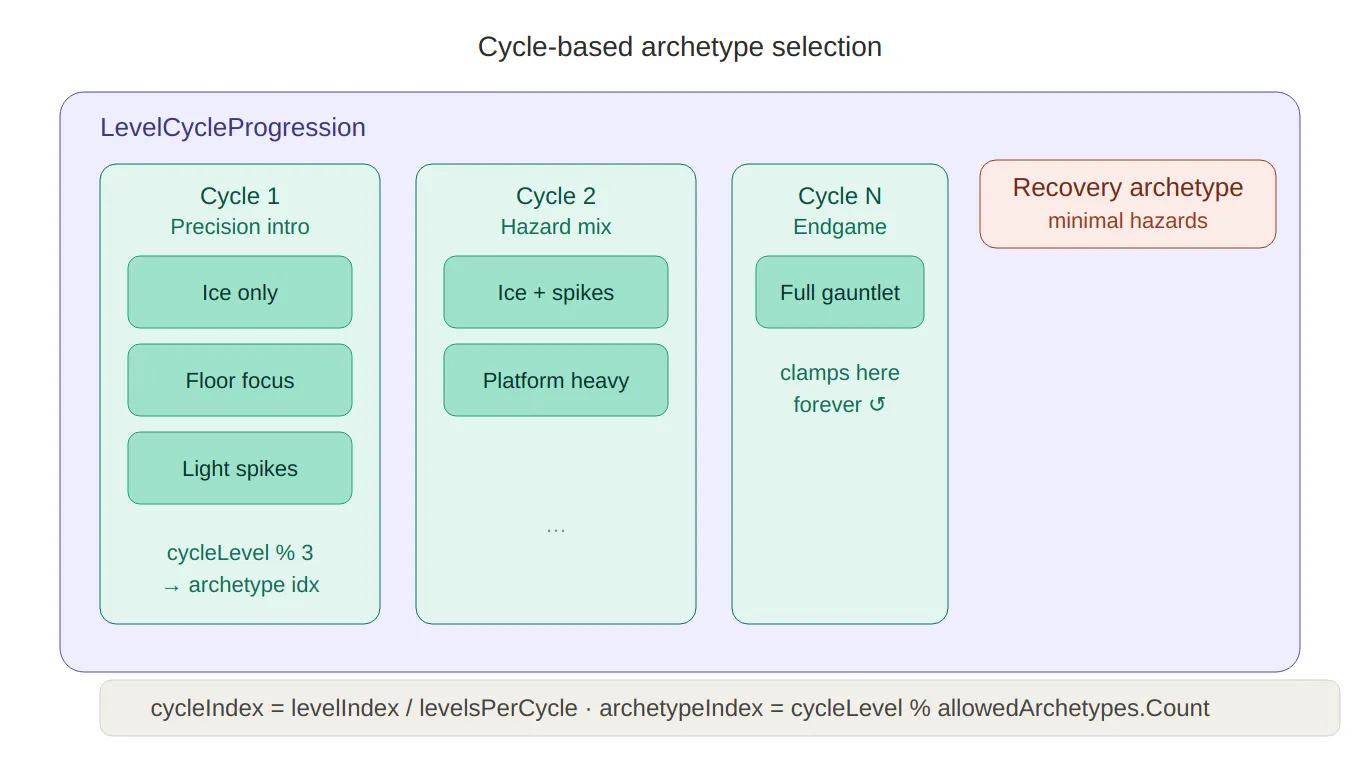
Cycle/archetype structure — a containment diagram showing LevelCycleProgression holding multiple cycles, each with its allowed archetypes, plus the recovery archetype sitting separately. The cycleLevel % count rotation logic is shown at the bottom.
Axis 3 — The Adaptive Difficulty Multiplier
The multiplier is what makes the system responsive. It is computed fresh every level from two independent signals: local stress (what happened this specific level) and global debt (accumulated pressure across the session).
Local Multiplier — Per-Level Stress
The local multiplier is derived from how many lives the player lost on the previous attempt and how many times they have failed the same level outright:
// RuntimeLevelParameters.cs
static float GetDifficultyMultiplier(int livesLost, int failedTimes)
{
    float multiplier = 1f;

    if      (livesLost >= 3) multiplier = 0.5f;   // game over → big relief
    else if (livesLost == 2) multiplier = 0.7f;   // moderate relief
    else if (livesLost == 1) multiplier = 0.85f;  // small nudge

    // Each failure shaves 5%, capped at 3 failures (−15%)
    int cappedFailures = Mathf.Min(failedTimes, 3);
    multiplier *= 1f - (0.05f * cappedFailures);

    return Mathf.Clamp(multiplier, 0.5f, 1f);
}
The failure penalty uses diminishing returns — the third failure has the same impact as the first, but you can never accumulate more than −15% from failures alone. This prevents the game from becoming trivially easy on a level the player keeps quitting immediately.
Global Debt — Cross-Session Pressure
The local multiplier resets every level. The global multiplier persists across multiple levels, carrying forward a difficulty debt that accumulates whenever the player loses lives:
// LevelManager.cs
void UpdateGlobalDifficulty(int livesLost)
{
    if (livesLost <= 0) return;

    float addedDebt = livesLost * 0.1f;  // 1 life = +0.1, 3 lives = +0.3

    globalDifficultyModifier.difficultyDebt =
        Mathf.Clamp01(globalDifficultyModifier.difficultyDebt + addedDebt);

    globalDifficultyModifier.remainingLevels = 4; // effect lasts 4 levels
}

void ConsumeGlobalDifficulty()
{
    if (globalDifficultyModifier.remainingLevels <= 0)
    {
        globalDifficultyModifier.difficultyDebt = 0f; // debt expires
        return;
    }
    globalDifficultyModifier.remainingLevels--;
}
The debt is then converted to a multiplier via a simple
Lerp:static float GetGlobalDifficultyMultiplier(float difficultyDebt) { float maxRelief = 0.8f; // global can reduce difficulty by at most 20% return Mathf.Lerp(1f, maxRelief, difficultyDebt); }A
difficultyDebtof0→ multiplier1.0(no effect).
AdifficultyDebtof1→ multiplier0.8(maximum 20% relief).The debt state is stored in a
GlobalDifficultyState_SOScriptableObject — a simple two-field container that lives in the project and survives scene loads:// GlobalDifficultyState_SO.cs public class GlobalDifficultyState_SO : ScriptableObject { public float difficultyDebt; // 0 → no easing, 1 → max easing public int remainingLevels; // how many more levels the debt persists }Combining Both Signals
The two multipliers multiply together to produce the final value passed into archetype application:
float localDifficultyModifier  = GetDifficultyMultiplier(livesLostThisLevel, failedTimes);
float globalDifficultyModifier = GetGlobalDifficultyMultiplier(globalDifficultyDebt);
float finalMultiplier          = localDifficultyModifier * globalDifficultyModifier;
At their minimum:
0.5 (local) × 0.8 (global) = 0.4— hazard weights reduced to 40% of their designed value.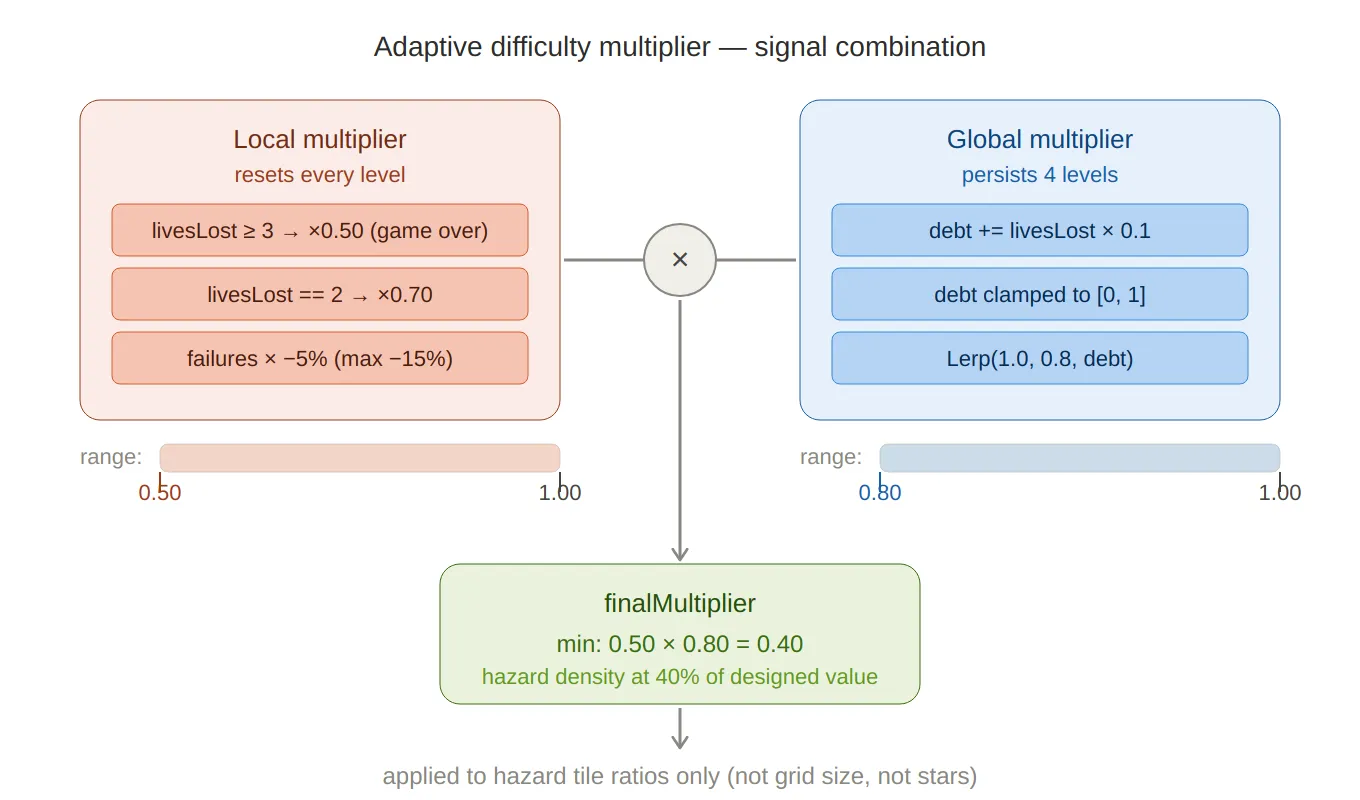
Multiplier combination — shows the two independent signals (local stress from lives lost, global debt accumulated over sessions), how they each produce a sub-multiplier in their own range, and how they multiply together to produce the final hazard density factor (minimum 0.40).
Applying the Multiplier — Archetype to Tile Ratios
The
finalMultiplieris not applied to the level size or star count — it only affects hazard tile ratios inside the activeTileDatabase_SO.ApplyArchetypeDatafirst zeros every hazard’s ratio, then re-weights only the ones listed in the archetype:static void ApplyArchetypeData( LevelArchetypeData_SO data, TileDatabase_SO tileDatabase, float cycleT, float difficultyModifier) { // Clear all ratios first foreach (var hazardTile in tileDatabase.HazardTiles) hazardTile.ratio = 0; if (data == null || data.modifiers == null) return; foreach (var modifier in data.modifiers) { // Scale: archetype weight × position within cycle × difficulty multiplier float scaled = Mathf.Clamp01(modifier.weight * cycleT * difficultyModifier); HazardTileDefinition_SO hazardTile = tileDatabase.GetHazardByGroundType(modifier.groundType); // Never exceed the tile's designer-set maximum ratio hazardTile.ratio = Mathf.Min(hazardTile.maxRatio, scaled * hazardTile.maxRatio); } }cycleTiscycleLevel / (levelsPerCycle - 1)— the normalised position within the current cycle (0 at the cycle’s first level, 1 at the last). This means hazards ramp up smoothly across each cycle and reset to zero at the start of the next, giving the player a sense of escalation and then relief.The
maxRatiocap on eachHazardTileDefinition_SOis the designer’s safety valve — no matter how the runtime modifies weights, a tile can never exceed the density that was playtested as acceptable.
Hazard Variety Unlocking
Beyond density, the number of distinct hazard types active at once also scales with level.
ApplyHazardVariationruns after archetype application and trims the active hazard set down to a target count, randomly disabling whichever ones are over the cap:static void ApplyHazardVariation(int levelIndex, TileDatabase_SO tileDatabase) { int lvl = levelIndex + 1; int targetActive; if (lvl < 40) targetActive = 1; else if (lvl < 70) targetActive = UnityEngine.Random.Range(1, 3); // 1–2 else if (lvl < 100) targetActive = UnityEngine.Random.Range(2, 4); // 2–3 else { float r = UnityEngine.Random.value; if (r < 0.6f) targetActive = 3; else if (r < 0.9f) targetActive = 2; else targetActive = 4; } var active = tileDatabase.HazardTiles .Where(h => h.ratio > 0).ToList(); int toDisable = active.Count - targetActive; for (int i = 0; i < toDisable; i++) { int idx = UnityEngine.Random.Range(0, active.Count); active[idx].ratio = 0; active.RemoveAt(idx); } }Early levels introduce hazards one at a time — the player learns each type in isolation before combinations appear. The endgame weighted distribution (
60% / 30% / 10%) keeps three hazard types as the norm while leaving room for the occasional four-hazard surprise.
Recovery Levels
When a player is under maximum stress — both local and global debt at their ceiling — the system can inject a recovery level: a deliberately gentle maze generated from a dedicated archetype with minimal or no hazards.
Recovery is gated behind two conditions being true simultaneously:
static bool HasMaxDifficultyRelief(int livesLost, int failedTimes, float globalDifficultyDebt)
{
    bool maxLocalRelief  = livesLost >= 3;       // game-over territory
    bool maxGlobalRelief = globalDifficultyDebt >= 1f; // debt is maxed out
    return maxLocalRelief && maxGlobalRelief;
}
Requiring both prevents a single bad level from immediately triggering recovery — the player has to be consistently struggling. When the condition holds, recovery levels appear at a frequency that itself decreases as cycles progress:
static bool IsRecoveryLevel(int cycleIndex, int cycleLevel, bool hasMaxRelief)
{
    if (!hasMaxRelief) return false;

    // Frequency shrinks as the player advances: 6 → 5 → 4 → 3 (minimum)
    int recoveryFrequency = Mathf.Clamp(6 - cycleIndex, 3, 6);
    return (cycleLevel % recoveryFrequency) == recoveryFrequency - 1;
}
In early cycles a recovery level can appear every 6 levels; by cycle 3+ the minimum is every 3 levels. This ensures a struggling late-game player gets more frequent relief than a struggling early-game one — because late-game levels are objectively harder.
How It All Connects
Every piece feeds into
LevelManager.GenerateRuntimeLevel:// LevelManager.cs private Grid GenerateRuntimeLevel(int levelIndex, LevelDatabase_SO database, GeneratorParameters_SO baseParameters, out int usedSeed) { // Pre-authored levels take priority LevelData_SO existing = database.GetLevelDataAtIndex(levelIndex); if (existing != null) { usedSeed = existing.usedSeed; return existing.ToGrid(); } // Compute all runtime parameters RuntimeLevelParameters runtimeParams = RuntimeLevelProgression.GetParametersForLevel( levelIndex, tileDatabase_SO, levelCycleProgression_SO, levelsPerCycle, previousLivesLostToThisLevel, // from previous attempt failedTimes, // total failures on this level globalDifficultyModifier.difficultyDebt // cross-session debt ); // Patch the base ScriptableObject with runtime values baseParameters.gridWidth = runtimeParams.width; baseParameters.gridHeight = runtimeParams.height; baseParameters.tileDatabase_SO = runtimeParams.tileDatabase_SO; baseParameters.minStarDistance = runtimeParams.minStarDistance; baseParameters.inputSeed = -1; // force random seed return PxP.PCG.Generator.GenerateMaze(levelIndex, baseParameters, out usedSeed); }After a level ends,
ProcessLevelDataandMarkLevelAsFailedupdate the debt for the next call:// On level complete: ConsumeGlobalDifficulty(); // decrement remaining debt levels UpdateGlobalDifficulty(livesLostThisLevel); // add new debt if lives were lost // On level failed: UpdateGlobalDifficulty(currentLivesLostToThisLevel); currentLevelData.failedTimes++;The debt is stored in a
ScriptableObject, so it persists across scene loads without needing any explicit serialisation on level transition.
Recovery level gate — a flowchart showing the AND condition (both local stress AND global debt must be maxed), the frequency formula clamp(6 − cycleIndex, 3, 6), and the note that later cycles trigger recovery more often — because later levels are objectively harder.
Telemetry
Every level generates a
LevelTelemetryEventthat logs the archetype, dominant modifier, outcome, and duration to Firebase. This data was essential for validating the difficulty curve during playtesting — particularly for confirming that recovery levels were triggering at the right frequency and that debt was decaying at a reasonable pace.// LevelTelemetryEvent.cs public struct LevelTelemetryEvent { public int levelIndex; public int cycleIndex; public string archetypeName; public string dominantModifier; // which GroundType dominated this level public string result; // "success" / "fail" / "quit" public int attemptNumber; public float duration; }
Summary
Component Role RuntimeLevelProgressionStateless calculator — takes performance data, returns parameters GlobalDifficultyState_SOPersistent debt store (ScriptableObject, survives scene loads) LevelArchetypeData_SODesigner-authored hazard composition per archetype LevelCycleProgression_SOOrdered sequence of cycles with their allowed archetypes LevelManagerOwns player performance state, accumulates debt, drives generation HazardTileDefinition_SO.maxRatioPer-tile safety cap — playtested ceiling the runtime never exceeds Key design decisions:
RuntimeLevelProgressionis a static, stateless class. It receives all the inputs it needs and returns a struct. No singleton, no side effects — easy to unit test, easy to call from an editor window.- Debt lives in a ScriptableObject. This sidesteps serialisation ceremony on scene transition and makes it inspectable in the editor during playtesting.
- Local and global signals multiply, not add. Additive relief could stack into a combined value below the intended floor; multiplication keeps both signals proportional and the output bounded without extra clamping logic.
- Recovery requires both signals at maximum. A single bad level doesn’t trigger a recovery; the player has to be genuinely struggling across multiple levels before the system steps in.
Created on February 2026