-
Git — Version Control with SourceTree
SourceTree is a free Git GUI client by Atlassian that lets you visualise and drive the full Git workflow without the command line. This guide walks through the complete feature branch cycle a developer follows when working in a team — from pulling the latest main to cleaning up after a merge.
1. Create a New Branch
Before starting any work, make sure your local
mainis up to date, then create a dedicated branch for your feature.Pull main
Open SourceTree. Make sure you are on the main branch (click it in the left sidebar under Branches). Click the Pull button in the toolbar to fetch and merge the latest remote changes. This ensures your new branch starts from the most recent state of the project, avoiding conflicts later.
Create a new branch
Click the Branch button in the toolbar (or right-click main in the sidebar → Branch…).
Enter a descriptive name following your team’s convention:
feature/my-feature-with-a-descriptive-name
bugfix/null-pointer-on-login
hotfix/payment-timeout
A good branch name tells your teammates what the work is about before they open a single file. Make sure Checkout New Branch is checked, then confirm.
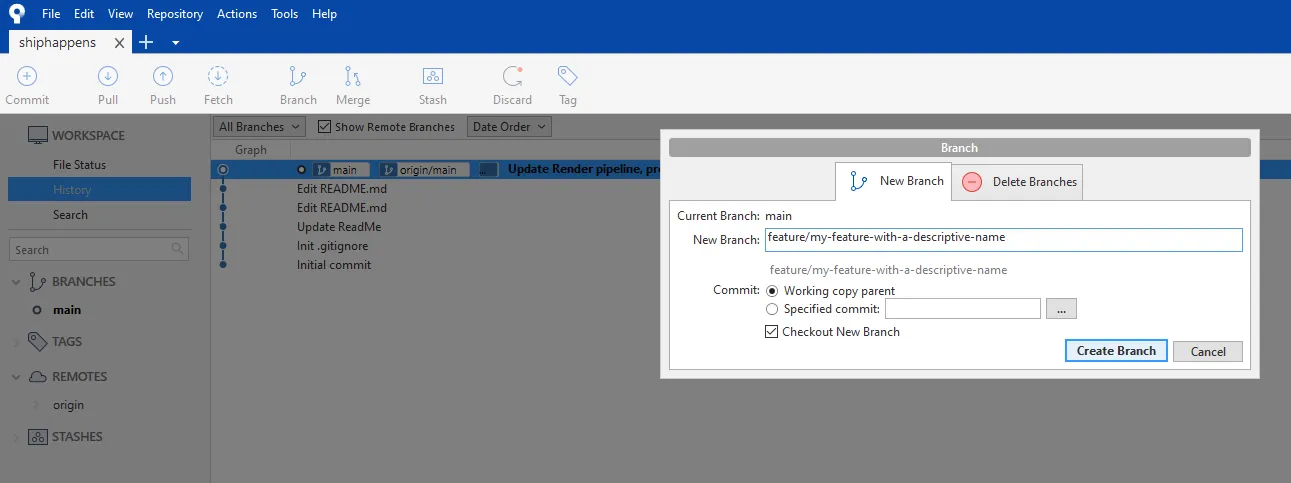
You are now on your feature branch. Any commits you make will stay isolated from
mainuntil you open a Merge Request.
2. Commit and Push Your Changes
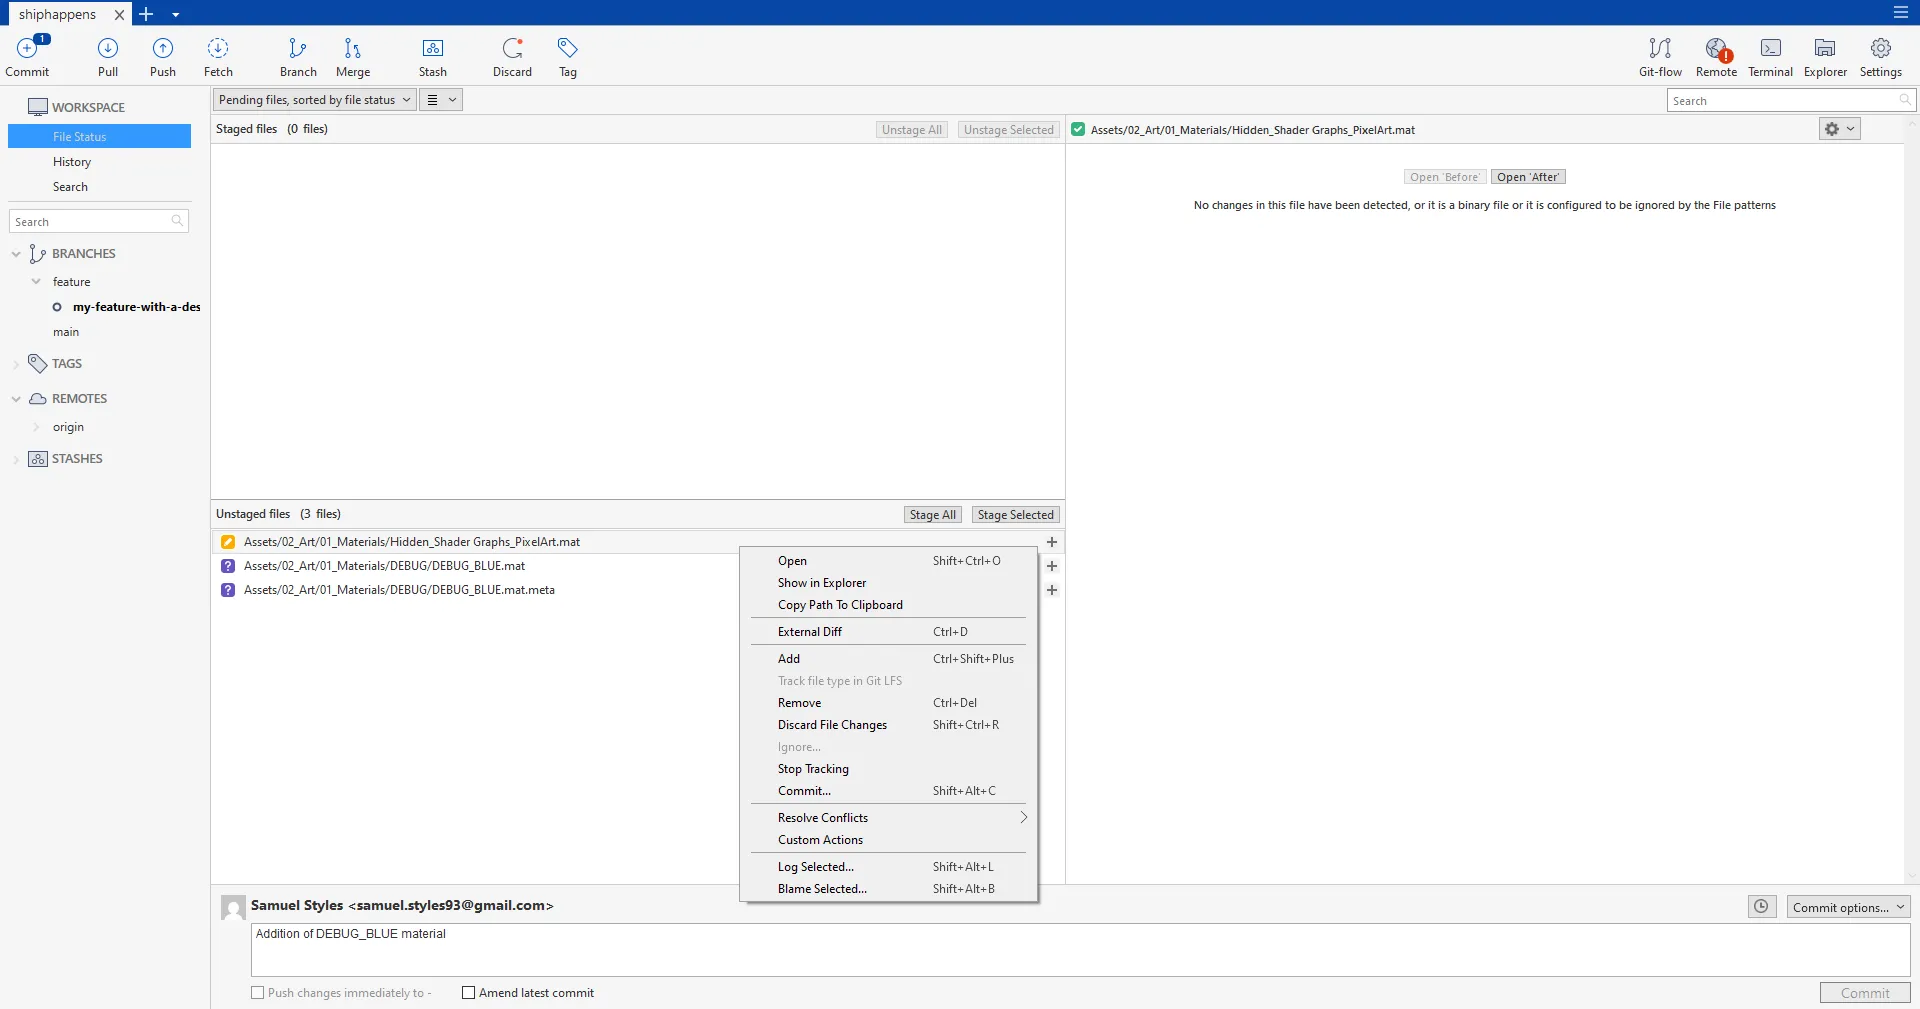
Work on your feature. When you are ready to save a snapshot, switch to the File Status tab in SourceTree.
Stage your changes
The bottom pane shows all modified files split into two areas:
- Unstaged files — changes not yet included in the next commit
- Staged files — changes that will be saved in the next commit
You can:
- Click Stage All to stage every modified file at once
- Stage individual files by selecting them and clicking Stage Selected or using the little [+] sign
- Discard file changes by right-clicking a file → Discard (this permanently reverts the file to its last committed state — use with care)
- Remove a file from the project entirely by right-clicking → Remove
Enter a commit message and commit
Type your commit message in the text box at the bottom. A good message:
- Uses the present tense: “Add”, “Fix”, “Update”
- Describes what changed and, when relevant, why
- Stays under ~70 characters
Click Commit to save the snapshot locally.
Push to remote
Once you have one or more commits ready, click the Push button in the toolbar. Select the remote branch (it will default to the same name as your local branch) and confirm.
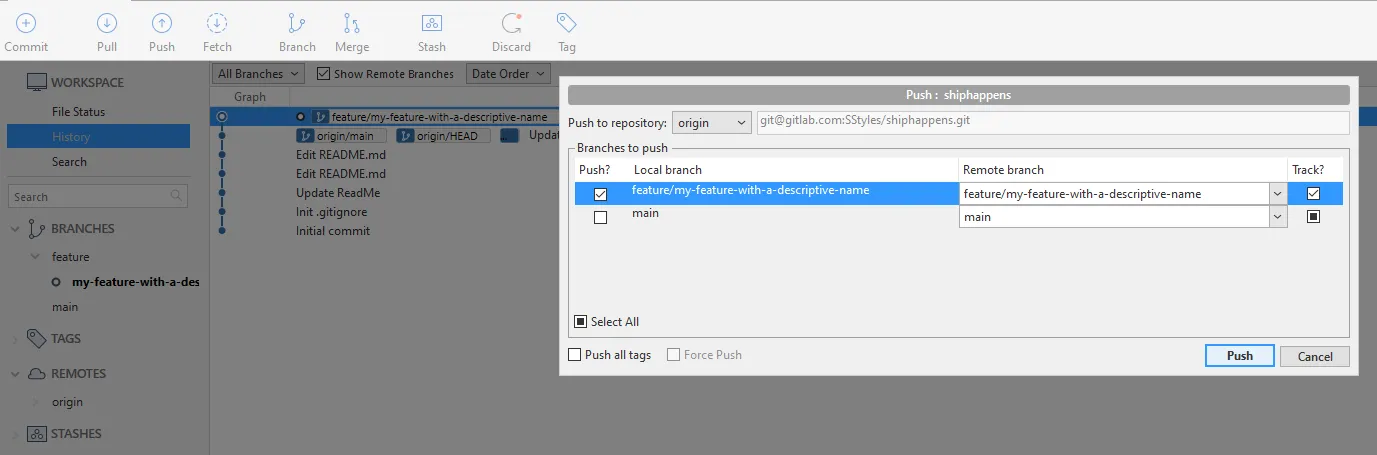
The first push creates the branch on the remote. Subsequent pushes on the same branch require no extra configuration.
3. Create a Merge Request on GitLab
With your branch pushed, open GitLab in your browser and navigate to your project.
Open the Merge Request form
GitLab will usually show a banner at the top: “You pushed…”.
Click [Create Merge Request].
Alternatively go to Merge Requests → New Merge Request, select your source branch and
mainas the target.Fill in the description
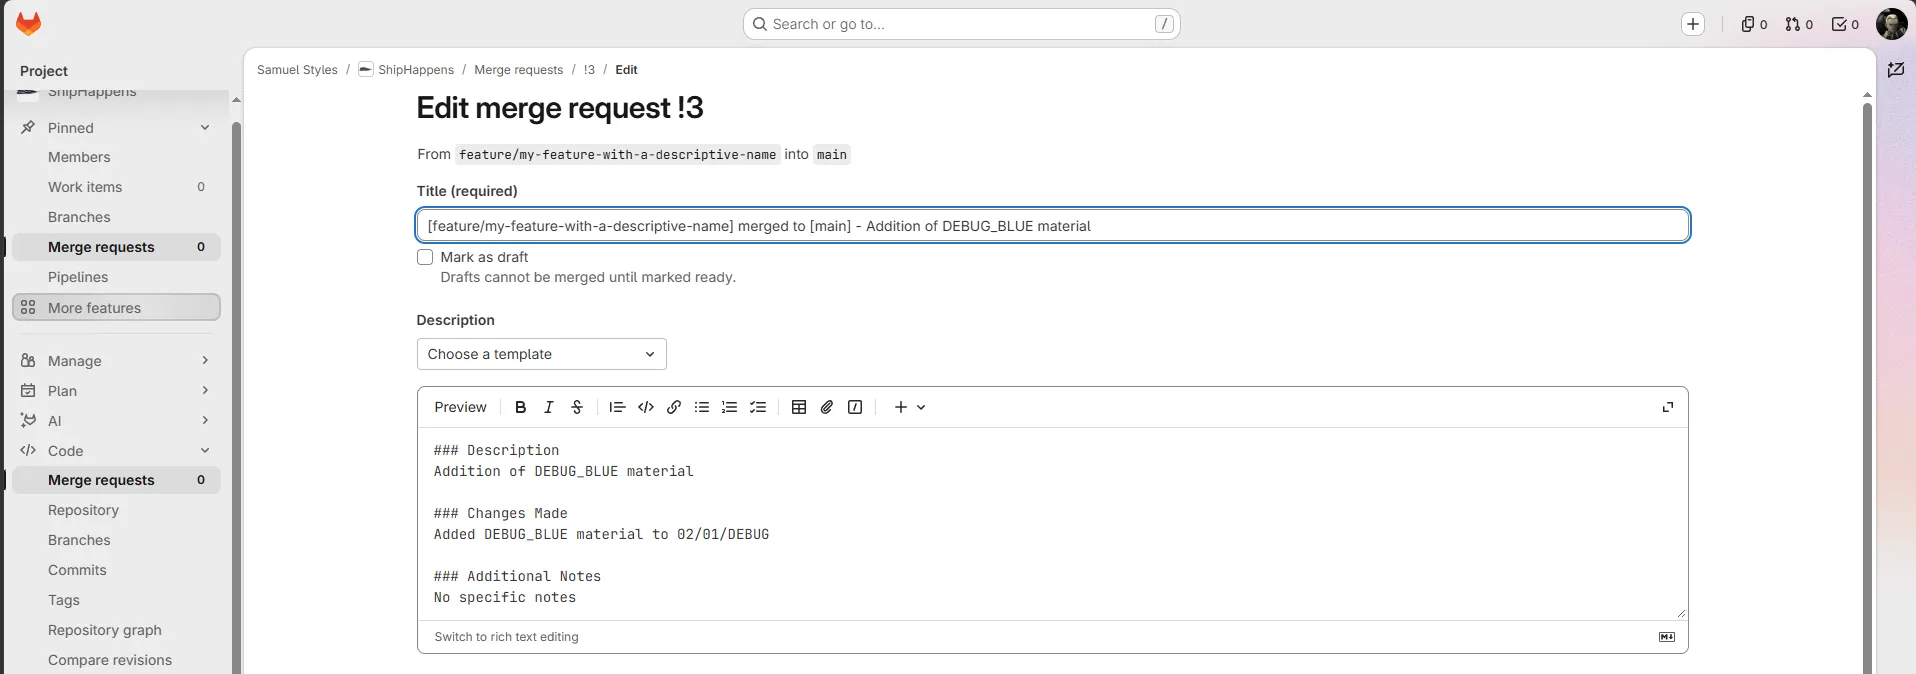
Give the MR a clear title that mirrors the branch name intent.
For the description, use a template if your project has one configured. It prompts you for the sections reviewers need:
### Description
This merge request addresses, and describe the addition or modification of a feature.
(e.g. Addition of [feature], Update of [feature],...)

### Changes Made
Describe the modification made to the project.
(e.g. Addition of [feature] in folder 00/01/NameOfFolder)

### Additional Notes
Include any extra information or considerations for reviewers.
This can be leaved blank if not specific attention is required.
A well-written description saves reviewers time and avoids back-and-forth.
Set Assignee and Reviewer
- Assignee — the person responsible for the MR
(usually a team lead) - Reviewer — the teammate(s) who will review the code before it merges
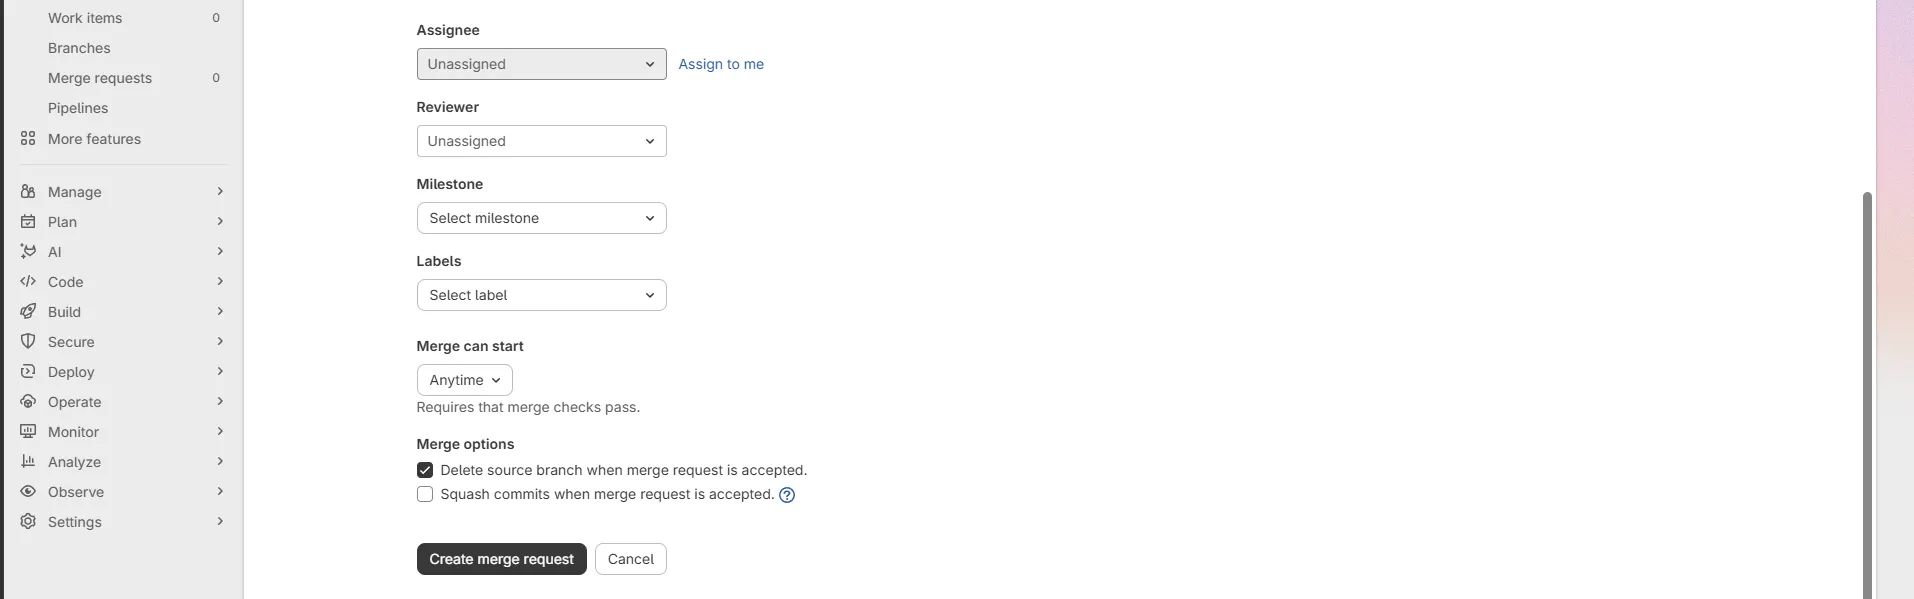
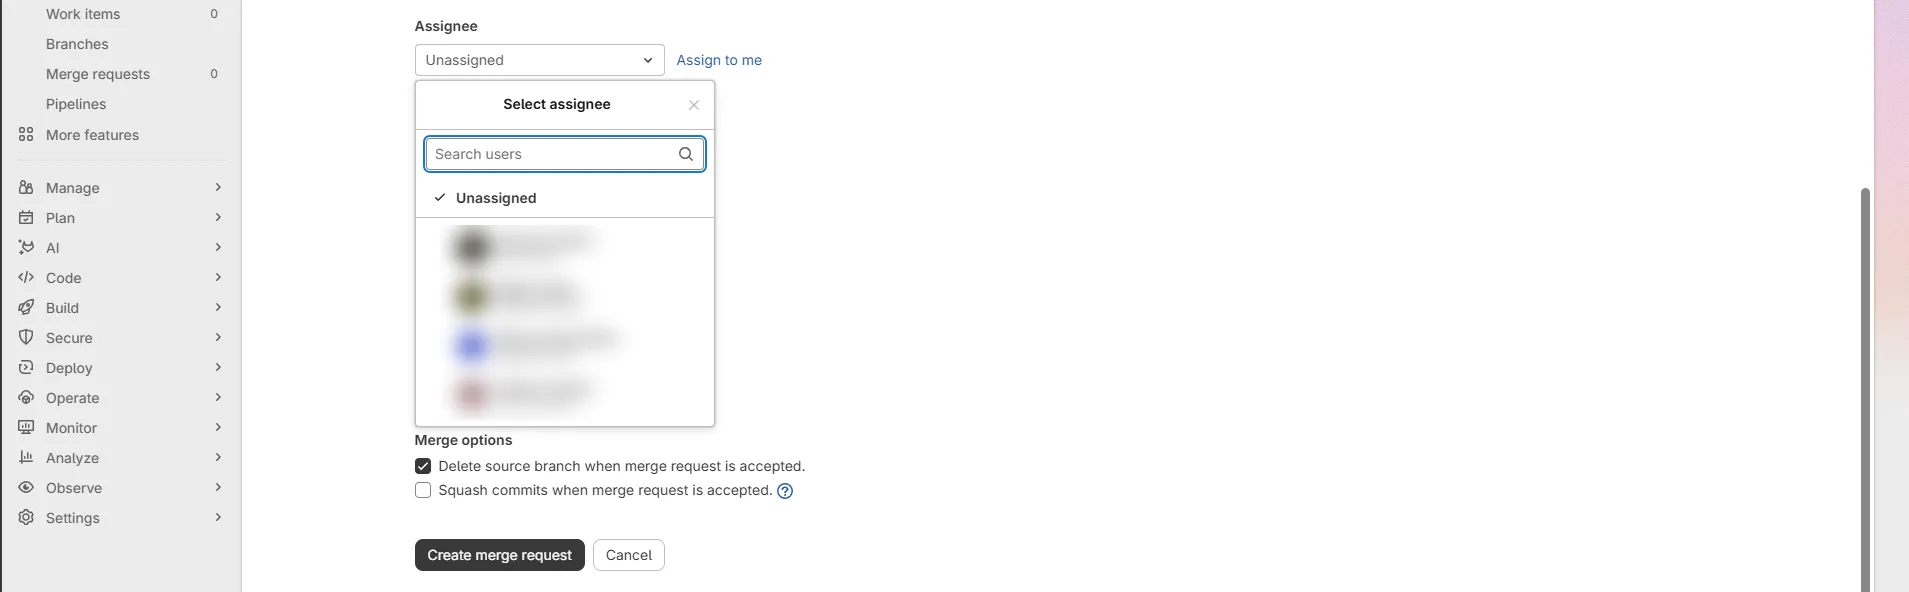
Click Create Merge Request to submit. The assigned reviewers will receive a notification.
4. Reviewer: Approve and Merge
If you are the reviewer, GitLab will notify you by email or in-app notification.
Go to Merge Requests in the GitLab sidebar and click on the MR assigned to you.
Read through the Changes tab — look at the diff, check for correctness, edge cases, and consistency with the project conventions. Leave inline comments if anything needs addressing.
When everything looks good, click Approve to signal your sign-off, then click Merge to merge the branch into
main.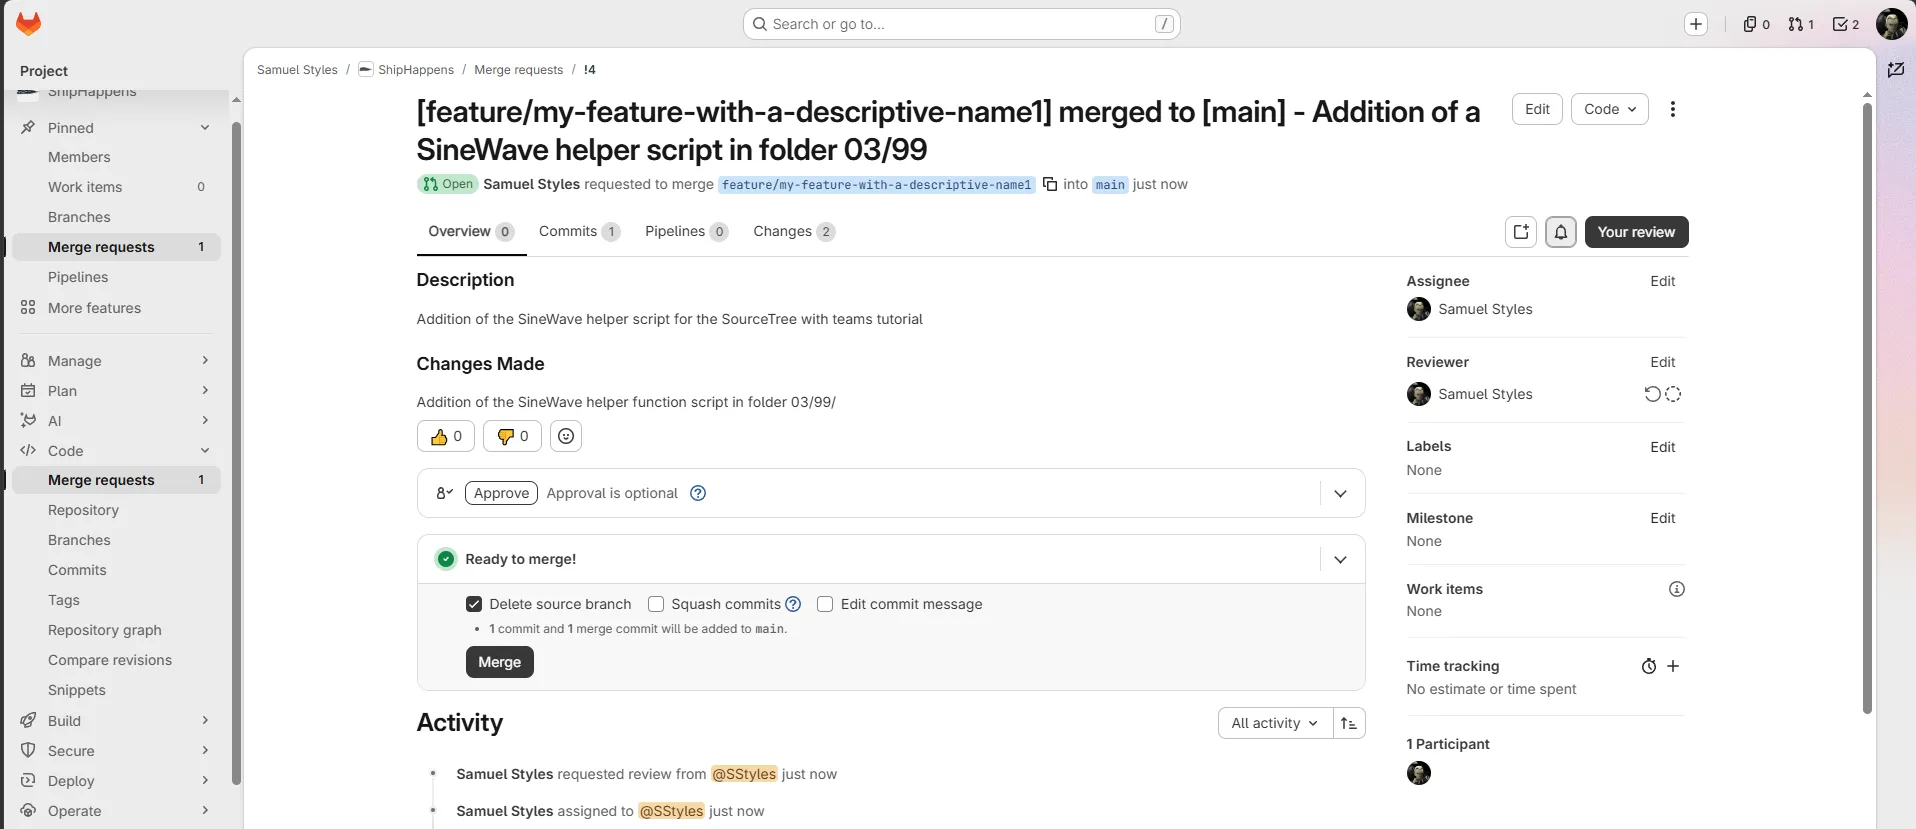
Once merged, the feature branch on the remote is no longer needed. GitLab offers an option to delete the source branch automatically on merge — enable it to keep the remote clean.
5. Clean Up — Delete Branch and Pull main
After the MR is merged, sync your local repository and remove the feature branch.
Pull main
Switch back to main in SourceTree and click Pull to bring in the merge commit.
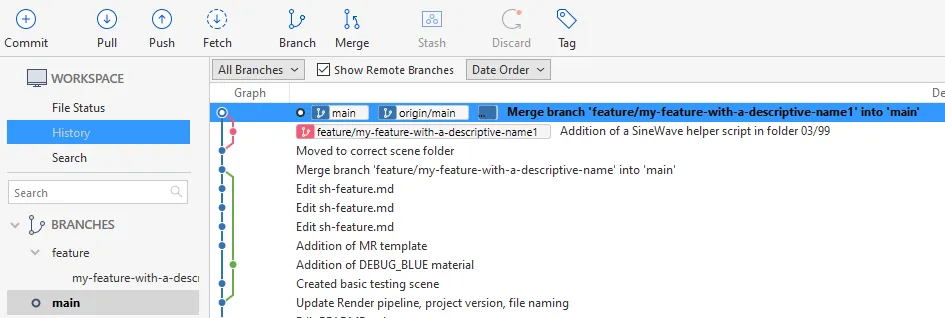
Delete the local branch
In the left sidebar, right-click your feature branch → Delete branch… and confirm.
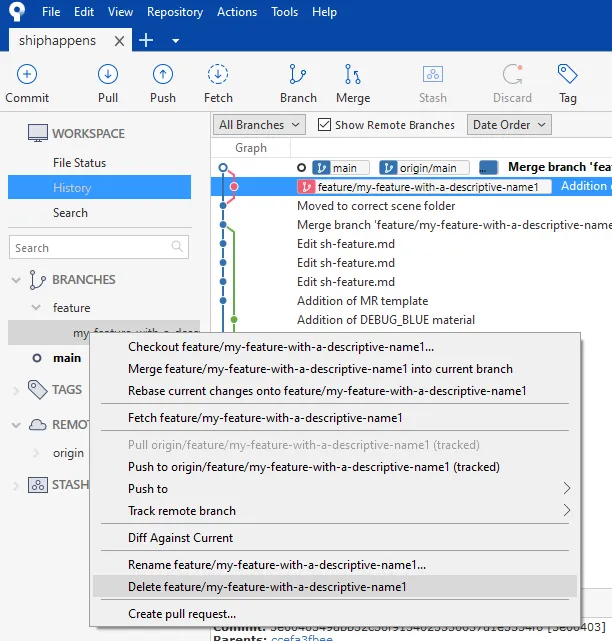
Optional — Prune tracking branches automatically
If your team deletes branches on the remote after merging, SourceTree can clean up the stale tracking references automatically so you never have to delete them manually.
Go to Repository → Repository Settings → Remotes and enable Prune tracking branches on fetch.
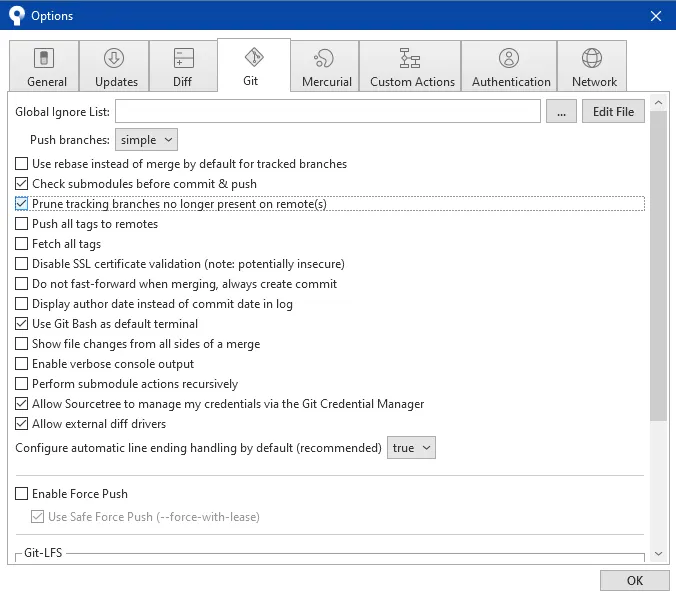
With pruning enabled, every Pull or Fetch removes any local tracking reference for a branch that no longer exists on the remote. You will not have to manually delete
origin/feature/my-feature-with-a-descriptive-nameafter it has been merged and deleted on GitLab.
Summary
Step Action SourceTree / GitLab 1 Pull latest mainSourceTree → Pull 1 Create feature branch SourceTree → Branch 2 Stage, commit, push SourceTree → File Status → Commit → Push 3 Open MR, fill description GitLab → Merge Requests → New 3 Set assignee and reviewer GitLab MR form 4 Review, approve, merge GitLab → Merge Requests → Merge 5 Pull main, delete local branch SourceTree → Pull → Delete branch 5 (Optional) Enable prune SourceTree → Repository Settings Created on September 2026 -
Git — Version Control for Teams
Git is a version control system — a tool that records every change made to your project over time. Think of it like a save history, but smarter: multiple people can work on the same files simultaneously without overwriting each other’s work. Every change is tracked, attributable, and reversible.
Without git, teams share files over email or cloud drives and conflicts are resolved manually. With git, the whole history lives in the project itself.
Installation
Windows
Download Git for Windows from git-scm.com. Accept the defaults during setup. This installs:
gitavailable in PowerShell and Command Prompt- Git Bash — a terminal emulator with Unix-style commands
Open Git Bash and verify the installation:
git --version
macOS
macOS ships with a minimal git. Install the full version via Homebrew:
# Install Homebrew (skip if you already have it)
/bin/bash -c "$(curl -fsSL https://raw.githubusercontent.com/Homebrew/install/HEAD/install.sh)"

brew install git
git --version
Linux (Debian / Ubuntu)
sudo apt update && sudo apt install git
git --version
For Fedora / RHEL:
sudo dnf install git
Initial Configuration
Before using git, tell it who you are. This information is attached to every commit you make.
git config --global user.name "Your Name"
git config --global user.email "you@example.com"
These are stored in
~/.gitconfig. To verify:git config --list #or git config -l
SSH Keys
What is an SSH Key?
When you push code to GitHub or GitLab, the platform needs to verify your identity. You could use a username and password every time — but SSH keys are more secure and require no typing.
An SSH key is a pair of files:
File Role Private key Stays on your machine. Never share it. Public key Uploaded to GitHub/GitLab. Acts like a padlock. Authentication works like a padlock: GitHub holds the lock (public key), you hold the key (private key). If they match, you’re in — no password needed.
Generating a Key
Open your terminal (Git Bash on Windows, Terminal on Mac/Linux):
ssh-keygen -t ed25519 -C "you@example.com"Flag Meaning -t ed25519ed25519 encryption algorithm — modern and recommended -C "..."A label to identify the key (use your email) Press Enter to accept the default file location. You can optionally set a passphrase for an extra layer of security.
Where the Key is Stored
File Path Description id_ed25519~/.ssh/id_ed25519Your private key — never share this id_ed25519.pub~/.ssh/id_ed25519.pubYour public key — this goes to GitHub/GitLab On Windows,
~isC:\Users\YourName. On Mac/Linux, it’s/home/yourname.Display your public key to copy it:
cat ~/.ssh/id_ed25519.pubThe output starts with
ssh-ed25519 AAAA...— copy the entire line.
Adding the Key to GitHub
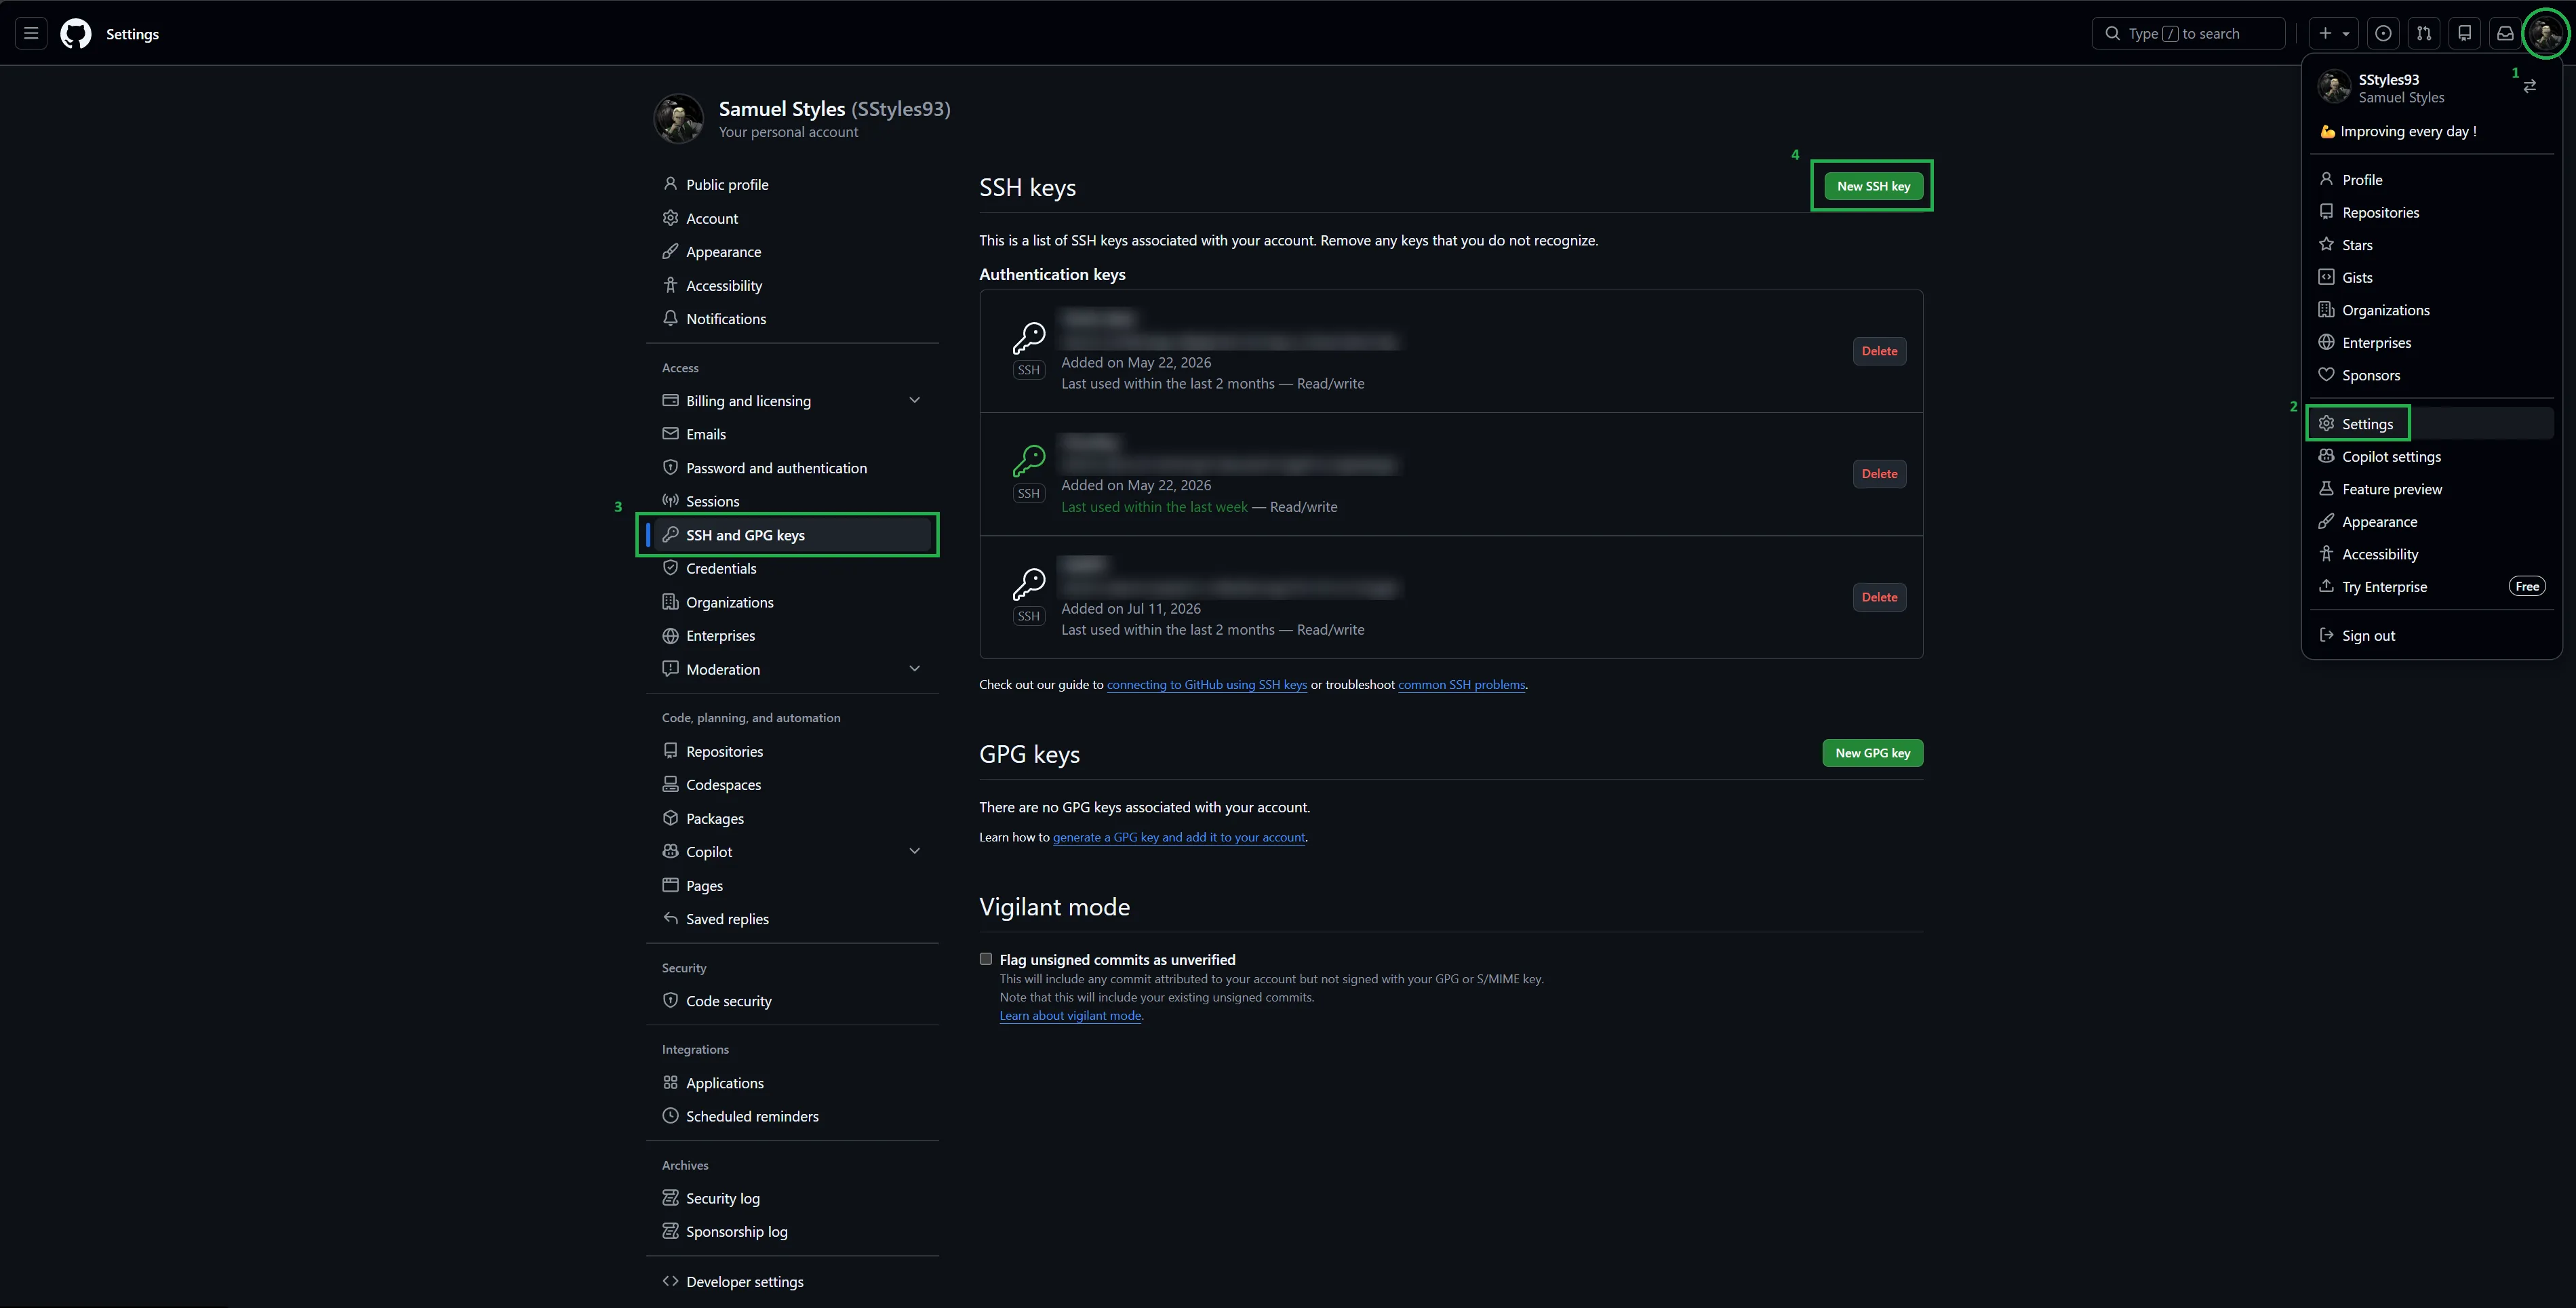
- Go to GitHub → Settings → SSH and GPG keys
- Click New SSH key
- Give it a title (e.g. “My Laptop”)
- Paste your public key in the Key field
- Click Add SSH key
Adding the Key to GitLab
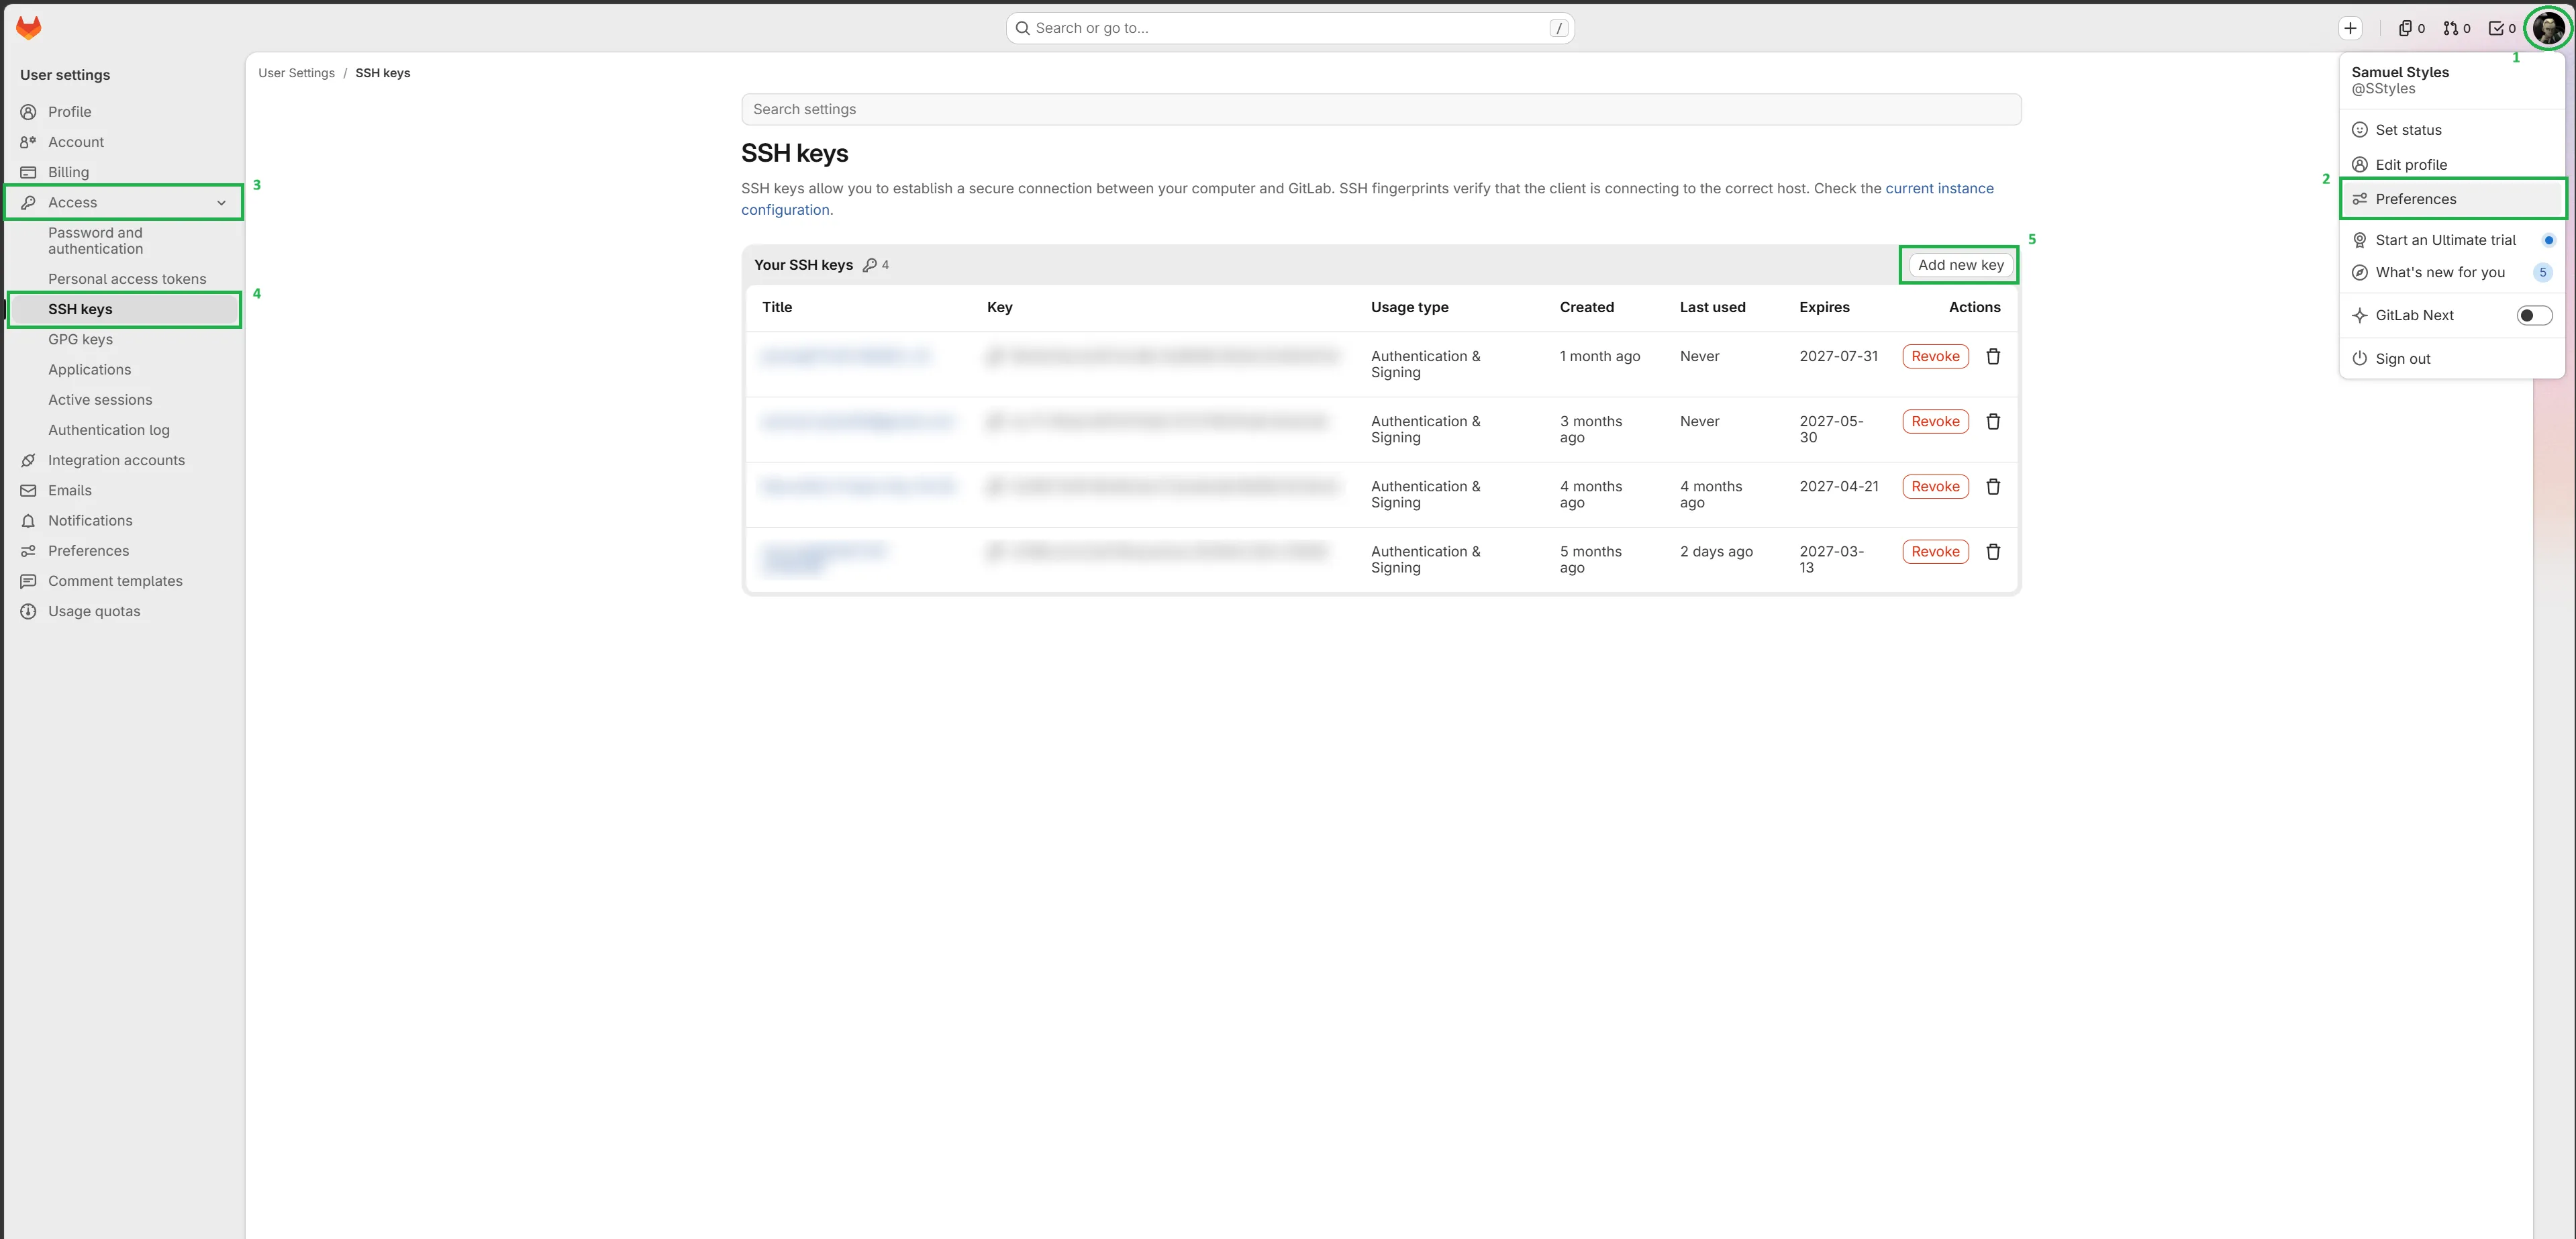
- Go to GitLab → Preferences → SSH Keys
- Paste your public key in the Key field
- Give it a title and optionally an expiry date
- Click Add key
Testing the Connection
ssh -T git@github.com   # GitHub
ssh -T git@gitlab.com   # GitLab
A successful response looks like:
Hi "username"! You've successfully authenticated, but GitHub does not provide shell access.In case of error “-v” can be added to the command for verbose output (more detailed)
Basic Commands
Initializing or Cloning a Repository
Start git tracking in an existing folder:
git initOr download an existing repository from GitHub/GitLab:
git clone git@github.com:username/repo-name.gitThe SSH URL (starting with
git@) uses your SSH key. HTTPS URLs also work but will prompt for credentials every time.git status
The most important command. Shows the current state of your working directory:
git statusCategory shown Meaning Untracked files New files git doesn’t know about yet Changes not staged Modified files, not yet added Changes to be committed Staged and ready to commit Run
git statusconstantly — it always tells you what to do next.git add
Stage files to include in the next commit:
git add file.txt          # stage one file
git add src/              # stage an entire folder
git add .                 # stage everything in the current directory
Staging is a deliberate step — it lets you choose exactly what goes into each commit.
git commit
Save a snapshot of your staged changes:
git commit -m "Add login form validation"A good commit message:
- Written in the present tense: “Add”, “Fix”, “Update”
- Describes what changed and ideally why
- Stays under ~70 characters
# Too vague
git commit -m "fix"

# Clear and useful
git commit -m "Fix crash when user has no profile picture"
git push
Upload your local commits to the remote repository:
git push                           # push current branch to its remote
git push -u origin feature/login   # link the branch to remote and push (first time)
The
-uflag sets the upstream so futuregit pushcalls work without specifying the branch name.git pull
Download and apply the latest changes from the remote:
git pullThis is
git fetch(download) +git merge(apply) in one command. Run it at the start of each session to stay in sync with your teammates.git branch
Branches let you work on a feature in isolation without touching the main codebase.
git branch                         # list all local branches
git branch feature/login           # create a new branch
git checkout feature/login         # switch to a branch
git checkout -b feature/login      # create and switch in one step
git branch -d feature/login        # delete a branch (after merging)
Since git 2.23,
git switchis the modern, dedicated command for switching branches. It does exactly whatgit checkoutdoes for branches — nothing else — making it clearer to read:git switch feature/login # switch to a branch git switch -c feature/login # create and switch in one step (-c = create)Both
checkoutandswitchwork.switchis preferred in new workflows.git reset
Remove files from staging or roll back to a previous state.
git reset file.txt # unstage a file, keep the changes in your working directory git reset # unstage everything, keep all changes git reset --hard <commit> # move HEAD to <commit> and discard all changes<commit>can be a commit hash, branch name, or tag:git reset --hard abc1234 # reset to a specific commit git reset --hard main # reset to the tip of the main branch git reset --hard v1.2.0 # reset to a tagged releaseWarning:
--hardpermanently discards all uncommitted changes. Any work not yet committed will be lost.git revert
Create a new commit that undoes the changes introduced by a previous commit:
git revert abc1234 # undo a specific commit by creating a new oneUnlike
git reset,git revertdoes not rewrite history — the original commit stays. This makes it safe to use on shared branches (likemain) where teammates have already pulled the commit.Command Rewrites history? Safe on shared branches? git reset --hardYes No git revertNo Yes
Simple Workflow
The simplest team workflow if the “Feature Branch”. Good for small teams and projects without fixed release cycles.
Why Branches Matter
Without branches, everyone pushes directly to
main. This leads to conflicts, broken builds, and code that ships without review. Branches give each feature its own safe workspace.
How it works
mainis always stable and deployable- Every feature or fix lives on its own branch
- Branches are merged back into
mainvia a Pull Request or Merge Request
main       ──────────────────────────────────────────●──────
            ↓ (pull)                                 ↑ (push)
feature    ────────●──────●──────●──────●────────────●
                (commits)               (ready to merge)
For Pull Resquests or Merge Requests see Professional Workflow — Pull Requests and Merge Requests
Branch naming convention
feature/user-login
bugfix/null-pointer-crash
hotfix/payment-gateway-timeout
Step-by-step workflow
# 1. Make sure main is up to date
git switch main
git pull

# 2. Create your feature branch
git switch -c feature/user-login

# 3. Work and commit regularly
git add .
git commit -m "Add login form"

# 4. Push to remote when ready
git push -u origin feature/user-login

# 5. Open a Pull Request (GitHub) or Merge Request (GitLab) on the platform
# 6. Once approved and merged on the platform, clean up locally
git switch main
git pull
git branch -d feature/user-login
Advanced Workflows
Structured Workflow — Gitflow
For larger teams with scheduled release cycles, Gitflow adds more structure between your work and production.
Branch Branched from Purpose main— Production-ready code only. Always stable. developmainIntegration point for completed features. feature/*developIndividual feature work. release/*developStabilization and testing before a release. hotfix/*mainEmergency production fixes. main ──────●───────────────────────────────────────────●─── ↓ (pull) ↑ (push) develop ──────────●─────────────────────────────────●───────── ↓ (pull) ↑ (push) feature/X ──────●──────●──────●────────────●Step-by-step workflow:
# 1. Start from develop — never from main
git switch develop
git pull

# 2. Create a feature branch off develop
git switch -c feature/payment-gateway

# 3. Work and commit
git add .
git commit -m "Add Stripe integration"

# 4. Push and open a MR/PR targeting develop (not main)
git push -u origin feature/payment-gateway

# 5. Once merged into develop, prepare a release branch
git switch develop
git pull
git switch -c release/1.2.0

# 6. Fix last-minute issues on the release branch
git commit -m "Fix edge case in payment form"

# 7. Merge into main AND back into develop
git switch main
git merge release/1.2.0
git switch develop
git merge release/1.2.0
git branch -d release/1.2.0

# 8. Tag the release on main
git switch main
git tag -a v1.2.0 -m "Release 1.2.0"
git push origin v1.2.0
Emergency hotfix directly on production:
git switch main
git switch -c hotfix/crash-on-login
# ... fix the bug ...
git commit -m "Fix crash on login for users with no avatar"
git switch main
git merge hotfix/crash-on-login
git switch develop
git merge hotfix/crash-on-login      # keep develop in sync
git branch -d hotfix/crash-on-login
When to use which:
Situation Recommendation Small team, continuous deployment Simple feature branch Larger team, versioned releases Gitflow Open-source with many contributors Gitflow or fork-based model
Professional Workflow — Pull Requests and Merge Requests
A Pull Request (GitHub) and Merge Request (GitLab) are the same concept — a formal request to merge a branch. The name differs by platform, the workflow is identical.
Their purpose goes beyond just merging code:
- Review changes before they reach production
- Discuss the approach with teammates
- Catch bugs early through peer review
- Trigger automated checks (tests, linting, CI/CD)
Step-by-step workflow:
# 1. Push your branch and open the PR/MR on GitHub or GitLab
git push -u origin feature/player-dash

# 2. Fill in the description (see template below), assign reviewers

# 3. Address review comments — push new commits to the same branch
git add .
git commit -m "Address review: clamp dash speed to prevent wall clipping"
git push

# 4. Once approved, merge on the platform (not locally)

# 5. Clean up locally
git switch main
git pull
git branch -d feature/player-dash
Writing a useful PR/MR description:
A good description saves your reviewers time — they shouldn’t need to read every line to understand the context:
## What this does
Adds a dash mechanic to the player — triggered by Shift, with a 0.8s cooldown and a short invincibility window.

## Why
Movement felt sluggish in playtests. Players needed a way to dodge attacks and close distance quickly.

## How to test
1. Enter Play mode
2. Hold Shift while moving in any direction
3. Verify the player dashes and the cooldown prevents spam
4. Walk into an enemy during the dash — verify no damage is taken
Rules that matter:
Protect
main. Never push directly tomain. On GitHub: Settings → Branches → Branch protection rules. Require at least one reviewer approval before any merge.One PR = one concern. A PR that adds a feature, refactors three unrelated files, and fixes a separate bug is hard to review. Keep PRs focused on a single change.
Review seriously. Code review is not a rubber stamp. Read the code, think about edge cases, ask questions. It’s how bugs get caught and how the whole team learns.
Commit often. Small, frequent commits are easier to review and easier to revert if something goes wrong.
Keep your branch up to date. If
mainmoves forward while you’re on a feature branch, bring those changes in:git switch feature/player-dash git merge main # merge main into your branchOr with rebase (cleaner history):
git rebase main
Quick Reference
Command What it does git initInitialize a new repository git clone <url>Download an existing repository git statusShow what’s changed git add <file>Stage a file for the next commit git add .Stage all changes git commit -m "..."Save a snapshot with a message git pushUpload commits to the remote git push -u origin <branch>Link and push a branch for the first time git pullDownload and apply remote changes git branch <name>Create a new branch git checkout <branch>Switch to a branch (classic) git checkout -b <name>Create and switch (classic) git switch <branch>Switch to a branch (modern) git switch -c <name>Create and switch (modern) git merge <branch>Merge a branch into the current one git rebase <branch>Reapply commits on top of another branch git resetUnstage files, keep changes git reset --hard <commit>Move HEAD to a commit and discard all changes git revert <commit>Undo a commit by creating a new one (safe for shared branches) ssh-keygen -t ed25519 -C "..."Generate an SSH key pair Created on September 2026